It can be tricky to transfer files from iPhone to windows and windows to iPhone, however with the right tool and method you can easily transfer files from iPhone to windows and vice versa. It does not matter if you are trying to transfer photos, music, videos or other type of files, with these techniques and methods and other tools your job will be done easily. iTunes, iCloud, Windows File Explorer, third party software such as Mobimover, iMazing, AnyTrans and other apps will fulfil this task.
Actually as long as it is photos, videos and other type of files that are downloaded from Internet on your iPhone, you can use the Lightning connector cable to transfer files. However it only works for copying files from your iPhone and pasting it across the Windows operating system. And if you try to copy any type of file into the iPhone from Windows 11/10, it will not give you the option.
How to Transfer files from iPhone to Windows 10/11?
- Open your iPhone and visit the settings app.
- Tap on Photos then scroll down to the end and find Transfer to MAC or PC.
- Tap on Keep original.
- Now Connect your iPhone and your Windows computer using the iPhone’s Lightning connector.
- Open your iPhone and allow it.
- After that open the Windows File Explorer> than tap on iPhone.
- Open the DCIM folder, then simply copy Photos, videos and music and paste it in a Windows 11/10 computer.
Transfer files from Windows 10/11 to iPhone Easily
As I mentioned earlier that it is not possible to to transfer files from Windows 11/10 to iPhone, for that for that we’ll have to use iTunes.
- So, download and install the latest version of iTunes on your Windows 11 computer.
- Than connect the iPhone and Windows 11 using the Lightning connector and tap on allow on your iPhone screen.
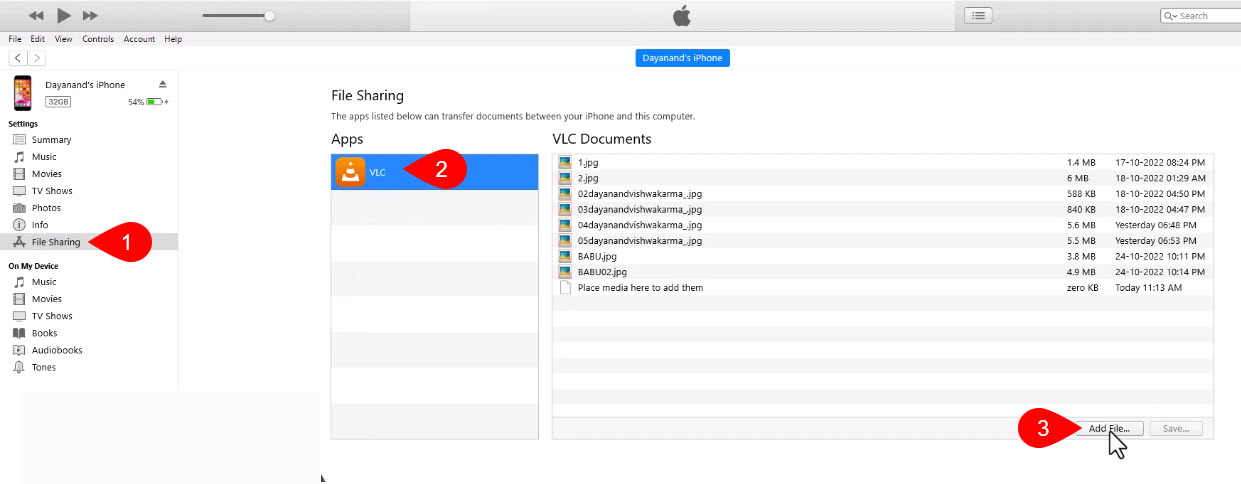
- Following that, open the iTunes app, than tap on the iPhone icon at the top.
- Click on File Sharing.
- Under the file sharing, you will see a lot of apps, just tap on any of them.
- After choosing the app, you will see the option called “Add file”.
- After clicking on Add file, select the files that you want to transfer from Windows 10/11 to iPhone.
- After that, tap on done.
- Congratulations on Transferring Files from Windows 11/10 to iPhone easily using iTunes.
Transfer files iPhone and Windows 10/11 using iCloud
Transferring files from iPhone and Windows using iCloud is really simple actually. All you have to do is upload your files into iCloud and then access it into other device with the same iCloud ID.
Transfer files from iPhone to Windows 10/11 using iCloud:
- Open the settings.
- Tap on your Name and Apple ID.
- In the iCloud section, find iCloud Drive and enable it or if your photos and videos were synced, you can access it on the iCloud.
- To access the files on Windows 10/11, open your favorite browser and search for icloud.com
- Login with the same Apple ID, then go ahead and access your files.
- The other way that you can use to access the files Windows 10/11 is to install the iCloud Photos on Windows.
- After that login with the same iCloud ID and access your shared files from Windows easily.
Transfer files from Windows 10/11 to iPhone:
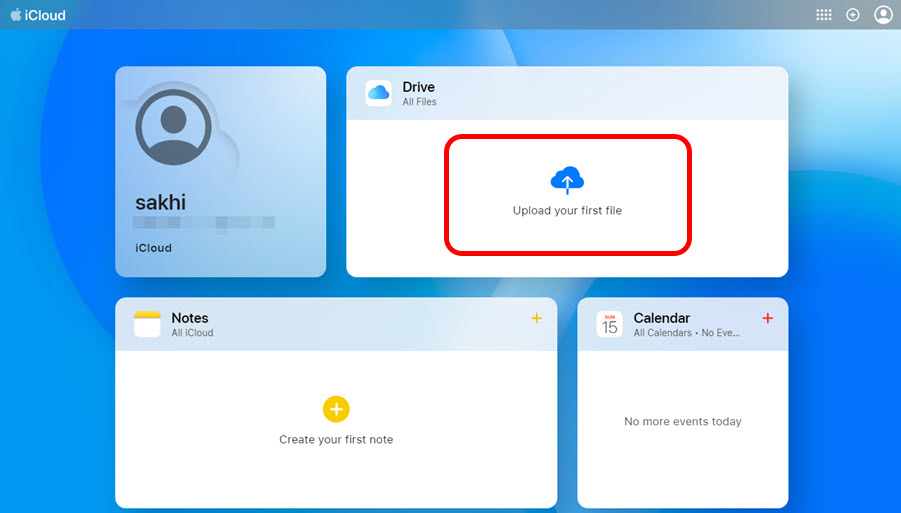
- Install iCloud Photos on Windows or open icloud.com on a browser.
- Login with your Apple ID, or iCloud ID.
- Under the iCloud Drive, Upload your files.
- Since iCloud is synced, you can easily access all of those files.
Conclusion:
There are other ways that you can use to Transfer files from iPhone to Windows 10/11 and vice versa. A good example can be files sharing using the same network but this method doesn’t work most of the time. Anyway, let me know, which method you prefer for Transferring files from iPhone to Windows 10/11.


Leave a Reply