Every now and then you have to share or Transfer Files Between iPhone and Mac. There are a couple of effective methods that you can use, in fact, iTunes was of those Apps. But ever since Apple has separated iTunes into 3 separate apps, they have completely removed this App. It means when you try to transfer your files using a cable iTunes won’t launch. So, this leaves the question of How to Transfer Files Between iPhone and Mac Easily?
As I said there are still effective and powerful methods that you can use, aside from the methods that I am introducing, Paid Apps are also available. Apps such as MobileTrans, and EaseUS MobiMover are one of the Paid Apps.
1. Transfer Files Between iPhone and Mac using Cable (Lightning or USB Cable)
if you are a beginner and want to transfer files between iPhones and Mac, it may seem a bit hard but in reality, it is not like that. Because there are many methods that you can use to transfer files between iPhone and Mac quickly. And one of them is through a cable, it does not matter whether you are using a lightning cable or a USB cable to connect your iPhone to the Mac. Remember this method is performed on macOS Monterey and iOS 15.1.
Transfer Images and Video using Image Capture:
Apple has introduced an application called image captured by default on Mac OS Monterrey. This application allows the user to get their photos and videos from their iPhone and a camera into their mac. During the transfer process, the iPhone must be awake, it must be unlocked and finally, it must be connected through a cable to the MacBook. This method is really helpful if you have thousands of photos and videos to transfer between iPhone and Mac.
Steps to use Image Capture:
- so connect your iPhone to the Mac using a cable and make sure that it is unlocked and it is a week.
- once both devices are connected, you will see a prompt on your iPhone about do you trust this device, you have to simply select trust and move on with unlocking the passcode.
- Launch image capture through this spotlight, or through the launchpad.
- On the left side of the image capture, select your iPhone.
- The last step is to select your images and videos, then simply choose a location to save them. Once you’re done, simply click on download or click on the download all. This way it is going to copy all of your videos and photos from your iPhone or camera to your Mac.

Image Capture
2. Transfer Files Between iPhone and Mac using AirDrop
One of the quickest and the most effective method that we can use to transfer files between iPhone and Mac is to use AirDrop. AirDrop is a feature that’s part of the iOS and macOS operating systems that allows you to quickly and easily share files with people nearby. It uses Bluetooth and Wi-Fi, so it works even if your devices aren’t connected to the Internet. You can use AirDrop to send photos, videos, websites, locations, and more between your devices. You can even use it to share content from apps like Photos, Safari, and Maps by long-pressing on an item and choosing Share.
Steps to Use AirDrop to Transfer Files between iPhone and Mac:
- Connect your Mac and iPhone to the same router, or you have to pair your Mac and iPhone Bluetooth to each other.
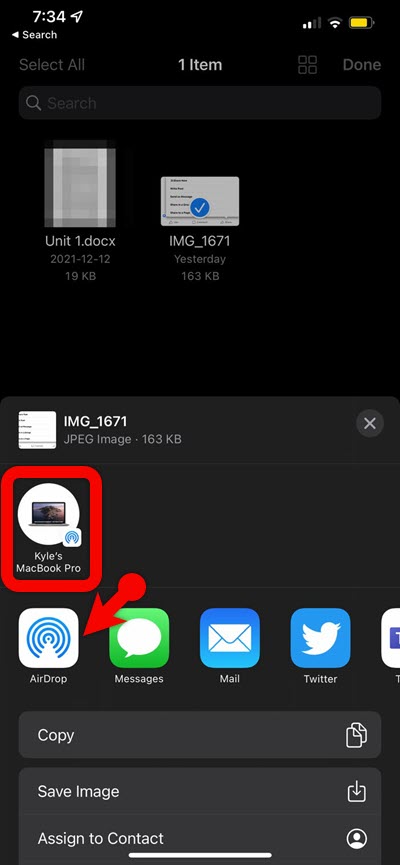
- Open a file that you want to share from your iPhone to your Mac, then tap on the share icon.
- Tip on AirDrop and then select your Mac computer.
- Wait until the files should be transferred.
Transfer file from Mac to iPhone using AirDrop:
If you wish to transfer files from your Mac to your iPhone, follow the steps.
- Connect your iPhone and Mac to the same WiFi, or Pair the Bluetooth to each other.
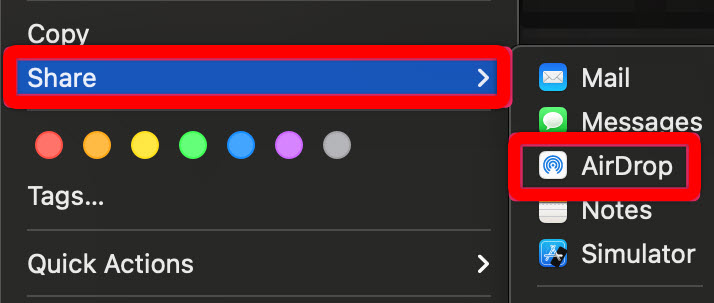
- Right-click on the file and choose share.
- From the Dropdown menu select AirDrop.
- Select your iPhone and wait for the file to be transferred.
3. Transfer Files Between iPhone and Mac using Cloud Storage
The other find method that you can use to transfer files between any devices, even Android and Windows PC is using the cloud storage. There are many cloud storage available on the web that you can use, among them iCloud, OneDrive, and PCloud is providing free 5 GB of storage. Google Drive provides 15 GB, Mega 50, MediaFire 10 GB, and IceDrive 10 GB.
The steps are really simple,
- All you have to do is create an account in one of those cloud storage, in my case, I will be using Google Drive. So, I have already created a Gmail account.
- If you have not created an account, go ahead and create one right away.
- I want to Transfer my Photos and videos from iPhone to Mac, So, I have downloaded the Google Drive App on my phone. I have also logged in with my Gmail account. Then I will upload all the Photos and Videos into Google Drive from my iPhone.
- Once all the files are uploaded into Google Drive, I will open the My Mac, open my favorite browser, search for Google Drive, and log in with my Gmail ID. Now I can easily download all of the files that I uploaded from my iPhone to Google Drive.
You can do the same with other Online Cloud Storage. In fact, if you are using iCloud, by default your phone will backup itself into the iCloud, which means you don’t have to upload your files manually. To access your file on Mac, search for iCloud.com, log in with your credentials and download your files.
Conclusion:
These are the steps and methods that I know that you can use to transfer files between iPhones and make easily. You can use any of those methods that you’re comfortable with. Now you have learned the process of transferring files between iPhone and Mac and vice versa. It is simple as drinking water.


Leave a Reply