This is exactly what Mac user want! Just share Mac OS X El Capitan files with Windows 10 or any later versions of Windows operating system. Now Mac OS X El Capitan 10.11.1 is the latest version of Mac operating system which I’m using on my laptop. In this step by step guide, we are going to show you, how to share Mac OS X El Capitan files with Windows 10 operating system and vice versa.
Share Mac OS X El Capitan Files with Windows PC
Start file sharing on Windows PC with Mac OS X is a bit difficult and different rather than Sharing files among other versions of Windows machine. It’s really fundamental for the both Mac and Windows users but file sharing has some advantages and some disadvantages.
Advantages of File Sharing
- More available space for users to access programs
- Easier to backup files
- Reduce the number of programs on any given network
- Simply administration
- Helps maintain consistency of shared data files
Disadvantages of File Sharing
- Security problems
- Potentially breaking copyright laws
- Duplication of data
- Data inconsistency
- Data Redundancy
How To Share Mac OS X El Capitan Files with Windows 10?
As I told you the advantages and disadvantages of file sharing right above so now let’s begin file sharing on Windows first. Right-click on the desktop and create a new folder, name it whatever you like. Right click on the folder and share it.
Step #1. Right-click on the folder which you are going to share it then select properties.
Step #2. Now a new window will pop up navigate to Sharing tab. Choose Advanced Sharing. You can set custom permissions, create multiple shares, and set other advanced sharing options. When you opt the advanced sharing, it will allow doing a lot of tasks like; set up a specific user to have access on the shared folder. As well as you will be able to enable or disable the credential. When pressed on Advanced Sharing again the new window will pop up, so check share this folder option then press on Permissions.
Step #3. If you want to add a specific user to have access on the shared folder so click on Add button. Search that particular user or group then hit the OK button. Now I want to share this folder with everyone on my network. If you choose “Full Permission” the user can bring any kind of changes on the shared folder. If you select Change, the user only brings some changes, if you select Read. The user can only read the shared folder he or she cannot do anything else. For example, the user cannot edit the file or the user cannot copy or paste etc. When you are satisfied just press the OK button.
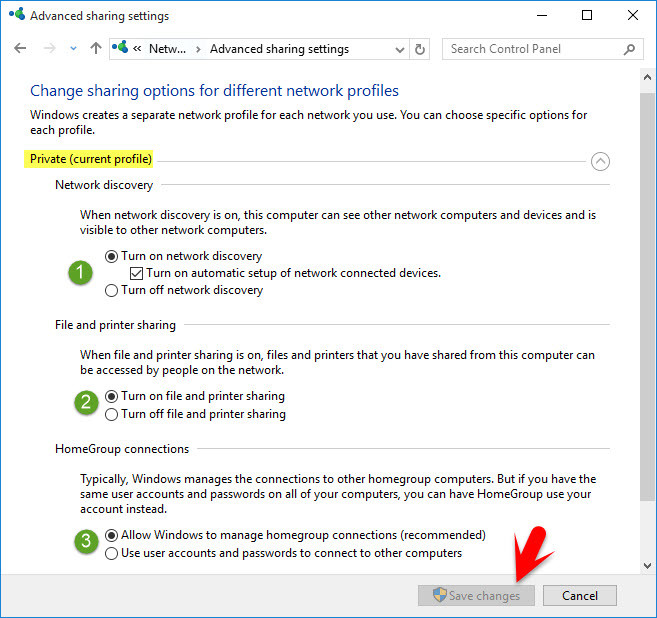
Note: If you have got any problem with sharing make sure that have turned on Network Discovery. If you don’t know where is located network discovery navigate to this path. Control Panel>All Control Panel Items>Network and Sharing Center>Advanced sharing settings. Finally, you might see three options there. Private, Guest or Public, All Networks. Here I’m not going to discuss all this thing here because it itself need an article.
Select Private network because it is more secure rather than the public network. Here you will share folder in your own network no one access until connect to your private network.
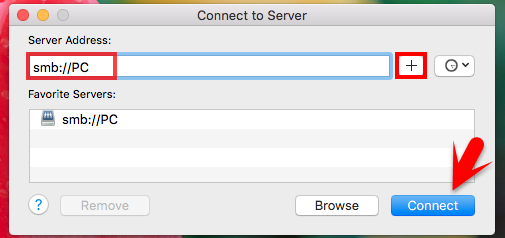
Step #4. Now our work is finished on the Windows machine. Go to your Mac operating system. At the center, click on Go then choose Connect to Server.
Step #5. Connect to Server window will be shown to you so type there this command. smb://user IP address or computer name. smb://PC. Press on the + icon to add in Favorite Servers list. Finally, click Connect. If you don’t know how to find your computer name, so right click on my PC icon then select Properties. Scroll down until you get computer name. For knowing the IP address of your computer tries to press Windows key plus R from your keyboard then type cmd hit enter. Now type ipconfig, it will show the IP address of your computer. But here I prefer to use the computer name which PC.
Step #6. As you can see the screenshot below you need to type the name with password. Type the username and password of your Windows machine. Do remember one thing. Now you are going to connect to your Windows computer. So write the Username and Password of your Windows operating system. “Remember this password in my keychain”, it will store or save the password in keychain of Mac OS X. If you check it, for the next time automatically you will be connected to the PC computer without asking the password. Finally, click on Connect button.
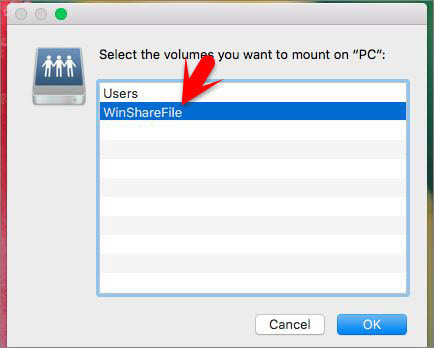
Step #7. Now choose the folder you want to mount. Here I’m going to select the WinShareFiles folder because I have shared this folder from my PC. So just choose the shared folder, click on OK button.
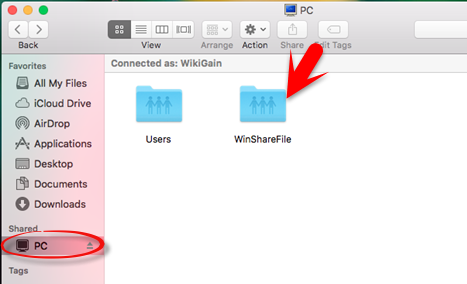
Now you are connected to the shared folder which you have shared it from your PC which Windows operating system is installed. Now open the Finder on Mac OS X El Capitan 10.11.1 then click on the computer name that my computer name is PC.
As you can see the screenshot below inside WinSharFile we have the same pictures and images and as well as on Mac operating system.
It was all about How to Share Mac OS X El Capitan Files with Windows 10. When you share files from Windows to mac os it means that you can communicate with each other. So share your file and it does not need any USB flash drive or an external Hard Disk. Do some process then be relax after that? I hope that you guys enjoyed this article and don’t forget to share another way of sharing via comment below with us. Thanks for being with us.




Hey, no matter what i do, i cant set it up, it doesnt log into my windows machine. I tried ip address and the name of windows, doesnt work. When i hit connect, it shakes the window and does not connect. I’m sure my credentials are correct, checked the user name from task manager, and i type my password 20 times a day to log into my windows computer. What seems to be the problem ? hope you can help me, thanks!
If you want to share file between Windows and MacOS then you have to enable File sharing from Control panel.
Hey there:) Great site, just wanted to drop by and say come check us out! fyledrop.com
Great site! Just wanted to drop a line and say hi. Come drop by and check us out. fyledrop.com Cheer.
We’re happy that you’ve found this blog helpful