In this article, I am going to show you how to install VMware tools on macOS Sierra. Have you ever installed macOS Sierra or El Capitan on Virtual Machine (VM) like VMware or VirtualBox? If you are new, then don’t worry I will leave the links below to install it on Virtual Machine. But if you’re not and you haven’t installed it on VM. Then you are in the right place because here I am want to show you how to install VMware tools on macOS Sierra. If you install it then you OS X 10.11 Will work perfectly with the VMware. When you install Vmware tools on OS X 10.11 then it will install the missing drivers and kext when you installed it then your macOS Sierra works perfectly. So follow below step by step to install VMware tools on macOS Sierra.
Install macOS Sierra or El Capitan on Virtual Machines
Use the Links below to install macOS Sierra or El Capitan on Virtual Machines like Virtualbox or Vmware. But if you want to Install VMware tools, then you must Install macOS on Vmware before going ahead.
- How to Install Mac OS X El Capitan on VirtualBox?
- How to Install macOS Sierra 10.12 on VMware?
- How to Install macOS Sierra 10.12 on VirtualBox?
- How to Install macOS Sierra 10.12 on Macbook with VMware Fusion?
Install VMware Tools on macOS Sierra
Step #1. Download Darwin.ISO from the link below and place it on your desktop.
- VMware Tool ISO File >>>Downlaod<<< Password: “www.wikigain.com”
Note: The VM Tool iso file is on the Tools folder in Patch tool.
Step #2. Power On the macOS Sierra VM that you want to install VMware tools on it.
Step #3. Enter your Password and login into your Account.
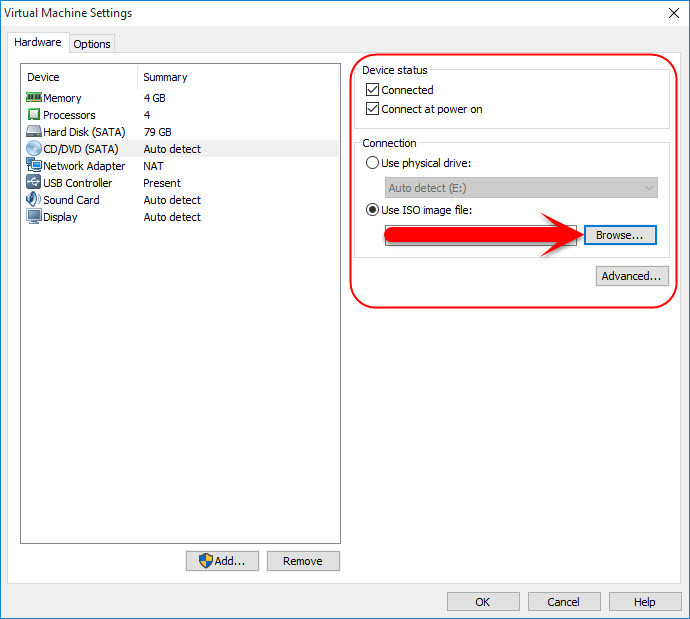
Step #4. Right-Click on the macOS Sierra tab then click on Removable Devices > CD/DVD (SATA) > Settings.
Step #5. From the Devices Status, Check the box of Connected and Connect at power on. Then from the Connection section “Select Use ISO image file:” and click on browse.
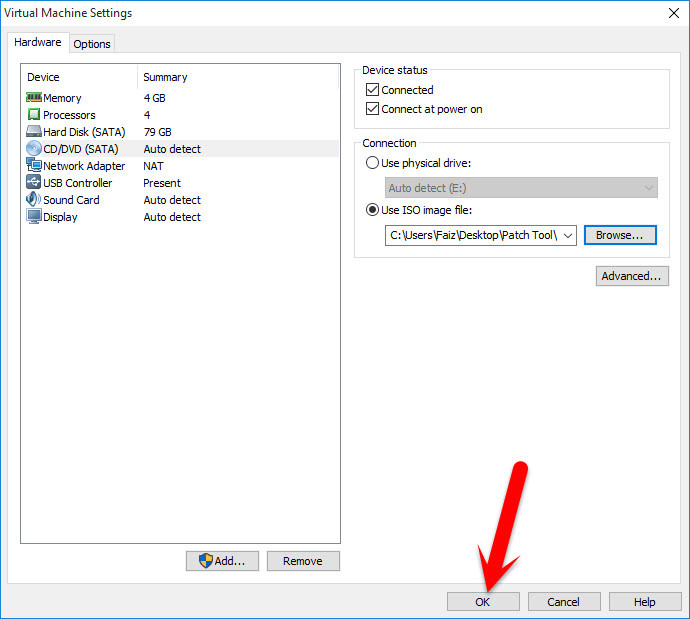
Step #6. Now Navigate and select the VM Tool.ISO file that you download from the link in step 1 and click Open.
Step #7. Now on the Virtual Machine settings click on OK to save the changes that you made.
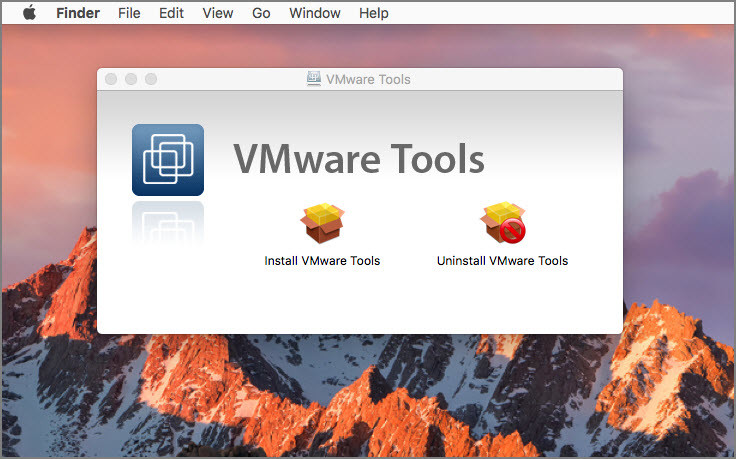
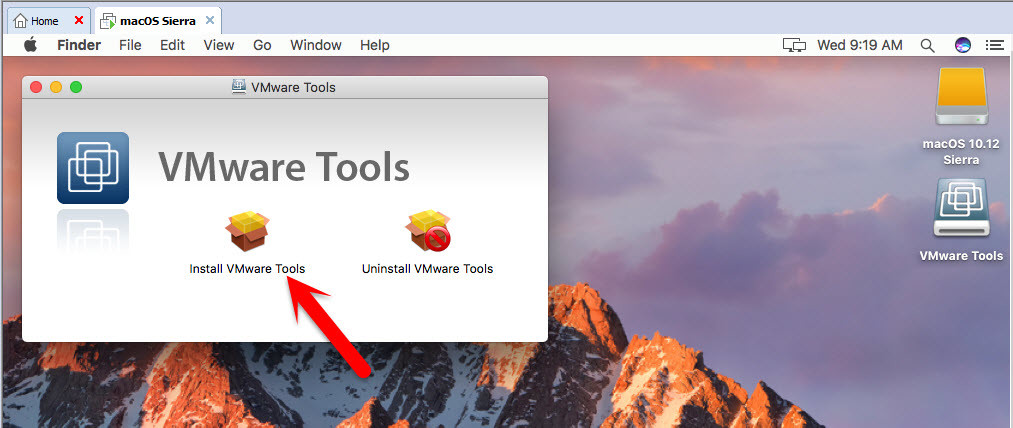
Step #8. After that go to OS X VM and enter full-screen mode, Wait a while for the file and then it will run automatically, so when VMware tools dialog box appears then click on Install VMware Tools.
Step #9. On introduction Page, click on Continue.
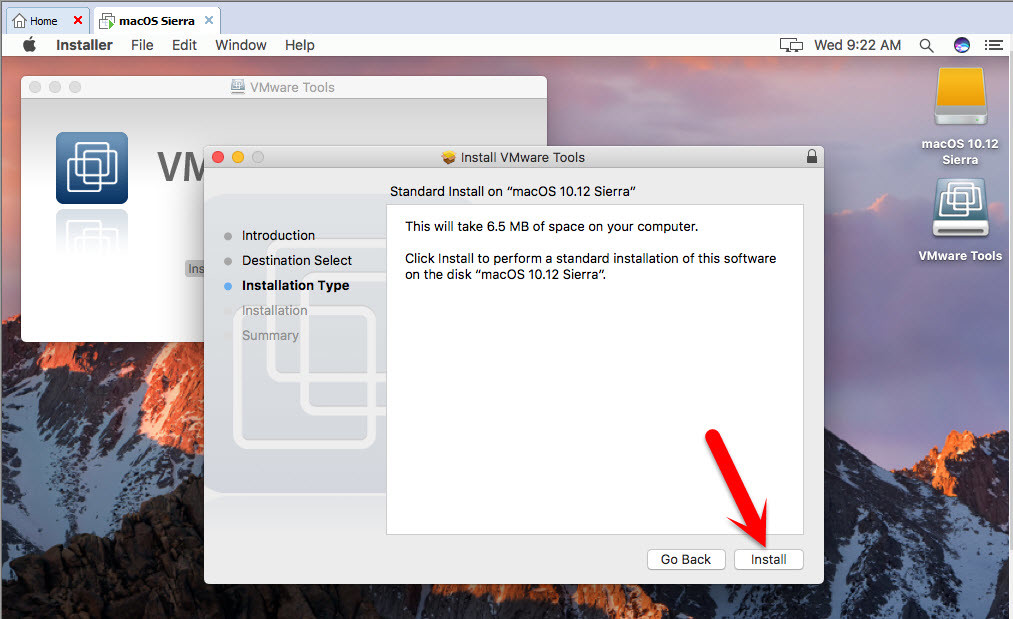
Step #10. Then click on Install.
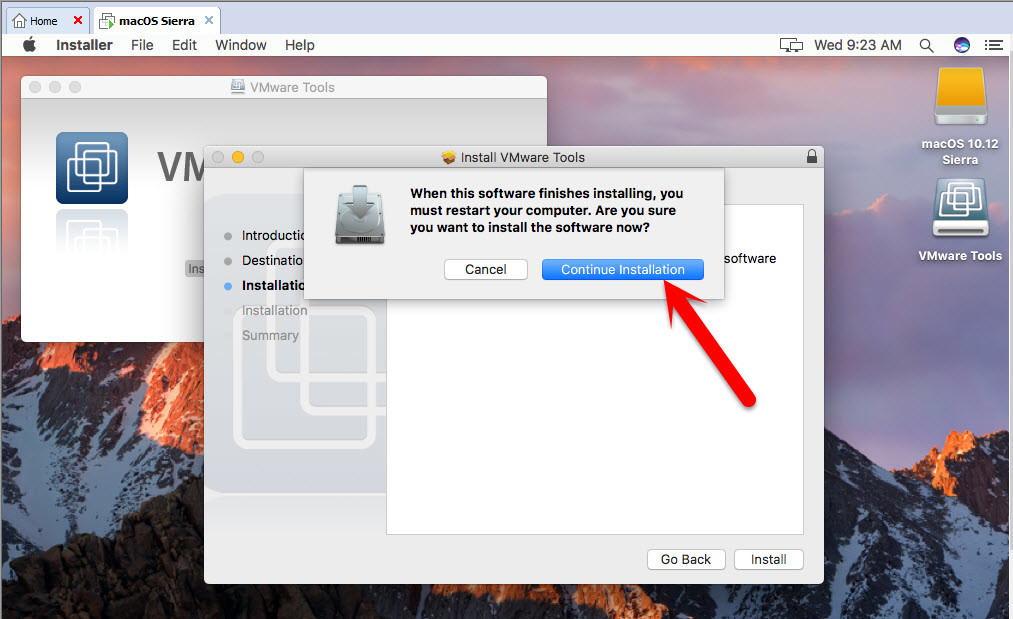
Step #11. Again click on Continue Installation.
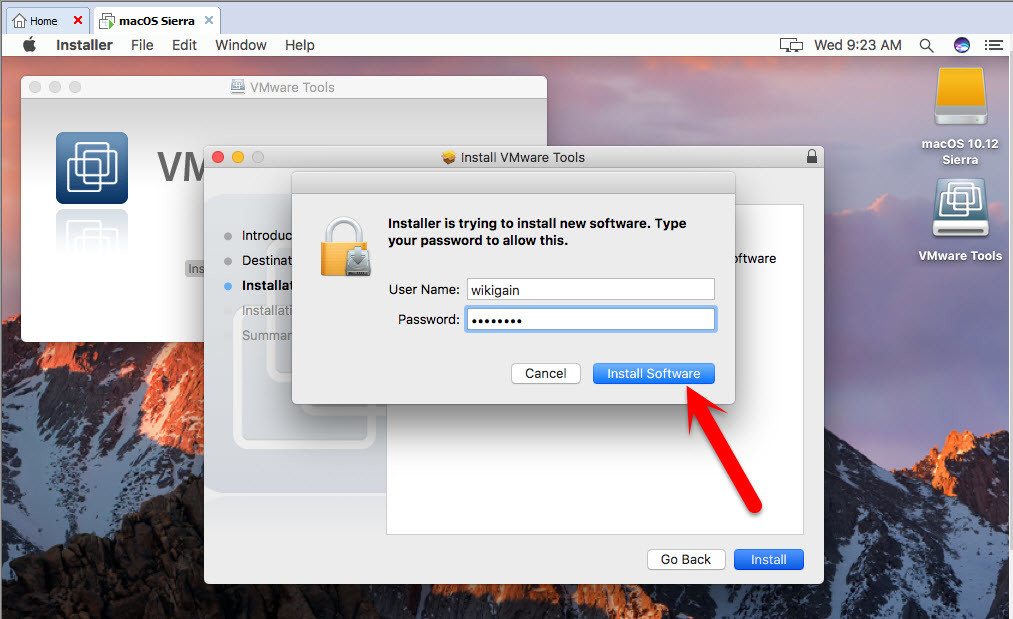
Step #12. Then type your Password and click on Install Software to allow this.
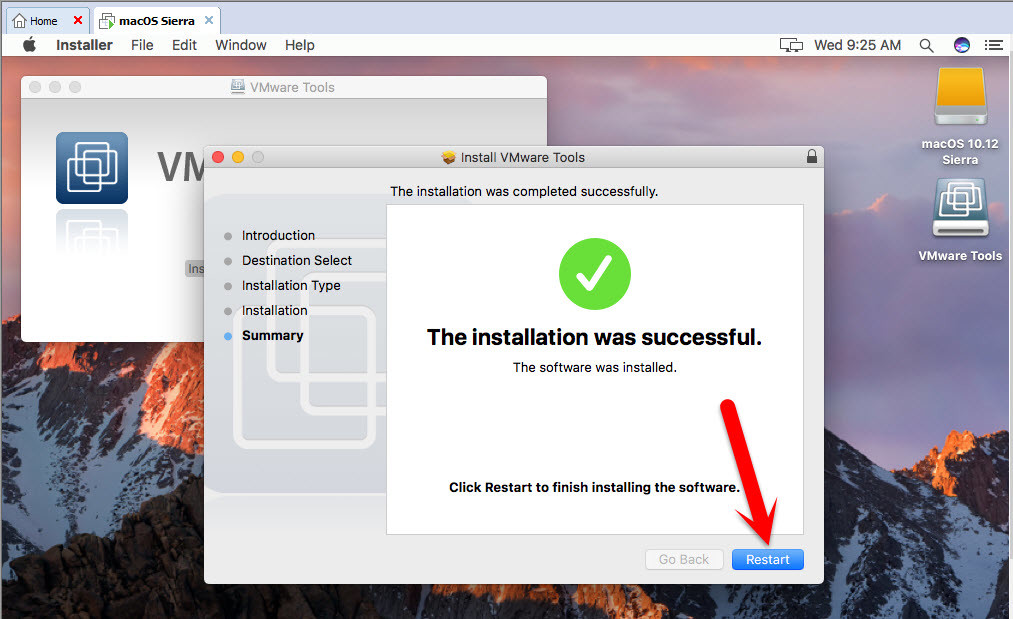
Step #13. Wait for Installer to complete the installation process and when the installation was Successful, then click on Restart to finish installing the software.
Done Installation
So when your OS X VM reboots then VMware Tools is installed on your VM, and it must work perfectly like Auto selecting the Display Size and other drivers.
This was all about, how to install VMware tools on macOS Sierra. If you faced any problem, tell us below by comment, feel free to tell us. We’re waiting for your suggestion.





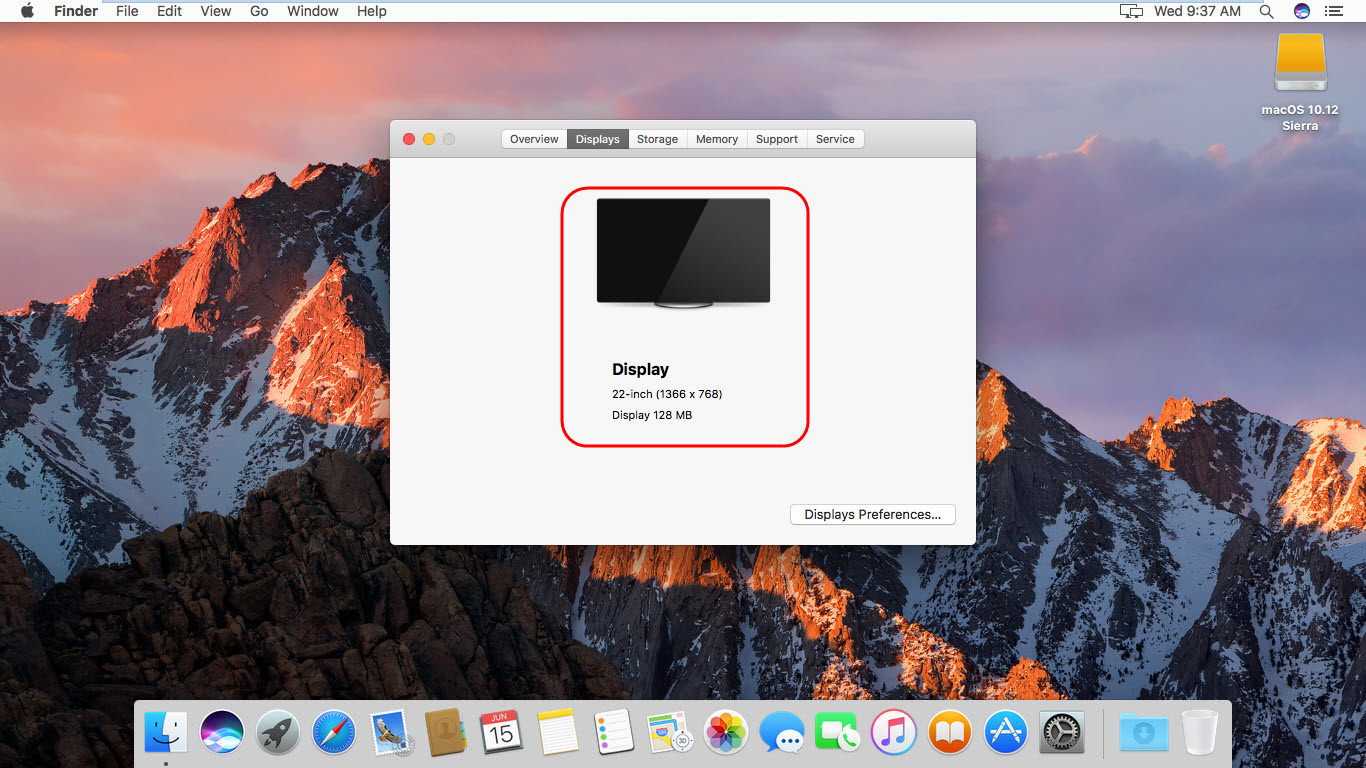
I have mac os 10.15 catalina on virtualbox. I did the trick with “VBoxInternal2/EfiGraphicsResolution 1920×1080” command so that to get full hd resolution but when I install vmtools & get the 128 Mb vram then the resolution goes back in the default resolution (1024 x 768). Only If I unistall vmtools then I get the the full hd resolution. Why ? How can I have vmtools (128 mb vram) with full hd resolution ?
Mine won’t boot anymore after installing the VMWare tools provided here. Keeps getting some kind of error and crashing at the Apple logo. 🙁
Thank you for the guide. Works well. Used Darwin.iso for vmware tools. I am unable to see my sierra timemachine backup drive or any other drive attached to PC in the VM. Did I miss something? thanks for support.
I want to use more than 128 MB for graphic in installed high sierra on vmware workstation 14, because I have lag in it. Is it possible?
Hi
Who has a clipboard between macOS Sierra and Windows 10
who has a clipboard between macOS Sierra и Windows 10 ?
The certificate of the .iso file has expired on 7/10/18. Is there a newer ISO?
I am getting output as “unable to find service” plz help
Watch and follow this video step by step: https://www.youtube.com/watch?v=Ukqaqz_GiQY
Hi when I make reinstall this massage show
Could not find component on update server
Oh thanks… You saved my day.
Thank you for your comment
nice it works!
Thank you
And also I cannot find the VM Ware Tools ISO but there is a VM Ware.rar but it is in an unknown format or is damaged!
Hello dear, Download and use this file: https://drive.google.com/open?id=0Bxz8D-fNAunPcVd5NGI1UjU3OWc (works with 10.12 and 13)
Further 1guide here:https://www.wikigain.com/install-vmware-tools-macos-high-sierra/
Hello. I extracted the file and it extracted to darwin.iso- name but is a SIG file. What do i do with the SIG file
Hello dear, Download and use this file: https://drive.google.com/open?id=0Bxz8D-fNAunPcVd5NGI1UjU3OWc (works with 10.12 and 13)
Further 1guide here:https://www.wikigain.com/install-vmware-tools-macos-high-sierra/
I’m doing the opposite… I use VMware Fusion to have Windows 10 in a Macbook Pro – macOS Sierra 10.12.5. I’ve tried several times to install VMware Tools and or either hangs in “installing thin print drivers” or either I get error messages like for example:
VMware VMCI
VMware Paravirtual SCSI
VMware VMXNet NIC
They all said they must be installed manually… I hope you can help me out! I’m really tired of this…
Hello dear,
Please follow this guide for VMware fusion on MacBook Pro: https://www.wikigain.com/install-macos-sierra-vmware-fusion-macbook/
It’s seems I didn’t explained myself… I have macOS Sierra by default, but I already installed VMware Fusion to use Windows 10. When I try to install VMware tools, it either hangs in “installing thin print drivers” or either I get error messages like:
VMware VMCI
VMware Paravirtual SCSI
VMware VMXNet NIC
They all said they must be installed manually… I hope you can help me out!
Thanks for answering.
Seems legit, but you may provide the official unlocker/patch instead of scary g-drive file. Thanks.
Where is the official file?
No Problem this How-to is so Nixe everyone should know that
I’m so happy with the Full hd Resolution in Mythos VMware Mac OS X Sierra
Thanks for this nice workaround
Welcome dear, Thanks for sharing your positive feedback.
YEHAAAAA it runs
i should install the VM-Ware-Tools from the Tools folder not from the Darwin.iso
thanks
Thanks for sharing your feedback dear.
Hello together,
I run VMware under MS Windows 8.1 in VM i run OS X Sierra but
i installed VMware tools with the Darvin.iso file
In VM-Ware Settings Display is Auto Detect
But in The Vm MAC OS x i only see display resoloution 1024×768
i installed VM-Ware Tools 3 times but it will not help
That’s okay, now just run MacOS then click on the Full-screen button from the VM Tab and after that, it will fix to your fix resolution.
it worked perfectly , thanks man
You’re welcome dear
I rarely leave comments but thanks a lot. Recently I was forced to upgrade my Yosemite to Sierra and that video card issue was pain in the ass =) Everything worked smoothly, highly appreciated your support
Thanks for sharing your positive feedback.
I enabled 3D acceleration and selected a monitor size of 1600×1200. I then downloaded and installed the VMware Tools ISO you provide, but my MacOS 10.12 VM still will not change the display resolution. It remains at the small default size.
Windows 10, VMware Workstation Pro 12.5.5 build-5234757
Any other suggestions?
Click on the Full-Screen button from the Virtual Machine Tab of VMWare.
I have the following message:
The CPU has been disabled by the guest operating system. Power off or reset the virtual machine.
Please, help
Did you choose vmware tools that we provided you?
WOW! I LOVE YOU!!! Thought I was hosed after I updated my VMWare Workstation. You are a life saver.
Thanks dear BOB and good luck
Installed vmware tools, I get a warning about the script needing to be superuser to survive a reboot, I’ve enabled root, but still only get 1024/768.
macOS 10.12.3 2x processors, 4gb ram Vsphere 6.5 MacPro 5.1 64gbram
Full screen the VM to fix the resolution.
I can not enable the 3d acceleration I Installed both vmtools and darwin but It could not active it
and tell me that the host operation could not support
I have an asus n56 with two intel HD 4600 and GTX 760m
I enabled all related thing to vm in bios
but It could not be ok with these setting
آقا مختار خیلی چاکریم داداش دمت گرم با این سایتت!
You’re welcome my dear. I’m not sure how you can’t enable 3 Acceleration. Do you want to install macOS Sierra on VMware? and it does not work?
خواهش میکنم برادر
I have reinstalled VMware Tools many times but I cannot get higher resolution then 1024×768. On VMware settings I have checked 3D accelaration and set graphic memory to 1GB. But this also not helps.
Increase your memory to 2 to 4 GB
hi mine is running but no graphics ,
ive got hd530 and gtx 950m is there anyway i could make get full graphic on my vmware macosx 10.12.?
Yes dear, You can install VMware tools to enhance your VM performance. Also for graphics download and install the driver from NVidia website.
https://www.wikigain.com/install-vmware-tools-macos-sierra/
I’m having the same issue. I think the problem is that VMWare Workstation caps NVRAM for the graphics card at 128MB and doesn’t pass through 3D acceleration. Makes OS X kind of useless to me since it won’t run iMovie or a few other programs.
Using VMWARE 12.0.0 build-2985596 & El Captian
So this answers my question I posted 3X now.. So others are also seeing 3D acceleration grayed and not able to enable.
This was select-able in earlier versions of VMWARE.
I am using on board Intel Video card.
I’m running 12.5.2 build-4638234
I can enable 3D acceleration, but I get a warning that it is not supported in the guest OS.
Well.. well.. look what I found about 3D acceleration..
http://froebe.net/blog/2015/05/05/howto-enable-3d-acceleration-in-vmware-playerworkstation-in-ubuntu-linux-15-04-with-intel-graphics-solved/Hey dear Wilson, I am sorry for you but we can’t enable 3D acceleration.
Thanks so much for assistance via this blog! I’ve only had one installation issue and that is VMWare Tools will not install without an error. I used the default darwin.iso provided with VMWare then I used the darwin.iso that you provided in the Patch Tools and got the same error message. Any ideas?
What’s the error message that occurs?
there is a darwin.iso.sig, and not sure what the .sig is for unless a version check / verification.
Don’t use darwin.iso, instead use vmware tools.iso
Oye, perfecto, funciona de maravilla, saludos.
If i installed vmware-tools it doesn’t work. Reinstall doesn’t help as solution. So i have only 1024×768. You have any idea?
If you think that every way that you apply doesn’t work just remove the Virtual Machine then, create a new one by using this step by step guide.
It will be more knowledgeable, and you’ll know the process of installing macOS Sierra on VirtualBox very well.
Good luck 🙂
Hello, How are you?
I just used your patch tool.
It worked. but i found some strange problem.
I wanted to change sierra screen resolution from 1024 * 768 to 1920 *1280.
Your patch tool changed resolution from 1024 * 768 to 1716 * 802.
I used vmware 10.0 and installed sierra.
Is there any way to change to 1920 * 1280?
I hope your helps.
Thanks.
Yes dear, just reinstall VMware tools on your macOS Sierra Virtual machine and this time, it should be working. To Reinstall VMware tools this time, right click on the macOS Sierra VM tab on VMware and select install VMware tools then go ahead to install it.
Great tutorial,
About the password. There is a typo in your original post.
– wikigian
– wikigain
🙂 Puzzled me a bit, but got it working in the end.
Thanks again
Welcome dear
it works perfectly with the official update from the store.
Thank you for sharing that !!!
Welcome dear, hope that you found helpful
Hi, thanks for the infos.
My only problem is the password, when i try to extract the files it keep saying is wrong.
The password for patch tools folder is http://www.wikigain.com
Hi! I tried both password but none of them works. Has there been any change?
No dear still the password is (www.wikigain.com) make you sure that you typed correctly.
Can you please fix the typo in your instructions? The password is http://www.wikigain.com but in your instructions you wrote http://www.wikigian.com which doesn’t work.
Your comment system automatically adds http:// to my comment. The password is www[dot]wikigain[dot]com but replace [dot] with .
Yes dear, and it’s mentioned in the article above.
This blog was… how do you say it? Relevant!!
Finally I’ve found something that helped me.
Thank you!
We’re happy that you found this helpful.