In this article, I’m going to show you how to install macOS Sierra on VMware on using VMDK on Windows 10. Apple announced macOS Sierra 10.12 in WWDC 2016. This article will guide to download a pre-made VMDK which bootable with macOS Sierra 10.12.6 (latest at the time of writing). Then patch VMware with macOS unlocker, create & modify a VM (Virtual Machine) for macOS Sierra, attach the VMDK and boot into macOS and perform a basic macOS account settings. Follow the step by step to install macOS Sierra on VMware using VMDK.
Before we get started, let me mention that several versions of macOS have come out since macOS Sierra and we have already created step by step guides to install them on VMware or VirtualBox. So if you want to install the newer versions of macOS then please check out the link below:
- Guide to Install macOS Big Sur on VMware (macOS 11)
- Guide to Install macOS Big Sur on VirtualBox (macOS 11)
- Guide to Install macOS Catalina on VMware (macOS 10.15)
- Guide to Install macOS Catalina on VirtualBox (macOS 10.15)
- Guide to Install macOS Mojave on VMware (macOS 10.14)
- Guide to Install macOS Mojave on VirtualBox (macOS 10.14)
- Guide to Install macOS High Sierra on VMware (macOS 10.13)
- Guide to Install macOS High Sierra on VirtualBox (macOS 10.13)
Related: How to install macOS Sierra on PC
Install macOS Sierra on VMware using VMDK
- Download the prerequisites
- Install the Prerequisites
- Install VMware Unlocker for macOS Sierra
- Create macOS Sierra VM
- Edit the macOS Sierra VM
- Edit macOS VM’s VMX file (Optional)
- Wait for macOS Sierra Installation to Complete
- Complete Basic macOS Account Settings
- Install VMware Tools (Optional)
Step 1: Download the prerequisites
To install macOS Sierra on VMware using VMDK, you need to download the virtualization software like VMware Workstation or VMware Player, macOS Sierra 10.12 VMDK file and macOS Unlocker for VMware. All the essential files are listed down below for download.
- Download VMware Workstation Pro 15.5.x or VMware Player 15.5.x.
- Download VMware Unlocker for macOS Sierra
- Download macOS Sierra VMDK
- macOS Sierra 10.12.6 (16G29) Latest
- macOS Sierra 10.12 (16A323) Stable
Step 2: Install the Prerequisites
Now install the following virtualization application, and if you already have it by any chance then you’re welcome to skip but make sure it works properly and updated to the latest version.
- Install VMware Workstation Pro 15.5.x or VMware Player 15.5.x
Run the VMware Workstation Pro/Player setup and follow the prompt leaving all the options as default.
Note: From here the steps below will only mention VMware Workstation but you can do the same thing in VMware player as well since it is similar to Workstation.
Step 3: Install VMware Unlocker for macOS Sierra
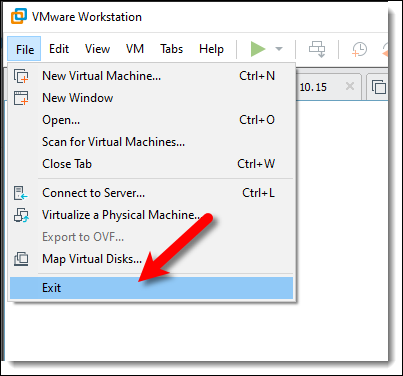
Firstly make sure VMware Workstation application is closed completely otherwise the VMware unlocker won’t work. You can do this by Clicking on File Tab > Exit.
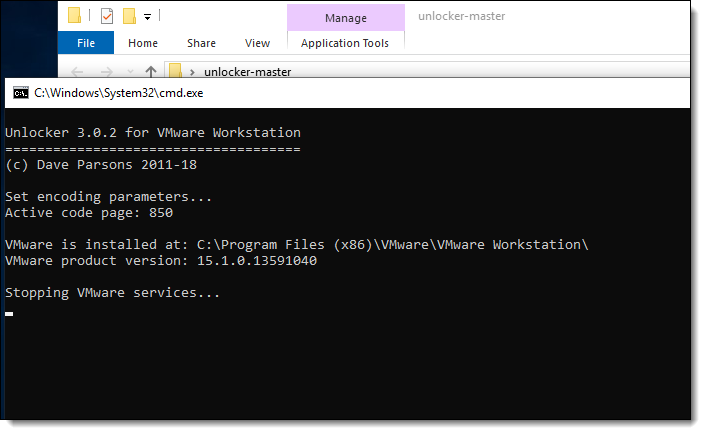
You should have downloaded VMware Unlocker for macOS Sierra from GitHub or the direct link. So now extract the VMware Unlocker for macOS Sierra. Right-click on win-install.cmd and select Run as Administrator. This step is very important because you won’t see Apple Mac OS X on the Operating System list while creating a new VM unless you patch VMware with the Unlocker tool.
Note: You may always uninstall the previous version of the Unlocker before using a new release. Failure to do this could render VMware unusable. – David Parsons
Step 4: Create a New Virtual Machine
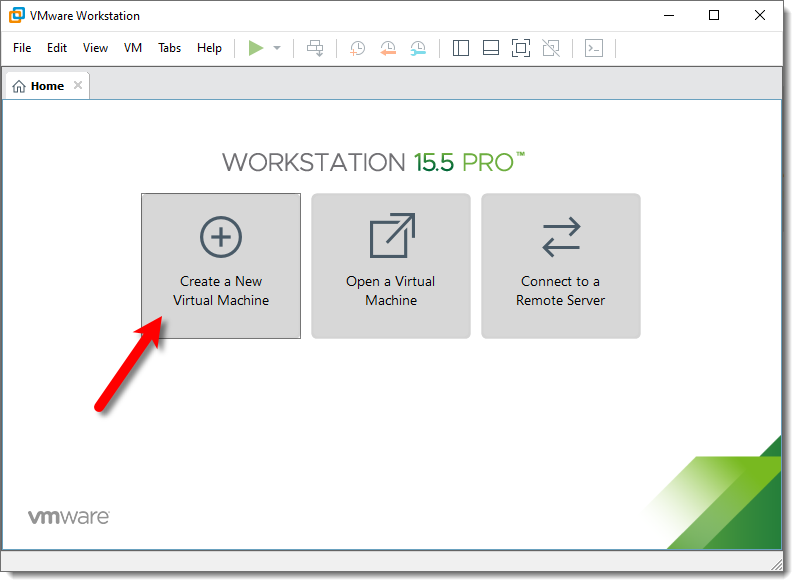
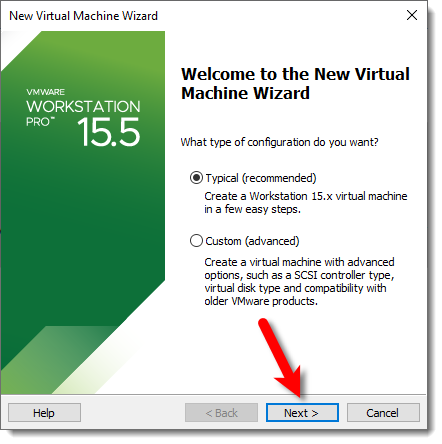
- Open VMware and click on Create a New Virtual Machine (Ctrl+N) then select Typical (Recommended) and click Next.
- Create a VM
- Select Typical (recommended)
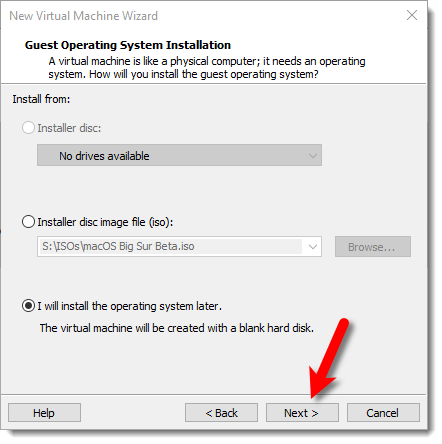
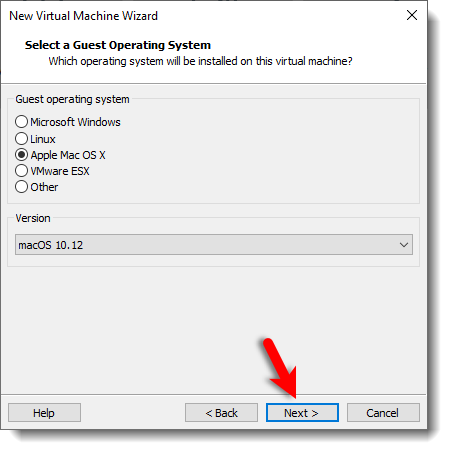
- Now select I will install the operating system later and click Next. Choose Apple Mac OS X from operating system list then select macOS 10.12 from version and click Next.
- Select Install the Operating System Later
- macOS Sierra 10.12 Version
- Name the virtual machine macOS Sierra. Click Browse to choose a location to save virtual machine files and click Next, or you may let it as default (recommended).
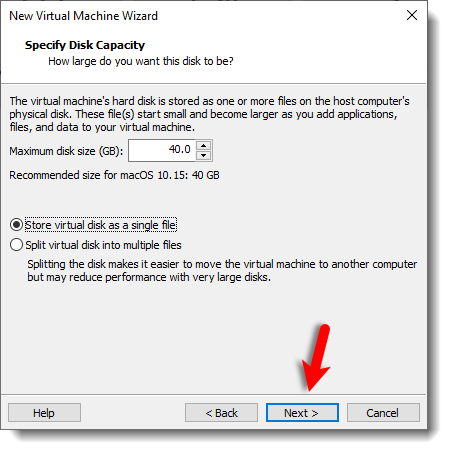
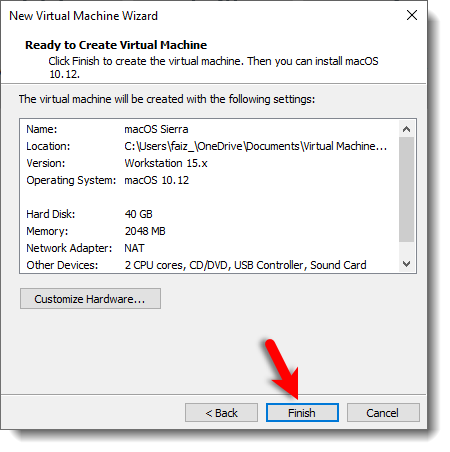
- Don’t Specify the disk space just select Store virtual disk as a single file and click Next. On Ready to Create Virtual Machine, Click Finish.
- Specify Disk Capacity
- Create the macOS Sierra VM
Step 5: Edit the new Virtual Machine
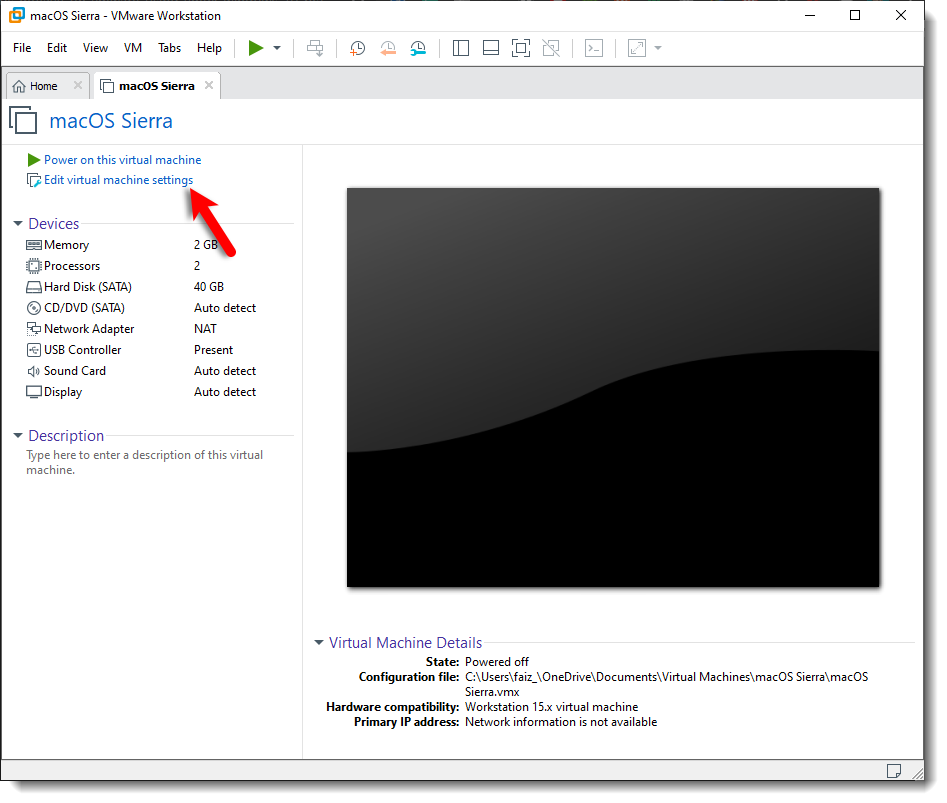
- Click on Edit Virtual Machine Settings.
- Increase the Memory from 2 GB to 4 GB or higher for better performance.
- Select Processor menu then increase the CPU processor core from 2 cores to 4 or Higher cores for better performance.
- Note: If you don’t have enough resources then you may not increase the Memory and Processor since the minimum requirement is 2 GB Memory and 2 Cores of Processor.
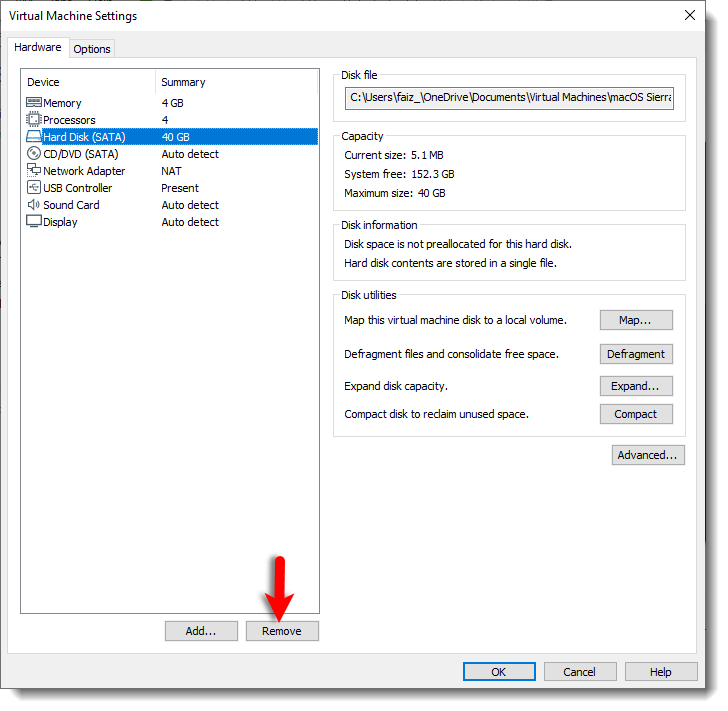
- Select Hard Disk from device section and Remove it.
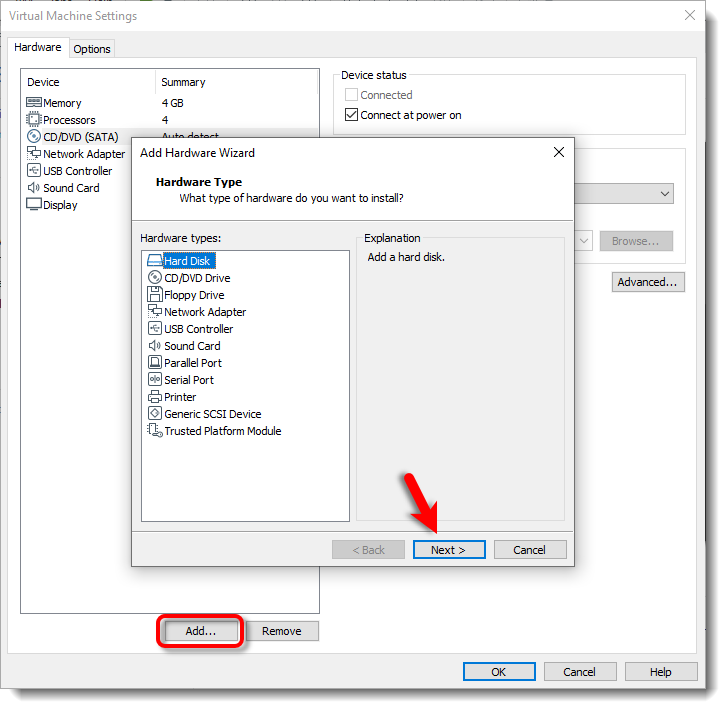
- Click Add button at the bottom of Virtual Machine window. Select Hard Disk from the Hardware section and click Next.
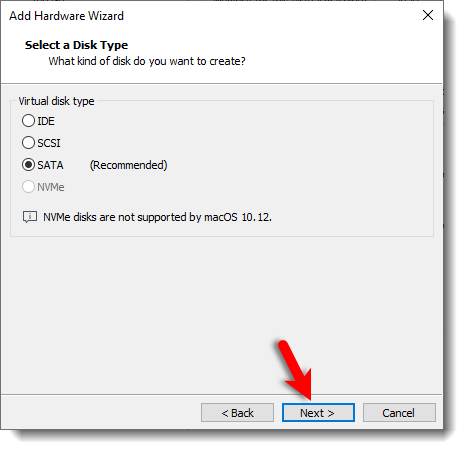
- Select SATA as disk type and click Next.
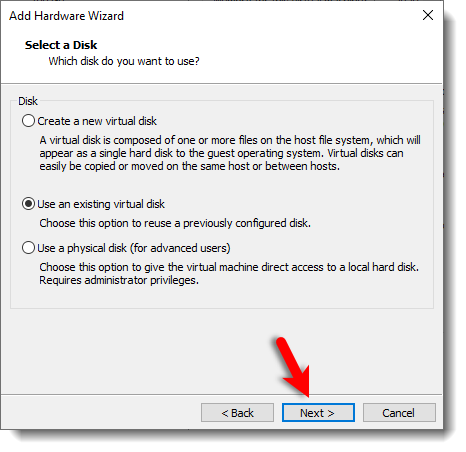
- Select the Use an existing virtual disk and click Next.
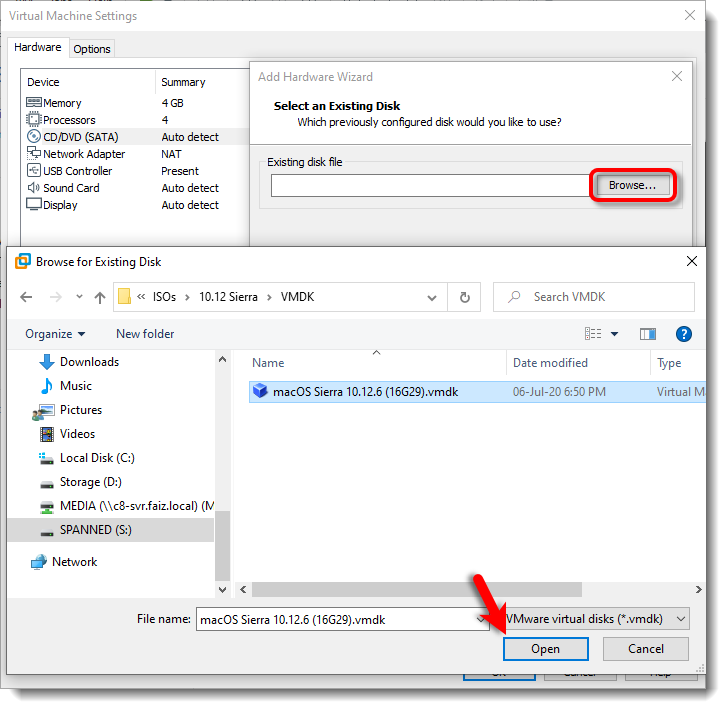
- Now, Click Browse then select macOS Sierra 10.12.6.vmdk File and click Open.
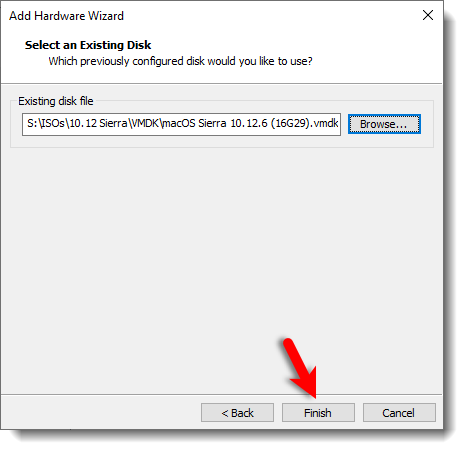
- After selecting the macOS Sierra VMDK then click Finish.
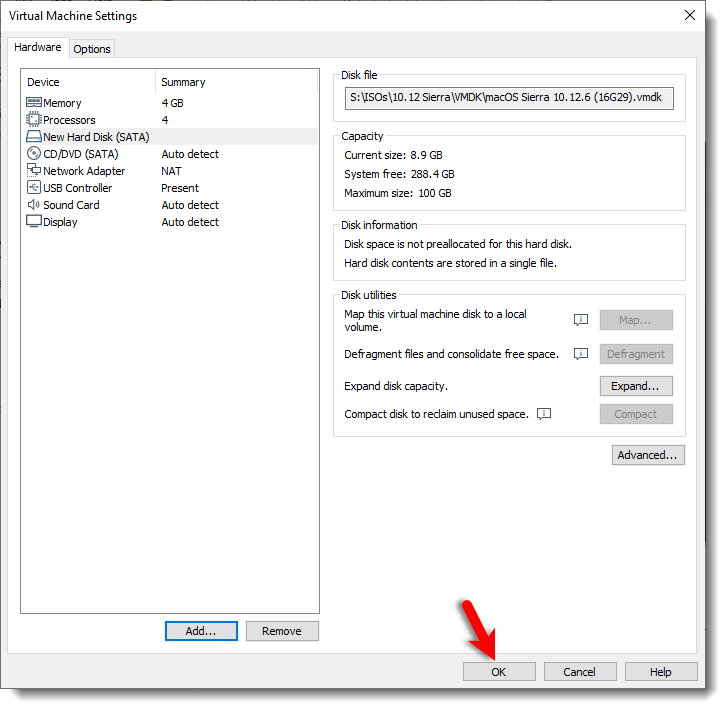
- Finally, click OK to save all the changes that you made to the virtual machine settings.
Step 6: Edit macOS Sierra VMX File (Optional)
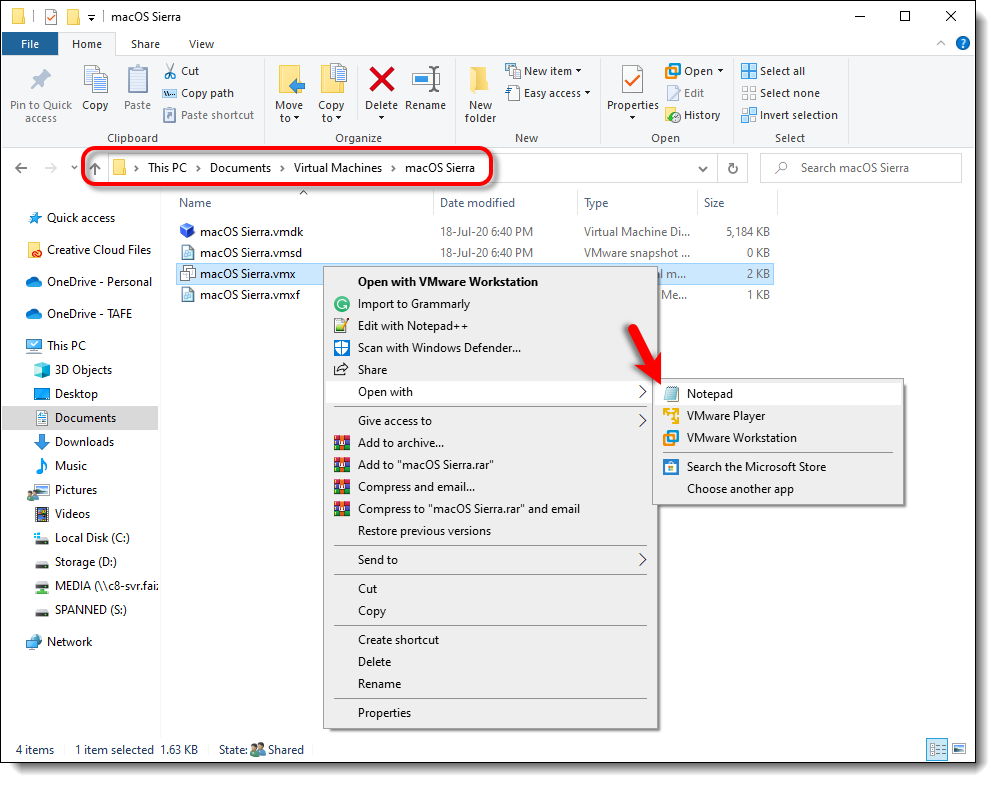
- Do these 2 steps only if you can’t boot into macOS or have other issues. Navigate to the virtual machine folder which you select in step #4.3 of this guide. If you didn’t specify a new location, then the default location is in Document > Virtual Machine. Right-click on macOS Sierra.vmx then open it via Notepad or any third-party text editor of your choice.
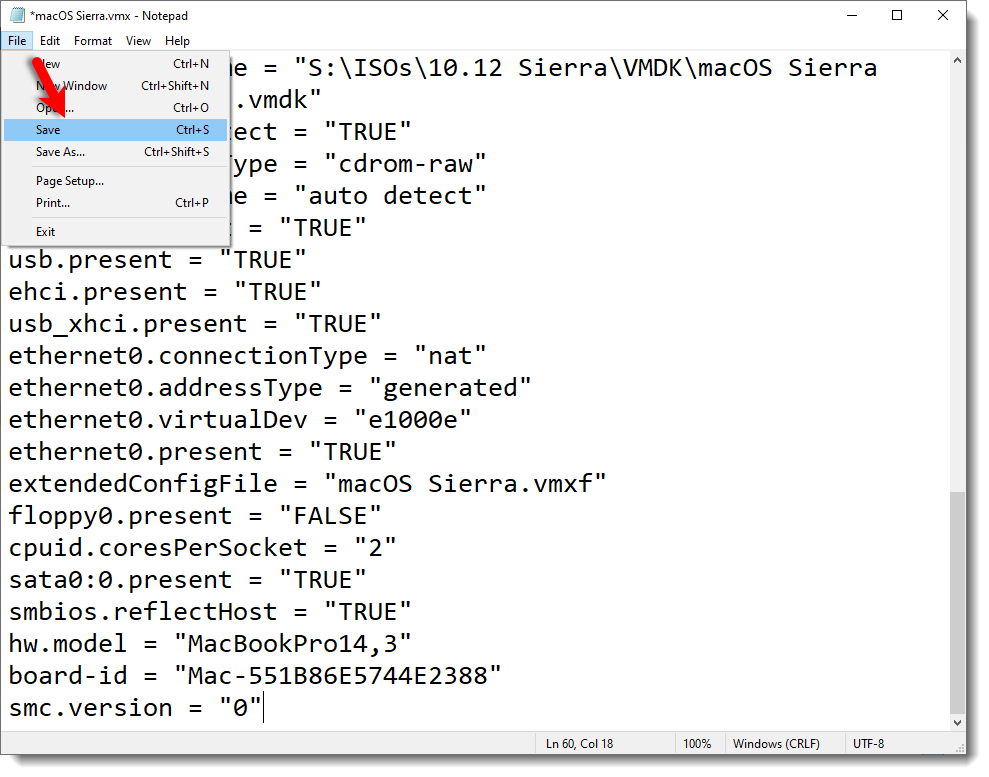
- Scroll down to the bottom of texts and add the following code; then click on File > Save. After that, you may close it as you don’t need it anymore.
smbios.reflectHost = "TRUE"
hw.model = "MacBookPro14,3"
board-id = "Mac-551B86E5744E2388"
smc.version = "0"- Open macOS Sierra VMX File
- Save macOS Sierra VMX File
Step 7: Wait for macOS Sierra Installation
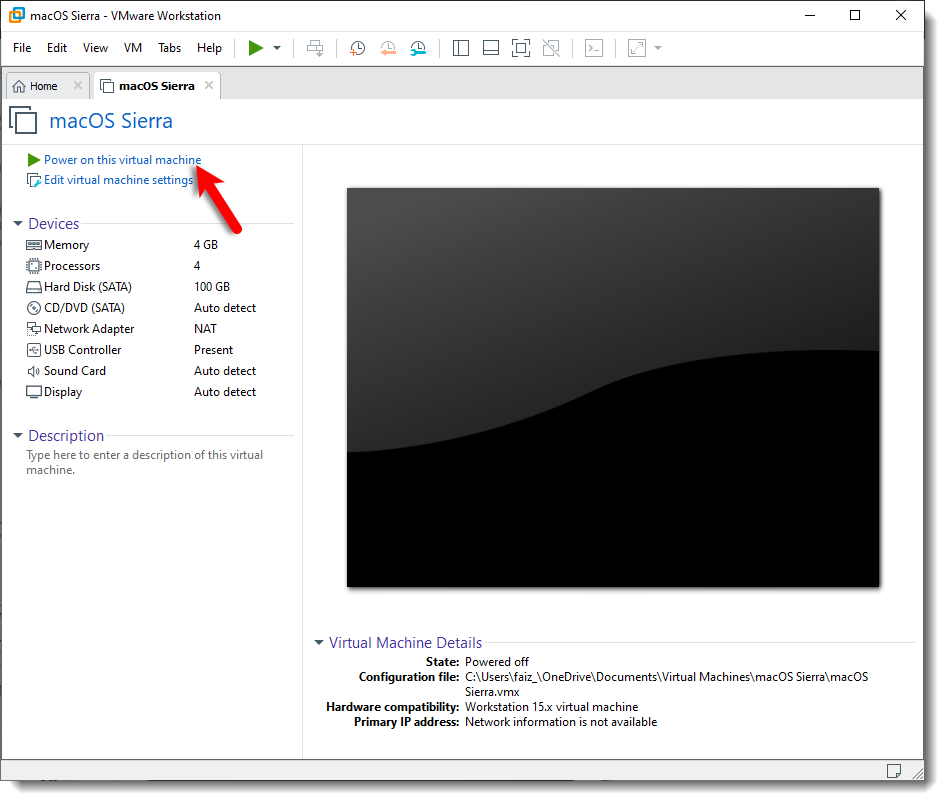
- Open VMware and on the macOS Sierra VM window Click Power on this Virtual Machine.
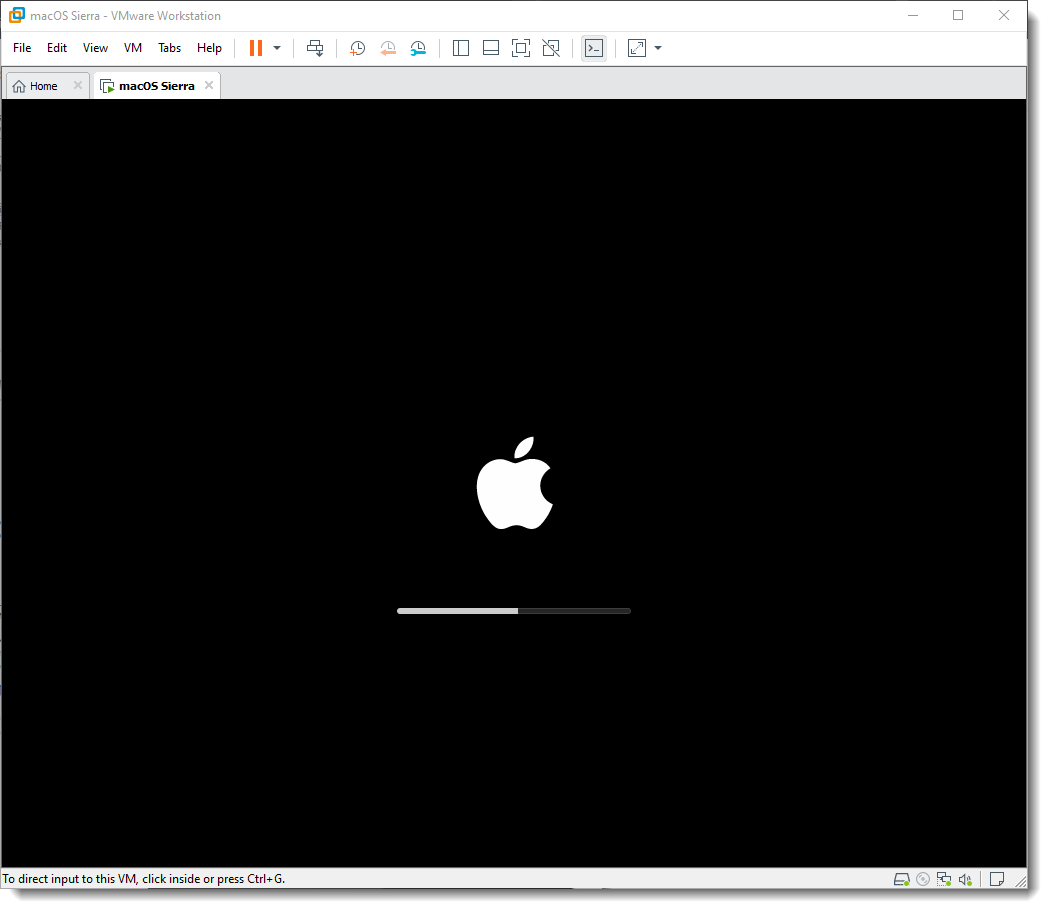
- Now, wait for macOS Sierra to boot up and complete the installation itself without you touching anything. It will take a couple of minutes depending on your system, be patient. Just ahead up that If you encounter an error then let the VM to restart automatically but eventually, it should boot into macOS. I received that error here.
Step 8: Complete Basic macOS Account Settings
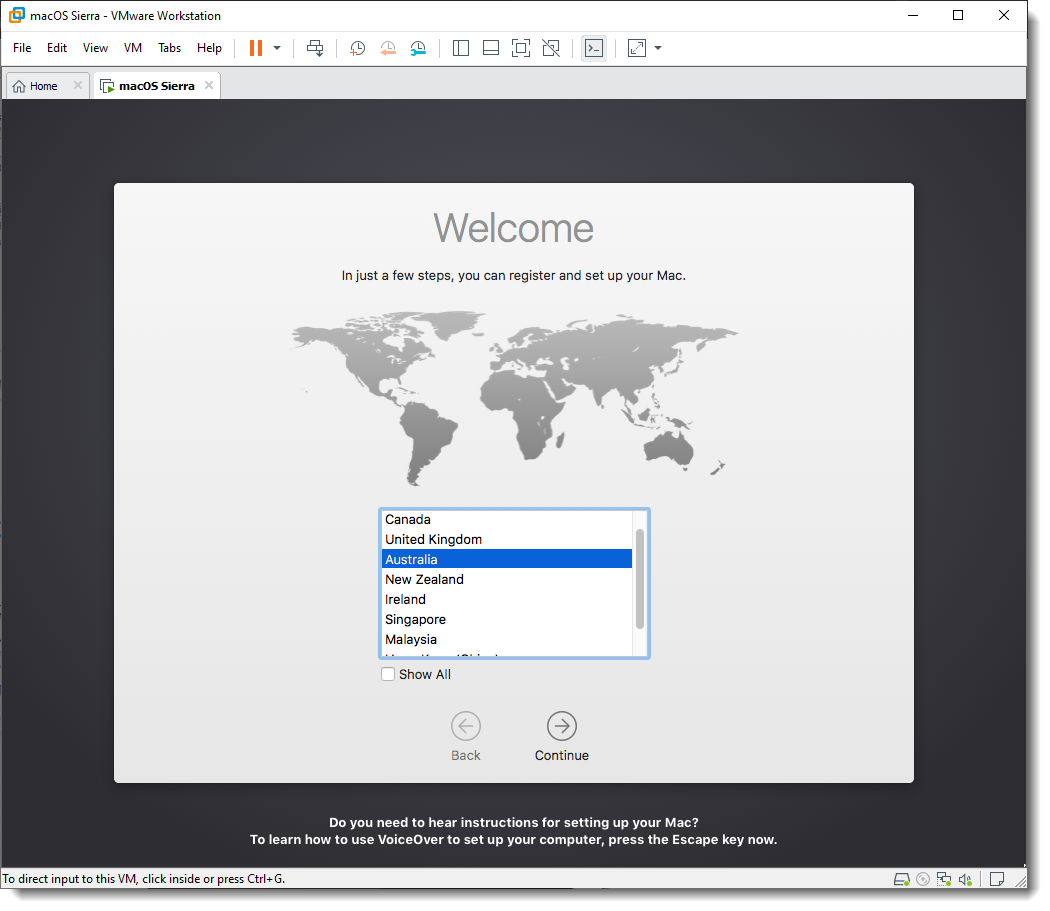
Once the installation part complete, the VM will reboot, and after the reboot, you should see macOS Sierra Welcome page.
- Choose your Country and click on Continue.
- Choose a Keyboard Layout and click Continue.
- Select Don’t transfer any information now and click Continue.
- Click Continue then click Don’t Use on Enable Location Services page.
- On Sign in with your Apple ID page, select Don’t Sign in then click on Continue and click Skip.
- Agree to the macOS Software License Agreement.
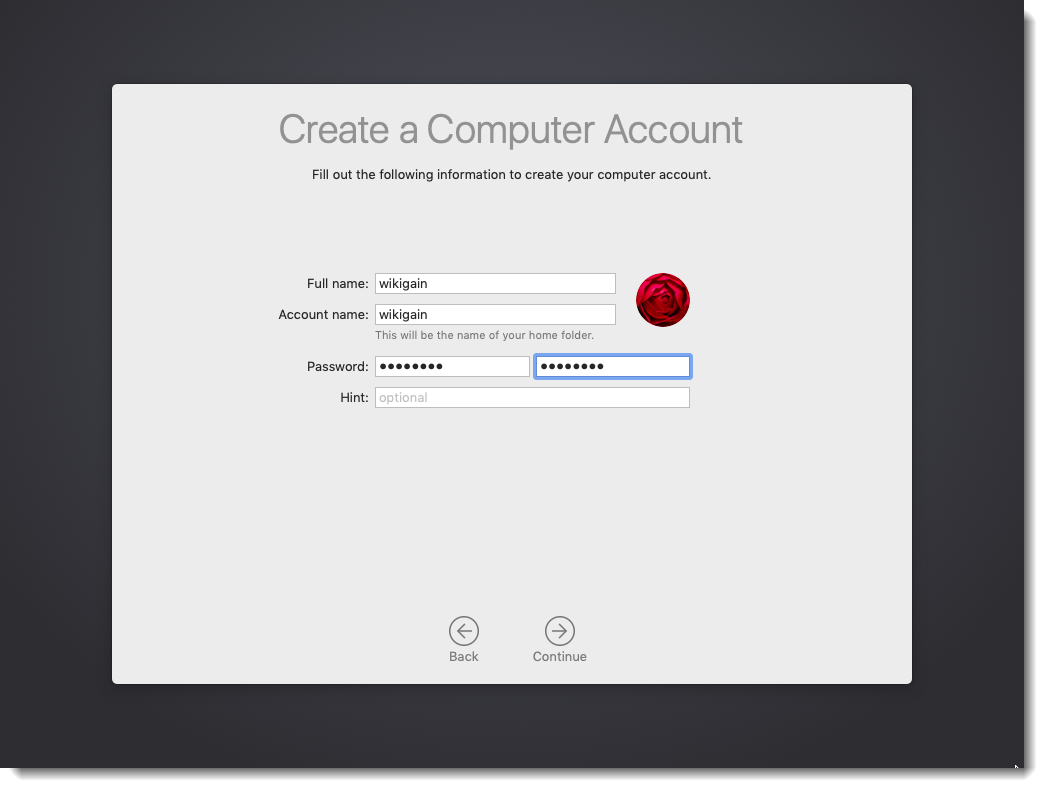
- Fill out the Full name, Account name, Password, Hint and click on Continue to create your user account for macOS Sierra 10.12.
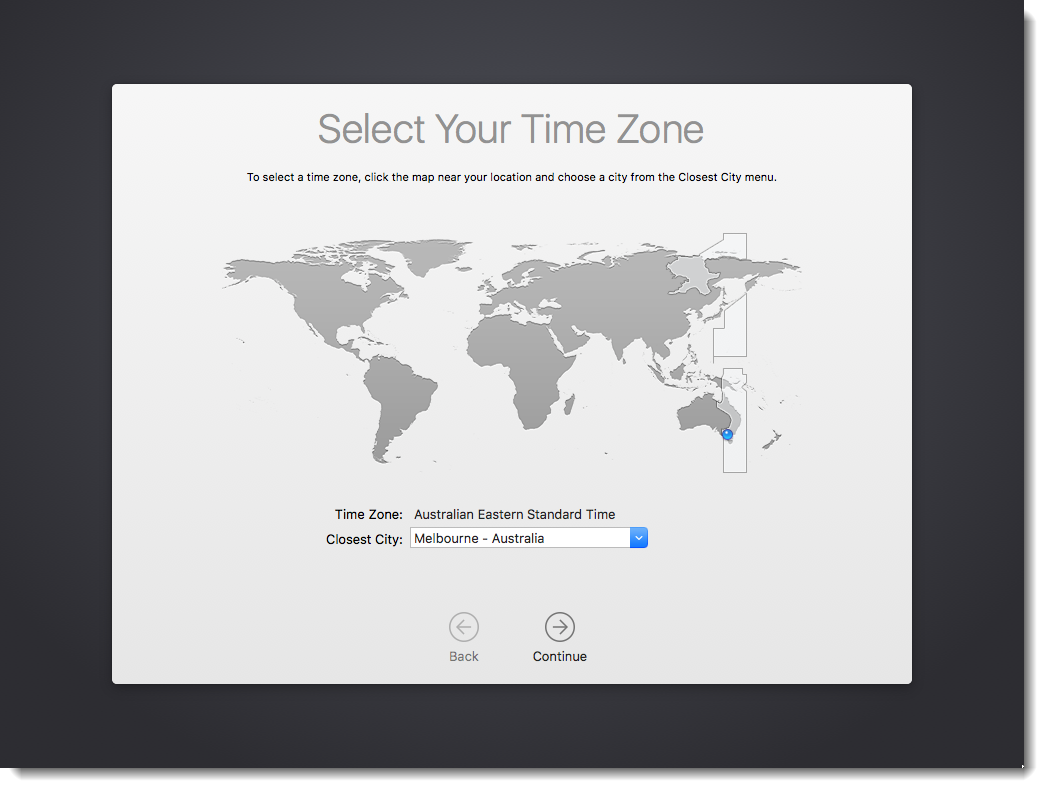
- Select your Time Zone and click Continue.
- Click Continue on the Analytics Page.
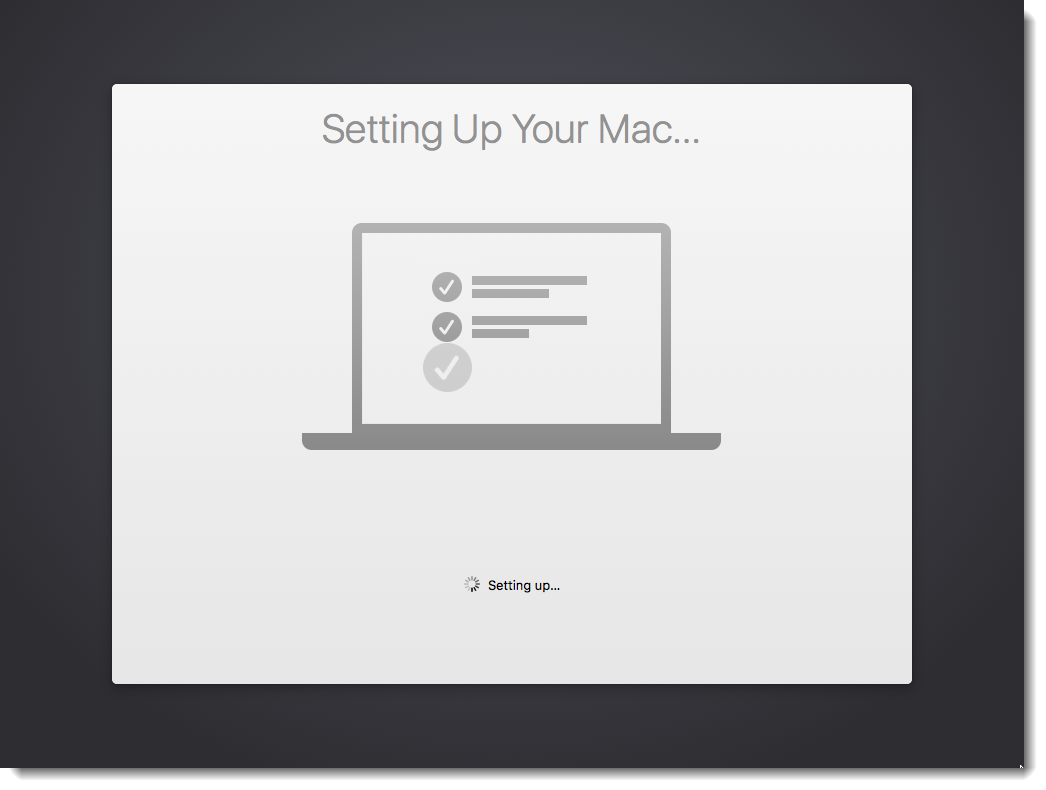
- Wait a little while to Setting Up Your Mac.
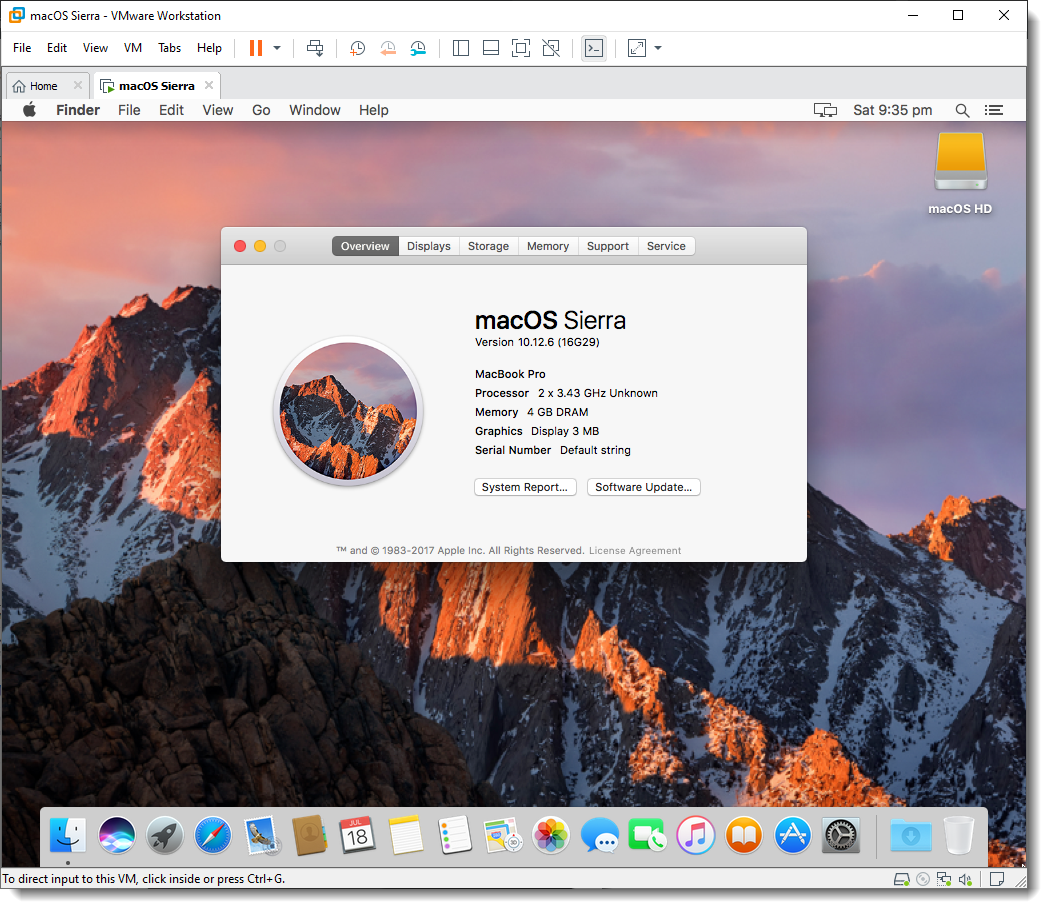
- Then it will run to the desktop of macOS Sierra.
Step 9: Install VMware Tools (Optional)
So now you should have noticed that the resolution of macOS Sierra can’t be changed and it’s not working as smoothly as you expected. To fix macOS Sierra Resolution on VMware or Make it more responsive, you need to install something called VMware Tools. It’s quite easy and straightforward to work with any system. So to do that we have created a comprehensive guide. Please click the link below and follow the guide Step by step.
See this guide: How to install VMware Tools on macOS Sierra.
Summary
Basically, in this article, I’ve shown you the step by step pictorial guide on how to install macOS Sierra on VMware using VMDK on Windows. After reading and following this guide, you should have done the following:
- Download the prerequisites
- Install the Prerequisites
- Install VMware Unlocker for macOS Sierra
- Create macOS Sierra VM
- Edit the macOS Sierra VM
- Edit macOS VM’s VMX file (Optional)
- Wait for macOS Sierra Installation to Complete
- Complete Basic macOS Account Settings
- Install VMware Tools (Optional)
Follow this guide to install macOS Sierra on VirtualBox.
This was all about, how to install macOS Sierra on VMware using VMDK. If you faced any problem, tell us below by comment, feel free to tell us. We’re waiting for your suggestion.


hi I followed the steps and when I boot the vm it is stuck on the Apple logo and shows the following message
“The CPU has been disabled by the guest operating system. Power off or reset the virtual machine.”
any forms of help is appreciated
Thanks for sharing! . followed the mentioned steps and it did work for me..
i have all the steps but when it comes to poering on the macos the apple logo appears and after a few seconds when the load bar appers it says that macos not yet setup
Thank you very much with your post!! I have the 15 version of VMware so your patch didn’t work for me, so i needed to find a recent version of it.
After that, everything fine!
Thanks
when I start the machine it just takes to boot configuration, nothing else….I guess I wasted my time downloading it
Really useful, thanks for the post
VMware Workstation unrecoverable error: (vcpu-0)
vcpu-0:VERIFY vmcore/vmm/main/physMem_monitor.c:1180
A log file is available in “C:\Users\shashank singh\Documents\Virtual Machines\Mac os High Seierra\vmware.log”.
You can request support.
To collect data to submit to VMware support, choose “Collect Support Data” from the Help menu.
You can also run the “vm-support” script in the Workstation folder directly.
We will respond on the basis of your support entitlement.
i am facing this error even after following your steps , so tell me what to do , plz help me
Hi, one question. I want to use Xcode etc on there to start building apps but it says I need a newer version of MacOS High Sierra for that. When I update the version via the updater from Apple the system fails to boot after that and I am forced to restore the .vmdk. any idea on how I can fix this?
thanks
B
Hello dear, Yes you can Install macOS High Sierra by this article: https://www.wikigain.com/install-macos-high-sierra-vmware-windows/
It is rebooting again and again while starting mac os
Try to add the code smc.version = “0” to vmx file
I also crossed with the same problem… I have added smc.version=”0″ to vmx line how to fix it?
Once test without quotation mark. smc.version = 0
Thank you. You are great!!
Welcome dear 🙂
How to change screen resolution on VmWare?
All you need to install VMware tools to get full screen and other features working.
Article Guide: https://www.wikigain.com/install-vmware-tools-macos-sierra/
Video Guide:
/watch?v=iACjHKO9IKMUPDATE: Sorry, the links are removed from YouTube. Sorry for the inconvenience.sir i have sierra 10.12 file in .dmg file not in .vmdk file this causes i don’t install macOS sierra .
if u tell me to convert .dmg file to bootable .vmdk file or another method to insall sierra.dmg install in vmware.
and another quetion which boot option are correct for this one.
1. bios
2. EFI
PLS TELL ME URGENT.
Download macOS Sierra .VMDK file from the link below.
https://drive.google.com/drive/folders/0B-PSijxodhB1OUZlLURhLUYwS2s?usp=sharing
what is the password to unzip patchtool.zip
The password is mentioned in the post but again I will tell you
Password for patch tool is: http://www.wikigain.com (Without Http)
Heh guys, GREAT step by step but I am getting hung up after I run the virtual machine. A little window pops up and says SMC value cant be 0 its going to use -1 and then I get an error message saying :
VMware Workstation unrecoverable error: (vcpu-0)
vcpu-0:VERIFY vmcore/vmm/main/physMem_monitor.c:1180
A log file is available in “C:\Program Files (x86)\MacOs\vmware.log”.
You can request support.
To collect data to submit to VMware support, choose “Collect Support Data” from the Help menu.
You can also run the “vm-support” script in the Workstation folder directly.
We will respond on the basis of your support entitlement.
Any ideas how to help me ?
Also any way I can get a free vm ware player. Really dont need it for anything else but running Mac OS ?
Thanks
Please read step #6 once again. You might have forgotten to change the code
If it does not work let us know. Good luck 🙂
Hi Mukhtar,
Thanks for the reply, sorry, I did do that.
I redid everything and now it seems to have taken the SMC text step. but I still get an error message and the image wont load. Any ideas? Can I send you a log file ?
Error Message is :
VMware Workstation unrecoverable error: (vcpu-0)
vcpu-0:VERIFY vmcore/vmm/main/physMem_monitor.c:1180
A log file is available in “C:\Users\rick.hoedt\Documents\Virtual Machines\macOS 10.12\vmware.log”.
You can request support.
To collect data to submit to VMware support, choose “Collect Support Data” from the Help menu.
You can also run the “vm-support” script in the Workstation folder directly.
We will respond on the basis of your support entitlement.
Thanks
Hurrah, that’s what I was looking for, what a data! existing
here at this blog, thanks admin of this site.
Welcome,dear, Hope that it must be helpful for you.
Hi
I was able to install it without any problems and was also able to make it full screen after reading another article of yours on that problem.
There are only 2 issues which I am facing and would like some help on them.
1. Scrolling function of my laptop touchpad is not working in macos sierra.
2. Mac OS Sierra is slow when I open any windows in it, it takes 4 – 5 seconds to open a window.
My laptop has i3 3110m processor and 6gb ram, is it sufficient to run mac os sierra smoothly or should I upgrade to new laptop ?
Please also inform how to fix the issues mentioned above
Thanks
You can Enable the Trackpad from the settings. Just go to Apple icon> System Preferences> TrackPad
It says no track pad found and any solution to fasten the mac os sierra or do I need to upgrade laptop ?
Hi
I have downloaded the patch tools file from the mediafire link shared above.
The file is password protected, can you please provide the password for the patch tools file.
Thanks for all your efforts of providing very easy and useful tutorials on mac and various other platforms
Thanks
ISK
Hi
I found the password on youtube link.
Once again thanks
Welcome, dear