In our previous post, we have shown you how to install macOS Sierra 10.12 on VMware, and now in this article, I’m going to show you how to install macOS Sierra 10.12 on VirtualBox on Windows 10. Apple has announced the next version of its Mac operating system “macOS Sierra”. Of course, the real change is that, after fifteen years, Apple has finally ditched the “OS X” moniker. All things old are new again, and the new operating system will only call “macOS.” So, I’m not going to discuss anymore regarding Apple’s new release “macOS Sierra” instead; I’m going to walk you through installing macOS Sierra on VirtualBox on Windows operating system.
Update: Before we get started, let me mention that several versions of macOS have come out since macOS Sierra and we have already created a step by step guides to install them on VMware or VirtualBox. So if you want to install the newer versions of macOS then please check out the links below:
- Guide to Install macOS Big Sur on VMware (macOS 11)
- Guide to Install macOS Big Sur on VirtualBox (macOS 11)
- Guide to Install macOS Catalina on VMware (macOS 10.15)
- Guide to Install macOS Catalina on VirtualBox (macOS 10.15)
- Guide to Install macOS Mojave on VMware (macOS 10.14)
- Guide to Install macOS Mojave on VirtualBox (macOS 10.14)
- Guide to Install macOS High Sierra on VMware (macOS 10.13)
- Guide to Install macOS High Sierra on VirtualBox (macOS 10.13)
System Requirements
Before we start, make sure to read the following requirements. Please do not skip this step because it’ll help you to successfully install macOS Sierra on VirtualBox on Windows 10 PC.
- Minimum 2 GB memory (Recommended 8GB or higher)
- Minimum 2 cores of processors (Recommended 4 cores or higher)
- Hard disk free space 20 GB (Recommended 100GB or higher)
- Your system should support Intel or AMD VT (Virtualization Technology)
- Intel/AMD VT (Virtualization Technology) Should be enabled from BIOS setup
Required: If you haven’t already then you should enable Virtualization Technology (aka Intel VT or AMD-V).
Furthermore, it’s highly recommended that you install macOS Sierra on SSD (Solid State Drive) instead of HDD (Hard Disk Drive) because you will have a much faster performance with SSD rather than HDD
Steps to Install macOS Sierra on VirtualBox Using VMDK
- Download the Prerequisites
- Install VirtualBox on Windows / PC
- Install & Update VirtualBox Extension (Optional)
- Create a New Virtual Machine for macOS Sierra
- Execute the VirtualBox Code
- Perform a Clean Installation of macOS Sierra
- Update macOS Sierra to the Latest Version (Optional)
Step 1: Download the Prerequisites
To install macOS Sierra on VirtualBox on Windows, you must download the following files and read the step by step guide to avoid any problems. If you miss any of the steps below, then you might be unsuccessful in running the macOS Sierra on VirtualBox.
- Download macOS Sierra VMDK (Required)
- macOS Sierra 10.12.6 (16G29) Latest
- macOS Sierra 10.12 (16A323) Stable
- Download VirtualBox & VBox Code (Required)
- Alternative Download Files (Not Required)
- Download VirtualBox 6.1.12 (Direct Link)
- Download VirtualBox Code (VirtualBox 5.x.x & 4.x.x)
Step 2: Install VirtualBox on Windows 10
From the “Download the Prerequisites” section of this post, you should have downloaded VirtualBox and if you didn’t, download VirtualBox latest version and install it on your Windows system. If you’ve already installed VirtualBox, then you can skip this step. Otherwise, follow the steps below to install VirtualBox on your Windows machine.
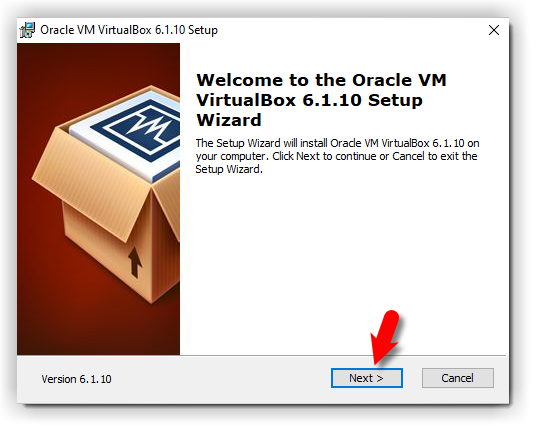
- On the welcome Wizard page, click Next.
- Keep the default setting on the Custom Setup page and click Next.
- Again Click Next to accept the default options unless you want to change something.
- On the warning Network interface page, just click Yes to process with Virtualbox installation.
- Click the Install button to install VBox. Again click Yes if required.
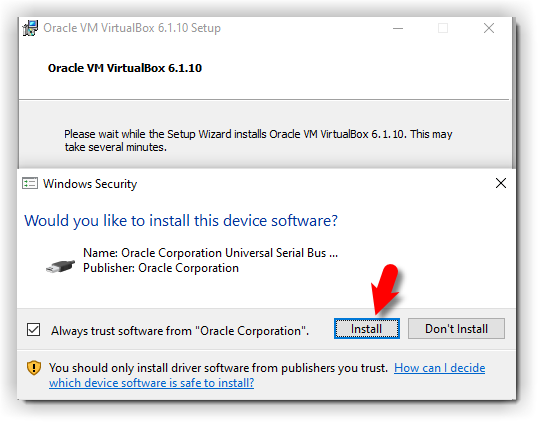
- While installing VBox, you might see a security warning about “Oracle Corporation”. You need to click Install on this page to process with the installation. If you click Don’t install, the installation process will be terminated here and you can’t go ahead. If you see the security warning again click the Install button
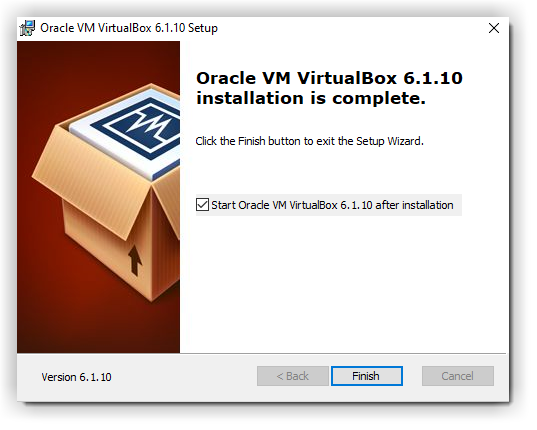
- Finally, click Finish.
- Virtualbox Setup Welcome Wizard
- Windows Security
- Virtualbox Setup Completed
Step 3: Install & Update VirtualBox Extension (Optional)
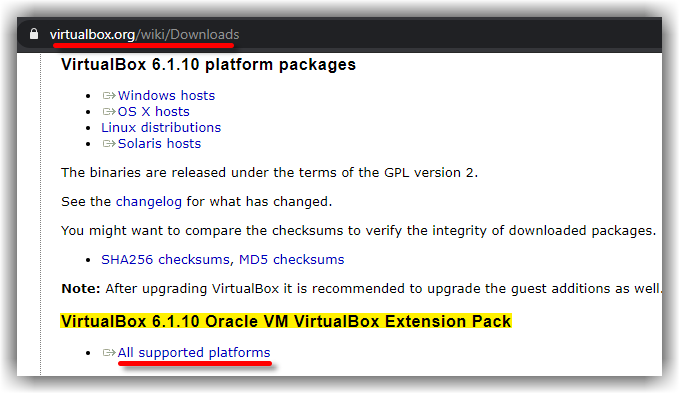
This step is not 100% necessary but it’s highly recommended to do this step because macOS Sierra might not function properly on VirtualBox. For this reason, it might cause problems during the installation. Go to the Virtualbox download page. Under VirtualBox 6.1.10 Oracle VM VirtualBox Extension Pack section, click All supported platforms to download the latest version of Virtualbox Extension Pack.
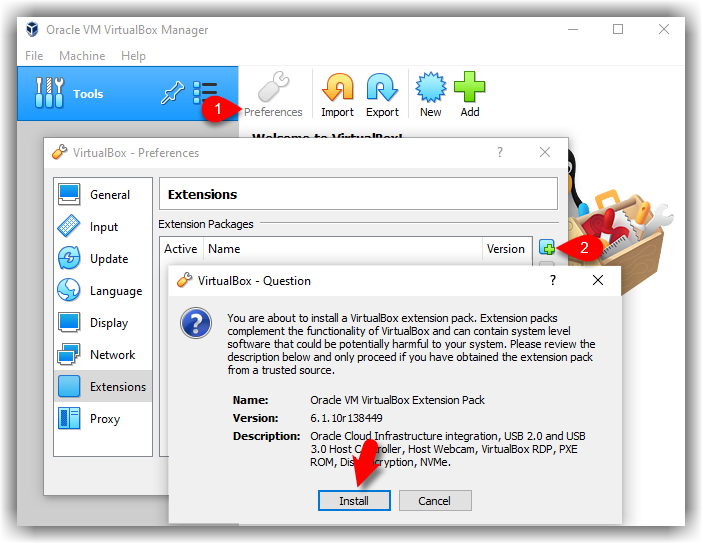
Once you’ve downloaded the Extension pack. Now, follow the steps below to update the Virtualbox extension pack.
- Open up VirtualBox, navigate to Tools>Pereferences>Extensions.
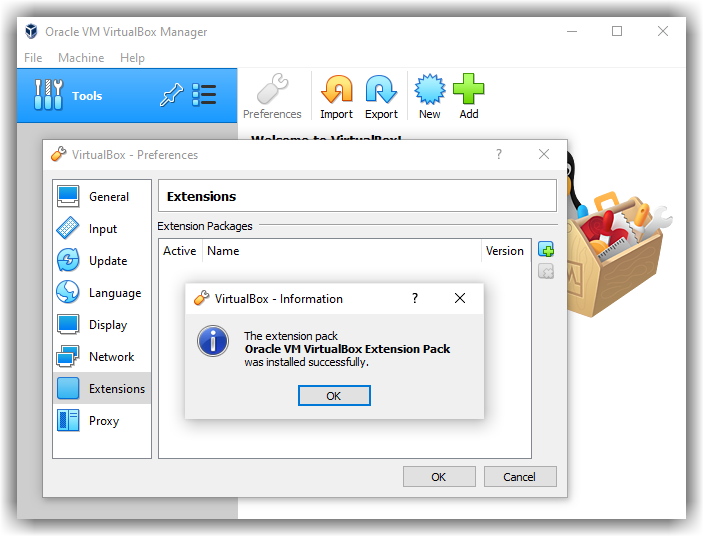
- Click on Plus (+) icon and select VirtualBox extension which you’ve downloaded at the beginning of this section. Click Install or Upgrade and then Agree to the terms and conditions. Click the OK button.
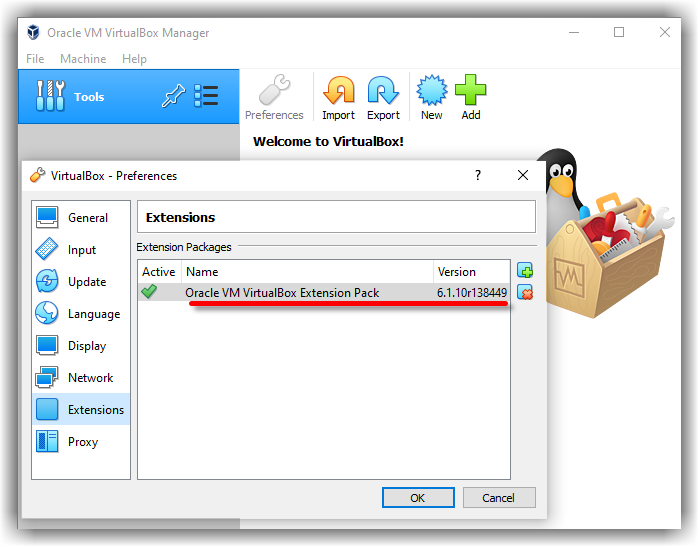
Finally, you should see something like the screenshots below.
- VirtualBox Extension Install
- Oracle VM VirtualBox Extension Pack
- Oracle VM VirtualBox Extension Pack Installed
Step 4: Create a New Virtual Machine for macOS Sierra
After installing VirtualBox, now you will need to create a new virtual machine on Virtualbox. Creating a virtual machine for macOS Sierra is kind of the same as you create a VM for the Windows Operating system or Linux but with some minor changes. In this post, I’ll outline those changes. Follow the steps below to create a new virtual machine for macOS Sierra using the VMDK file.
-
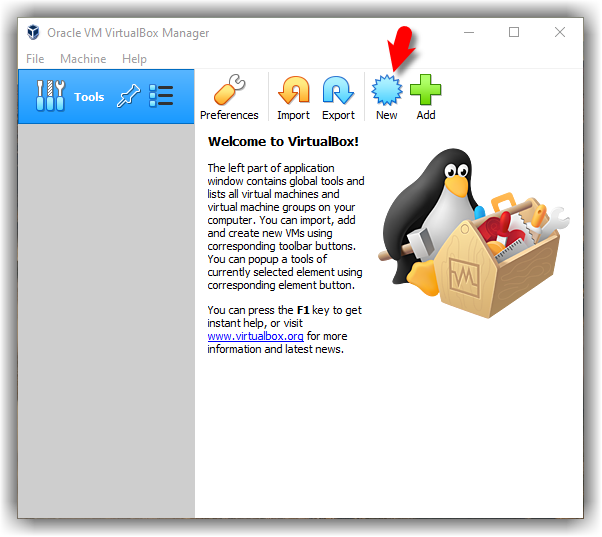
- Open up your VirtualBox application and click New.
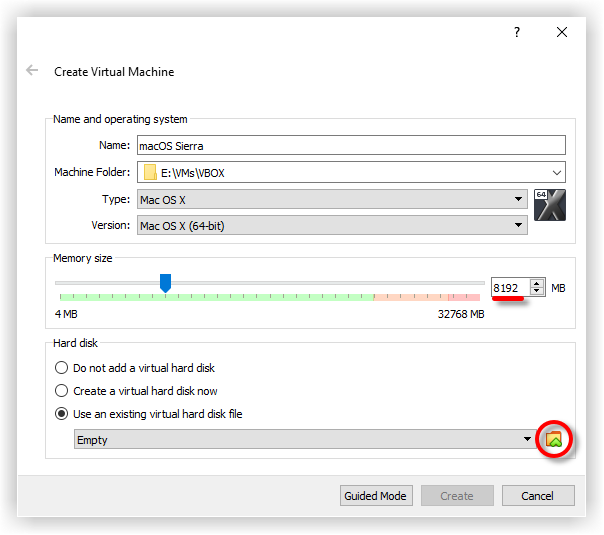
- Click Expert Mode and select the following options then click Create.
- Type a suitable Virtual Machine Name.
- Virtual Machine Location (a separate drive is recommended).
- Type (Mac OS X).
- Version (Mac OS X 64-bit).
- Memory 4 GB (recommended 8 GB or higher).
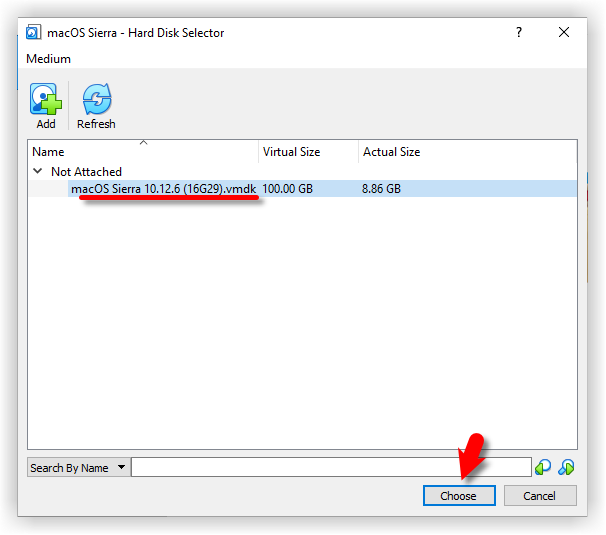
- Hard Disk: Select Use an existing virtual machine hard disk file. Click on the Folder icon to browse the macOS Sierra VMDK file.
- Click Add and select the Sierra VMDK image
- Use An Existing macOS Sierra Virtual Hard Disk
- Attach macOS Sierra VMKD Image
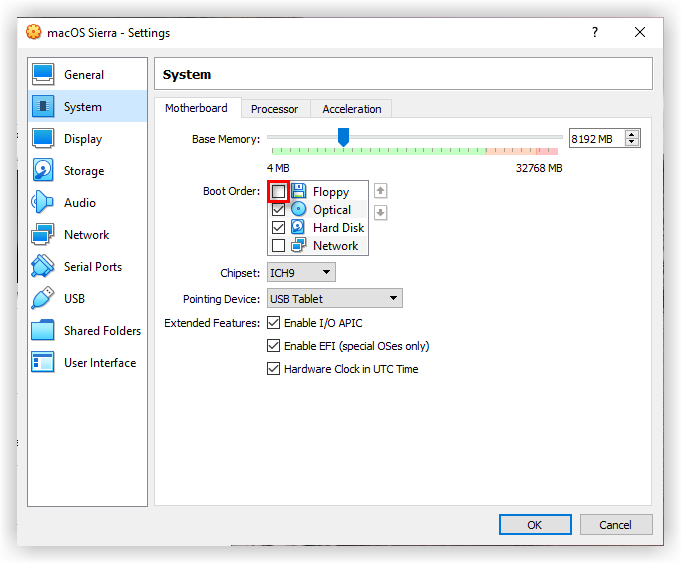
- It’s time to edit the virtual machine to make it works. Select macOS Sierra VM and click on Settings. Now, bring the following changes to macOS Sierra VM.
- Under System>Motherboard, increase the Base Memory to 10248MB. However, you can use a bit lower memory if your system doesn’t have this much RAM.
- Uncheck Floppy from the Boot Order section.
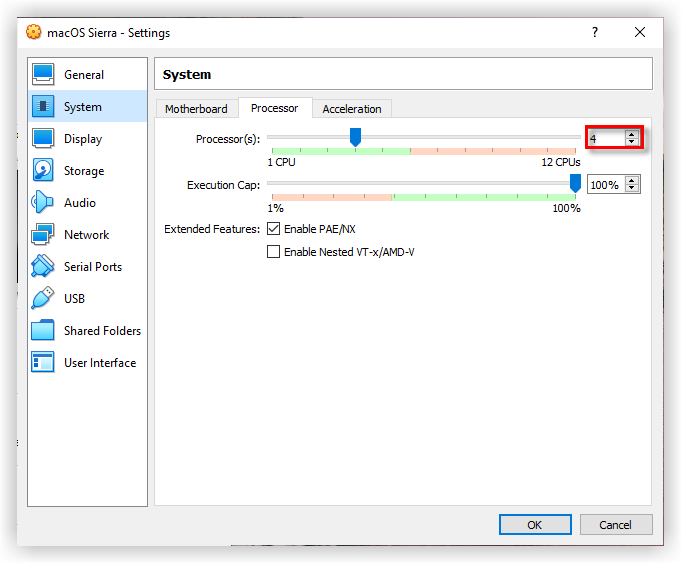
- Under the Processor tab, increase the processors to 4 or higher.
- macOS Sierra Boot Order
- macOS Sierra Processor
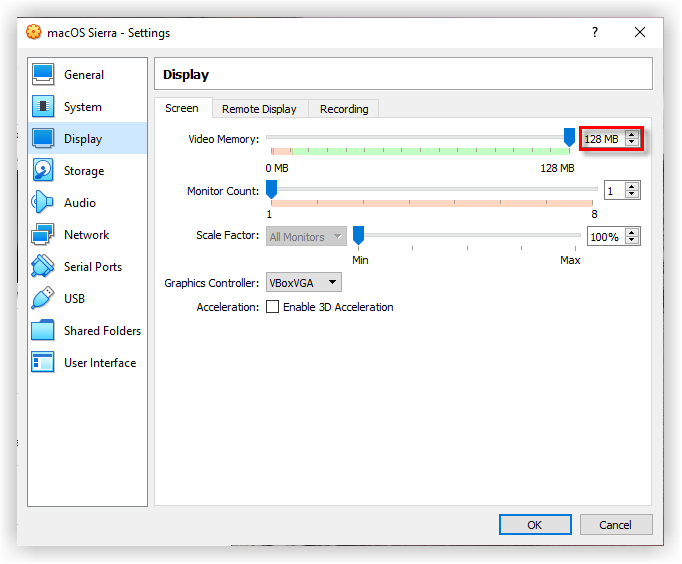
- On the Display window, increase the Video Memory to 128MB.
Step 5: Execute the VirtualBox Code
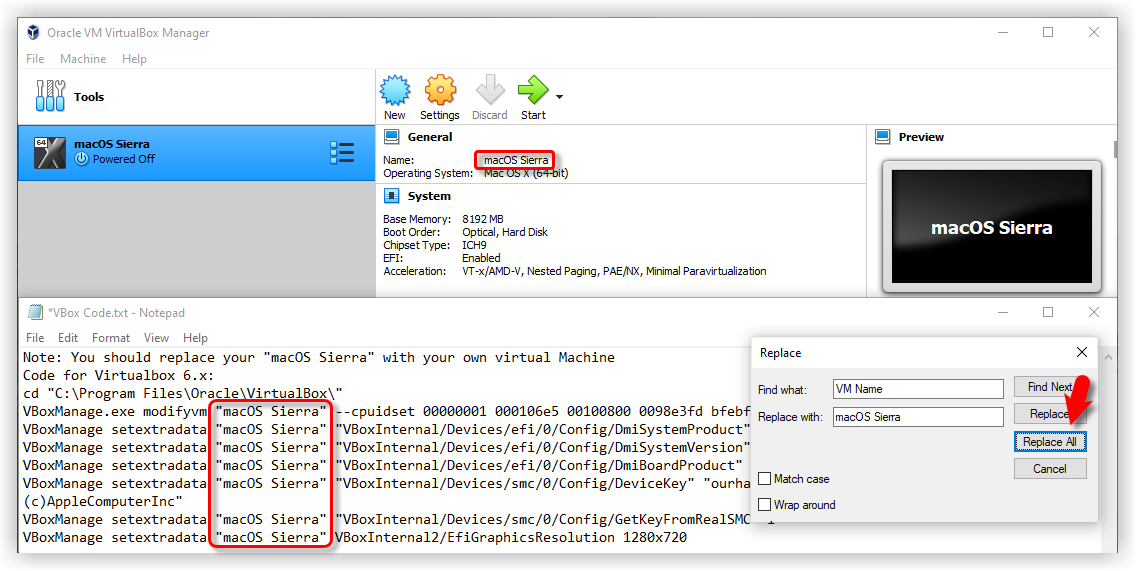
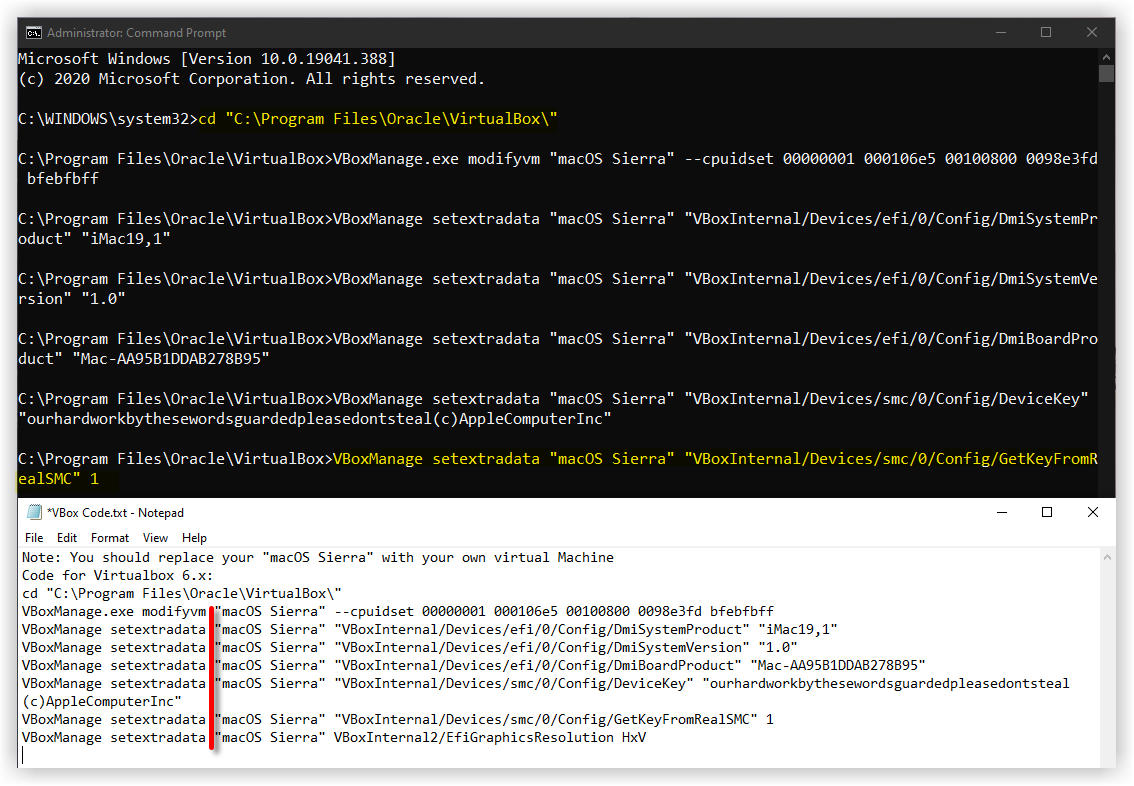
Once you’ve created and customized your virtual machine, it’s time to run some codes in order to install macOS Sierra on VirtualBox. First, you should note your virtual machine name because later on, we will use it. Open the VirtualBox code which you should have downloaded from the “Download the Prerequisites” section of this post. If you’ve not downloaded, doesn’t matter. Just use the following code.
Note: Before, you execute the code by command prompt. You should read the following steps.
cd "C:\Program Files\Oracle\VirtualBox\"
VBoxManage.exe modifyvm "VM Name" --cpuidset 00000001 000106e5 00100800 0098e3fd bfebfbff
VBoxManage setextradata "VM Name" "VBoxInternal/Devices/efi/0/Config/DmiSystemProduct" "iMac19,1"
VBoxManage setextradata "VM Name" "VBoxInternal/Devices/efi/0/Config/DmiSystemVersion" "1.0"
VBoxManage setextradata "VM Name" "VBoxInternal/Devices/efi/0/Config/DmiBoardProduct" "Mac-AA95B1DDAB278B95"
VBoxManage setextradata "VM Name" "VBoxInternal/Devices/smc/0/Config/DeviceKey" "ourhardworkbythesewordsguardedpleasedontsteal(c)AppleComputerInc"
VBoxManage setextradata "VM Name" "VBoxInternal/Devices/smc/0/Config/GetKeyFromRealSMC" 1- When you opened VirtualBox code via notepad or any other text editor, use the replace function of the program to Replace the “VM Name” with your virtual machine name. See the picture below to get an idea of how to do it.
- Now, you’ve two choices. First, if you want to fix your macOS Sierra screen resolution in the first place. You should also execute the following code. You have to change “VM Name” with your virtual machine name and HxV with a screen resolution such as “1280×720“. For more supported screen resolution on VirtualBox and detailed guide, visit fix macOS Catalina screen resolution on VirtualBox.
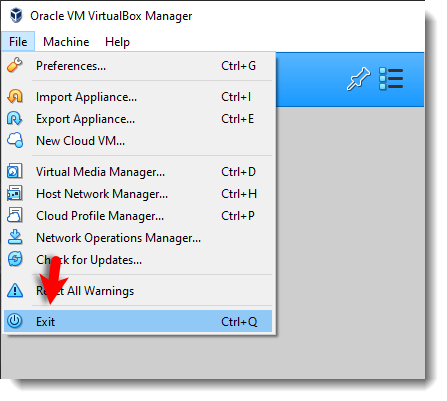
VBoxManage setextradata "VM Name" VBoxInternal2/EfiGraphicsResolution HxVImportant Note: We highly recommend to quit the VirtualBox program before executing the code. If you don’t do it, your virtual machine might not proceed to the installation step.
- Once you replaced the “VM Name” with your virtual machine name, then run the code one by one via command prompt (CMD). You can open the command prompt by pressing the Windows+X key in Windows 10 and select Command Prompt from the list. Or simply press Windows key and type CMD. Click Run As Administrator and click Yes
.
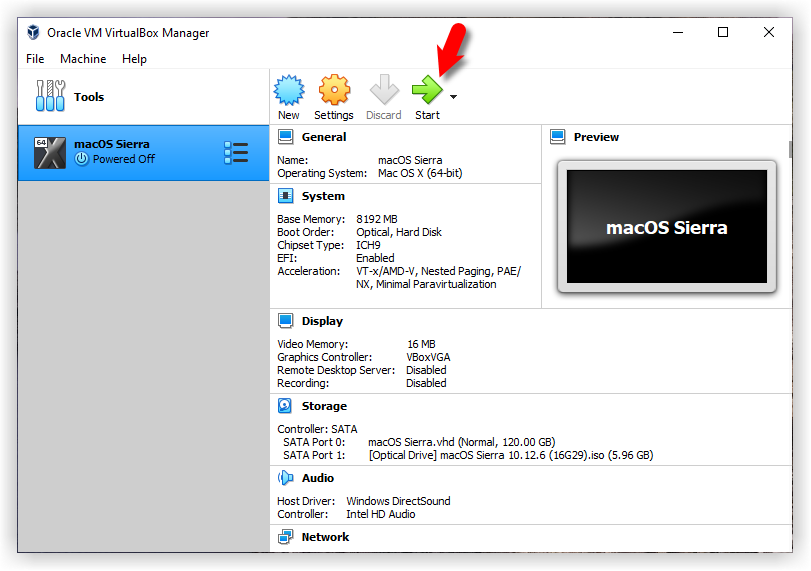
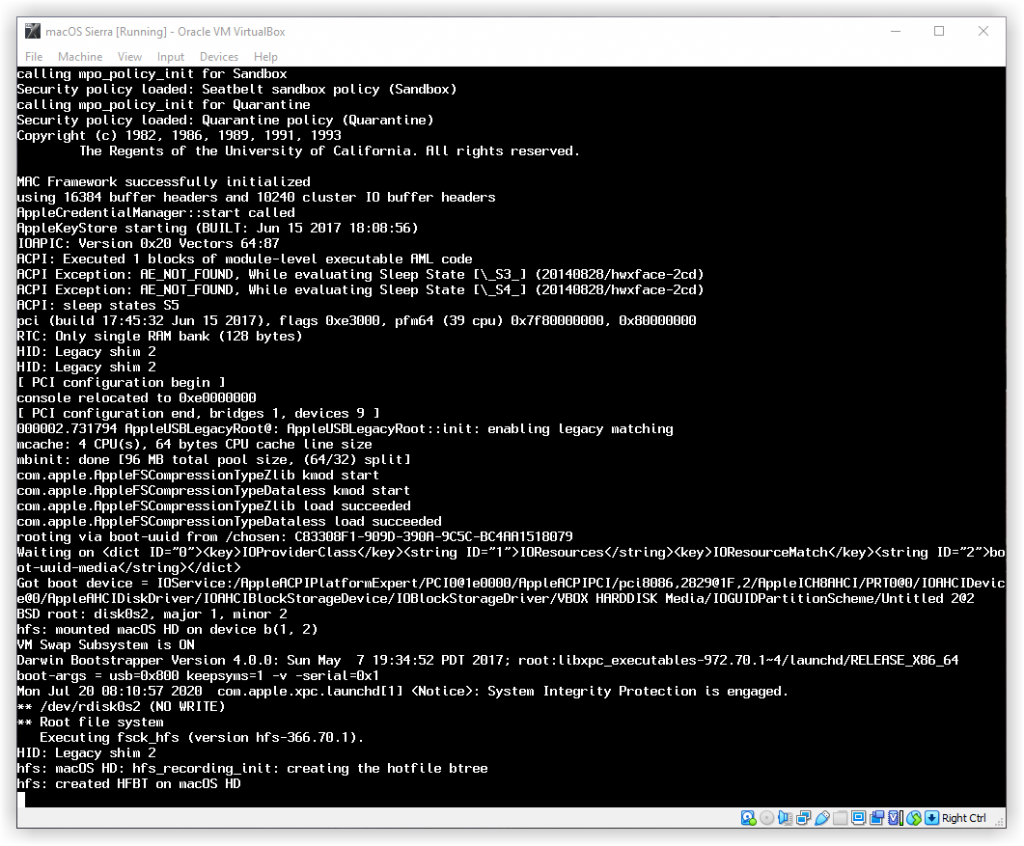
- Now, that you’ve executed the macOS Sierra VirtualBox code. Open the VirtualBox app then click the Start button to power on the VM. A black screen with a lot of white text will appear on the screen. Just wait for a few minutes and the macOS Sierra installation will start.
- Start the macOS Sierra VM
- Loading macOS Sierra
Step 6: Perform a Clean Installation of macOS Sierra
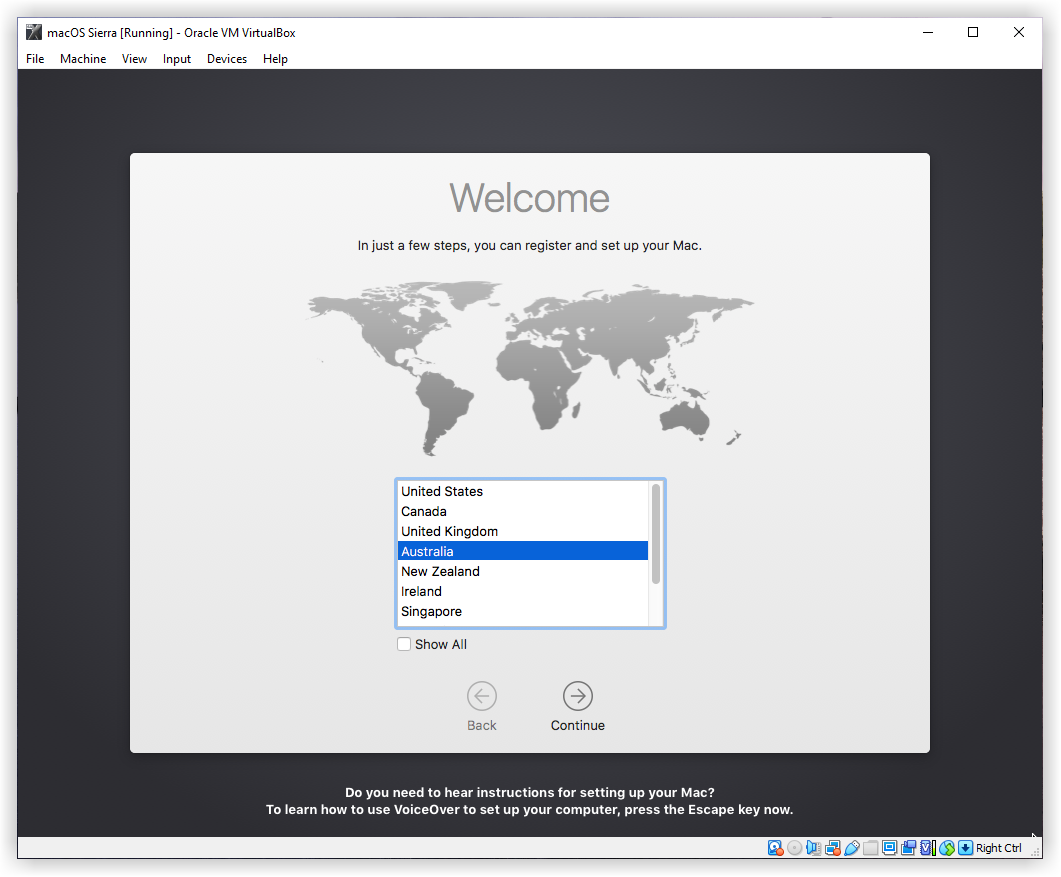
Once you hit enter, a whole bunch of code will run on the screen, but you should not worry about it. Wait for a few minutes, and you should see the macOS Sierra installation window. Have a cup of coffee until the installation complete. It’s going to take around 15 minutes to finish.
- Choose your Country and click on Continue.
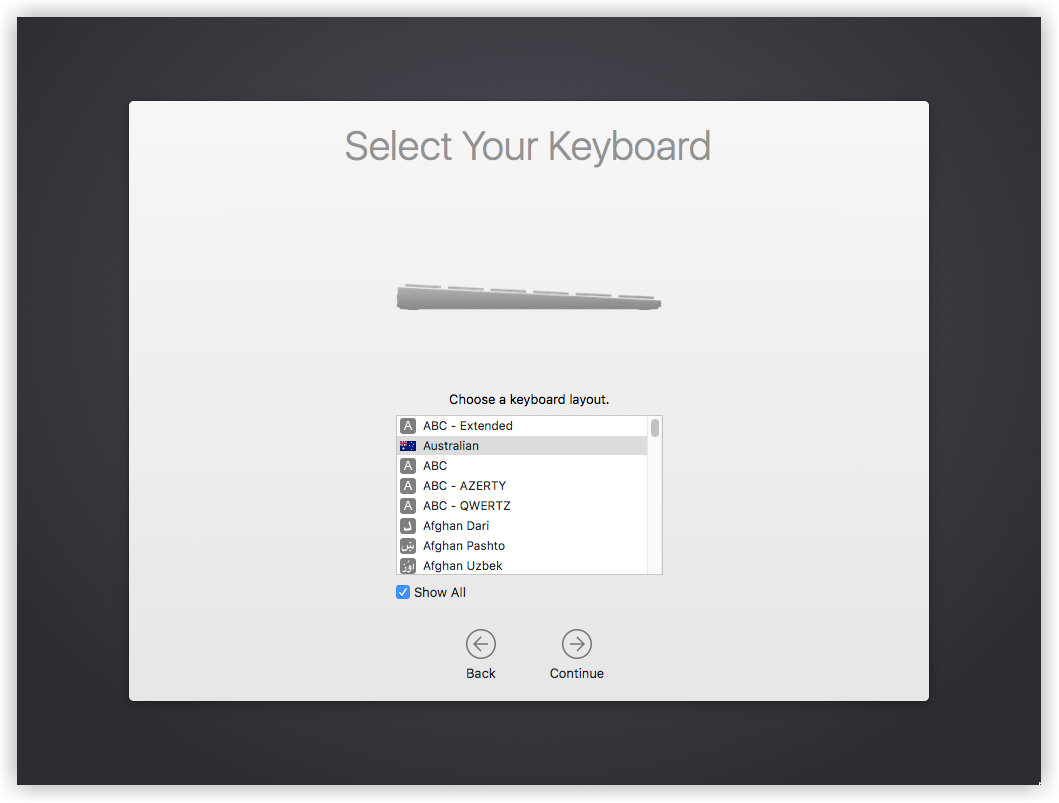
- Pick a keyboard Layout and click on Continue.
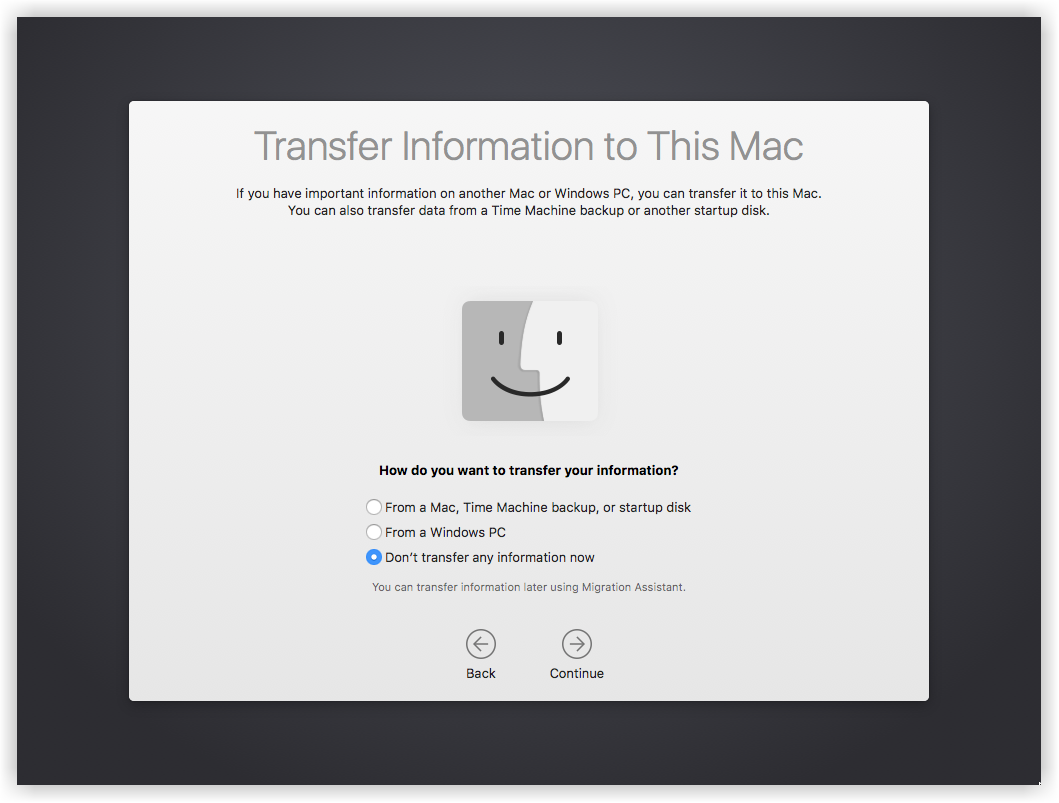
- Now, select Don’t transfer information to this Mac and click on Continue.
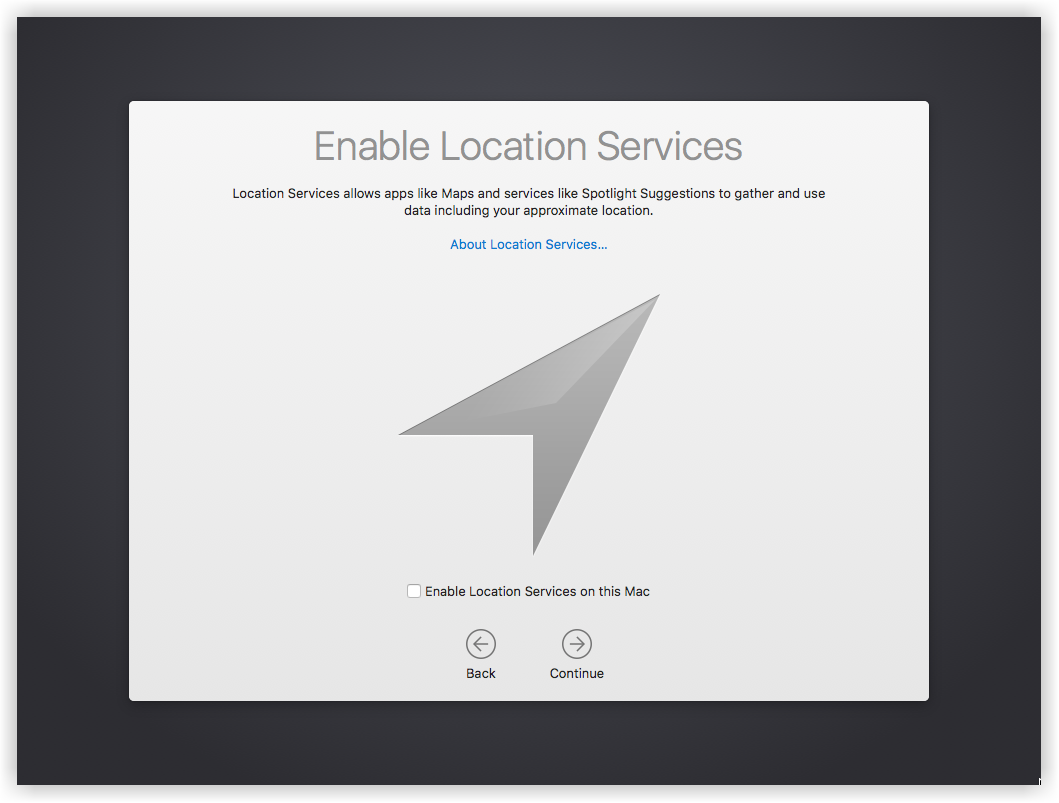
- Uncheck Enable location services and click on Continue.
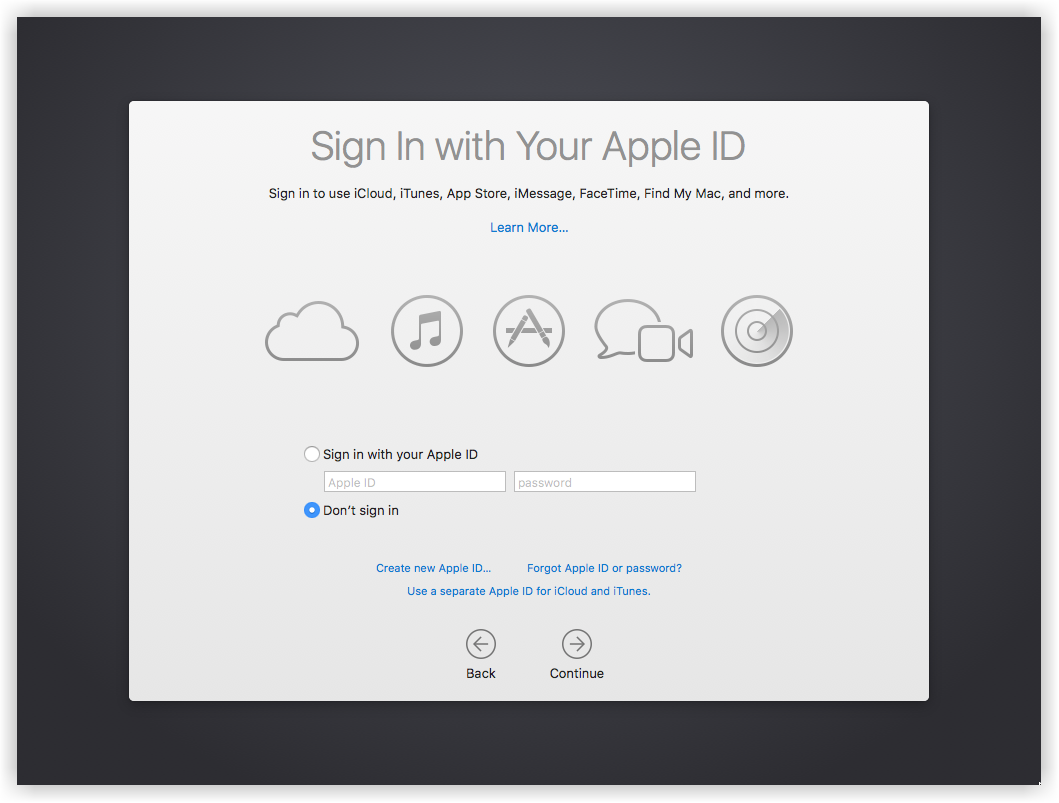
- In this step, you have to Sign in with your Apple ID. If you don’t have one, create a free Apple ID by following this article, “how to create an Apple ID on iPhone, iPad or iPod Touch”. We recommend to not log in with your Apple ID at this point. Just select Don’t Sign in and click on Continue and Skip.
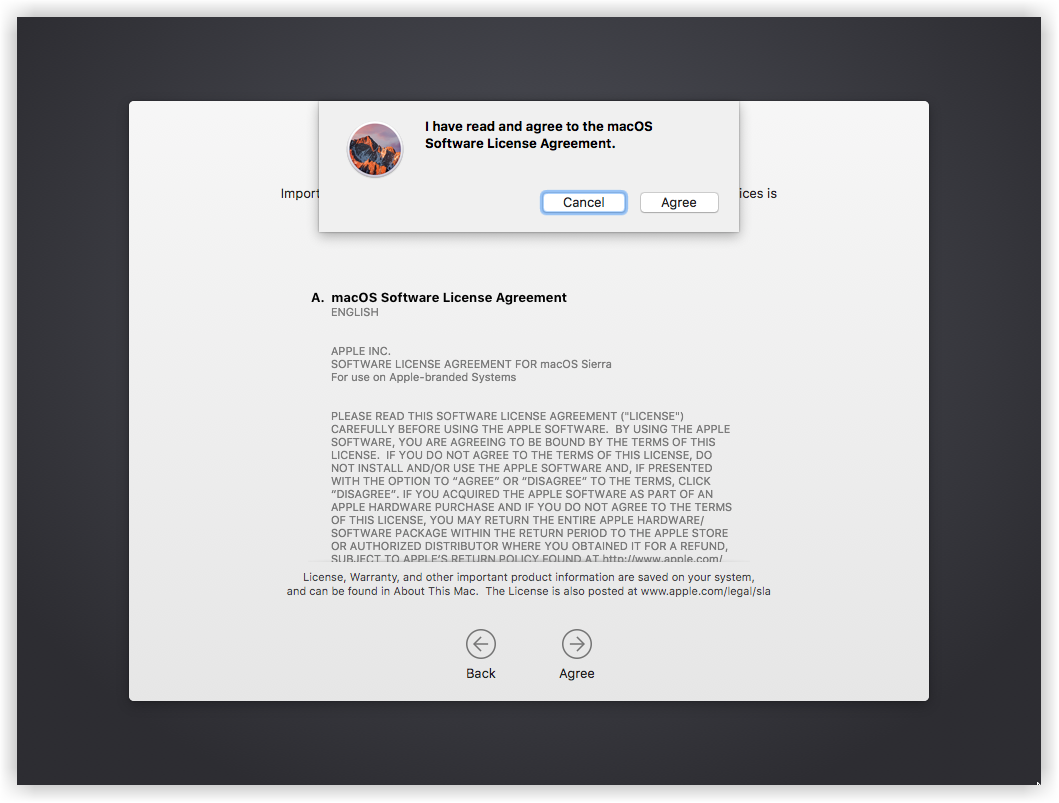
- Agree to the Terms and Conditions.
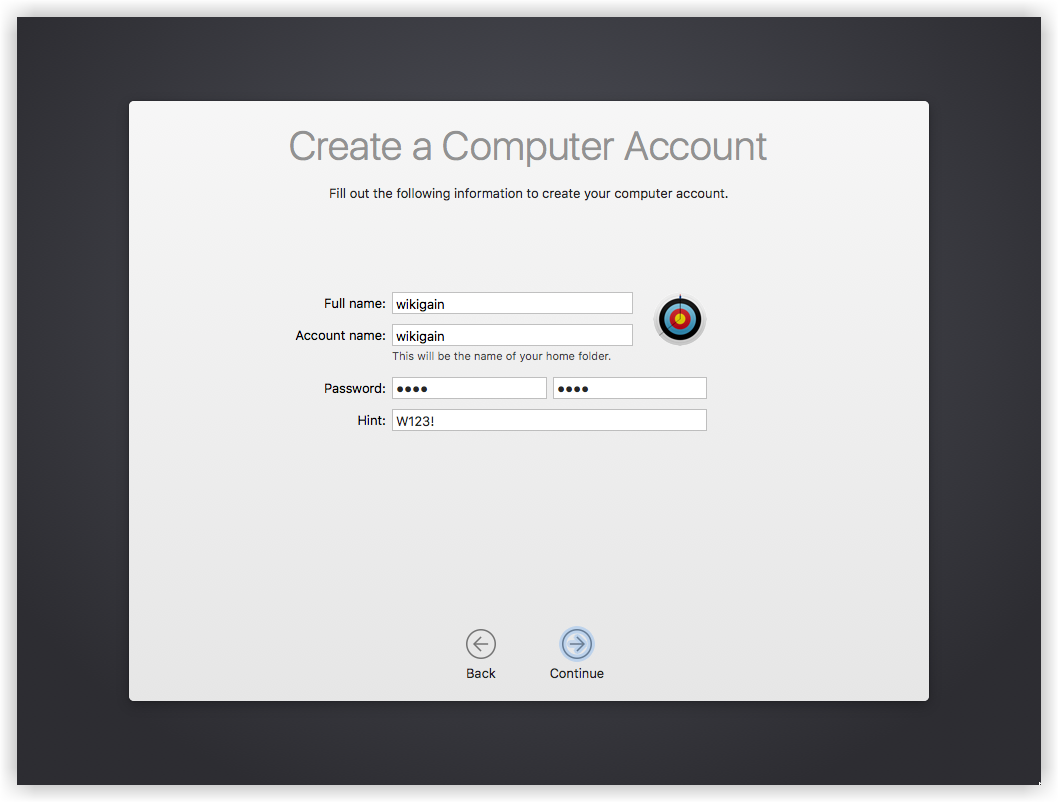
- Fill out the Full name, Account name, Password, Hint, and click Continue to create your user account for macOS Sierra.
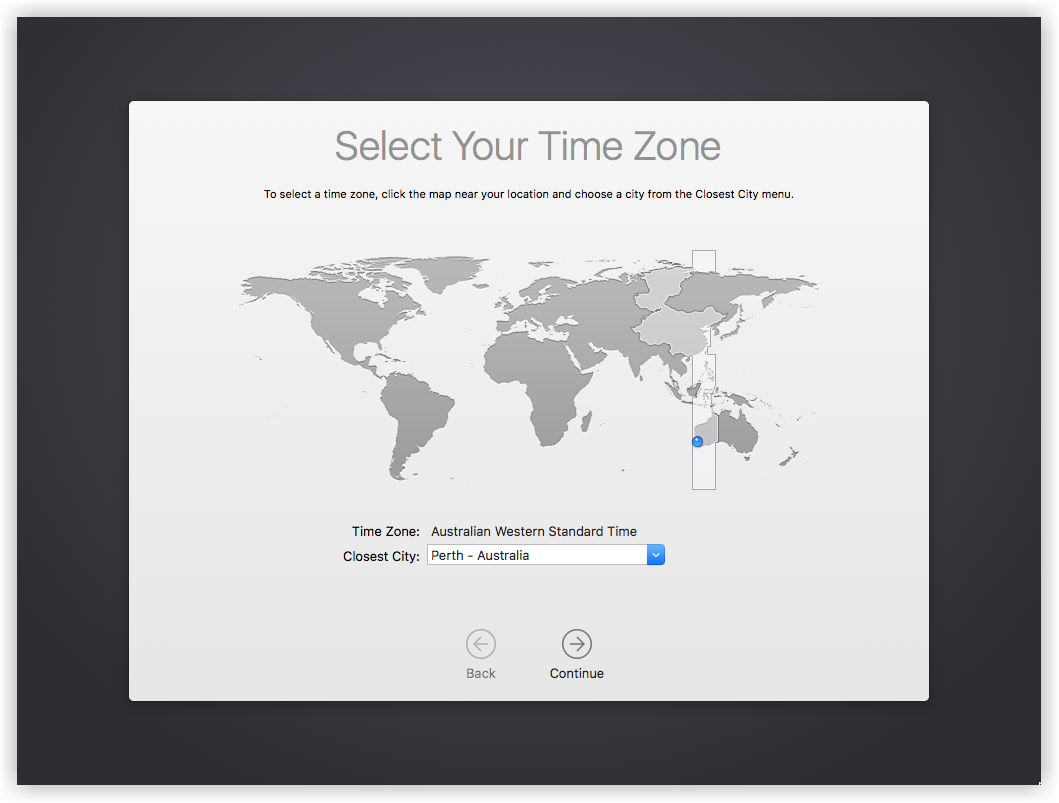
- Select your time zone and click Continue
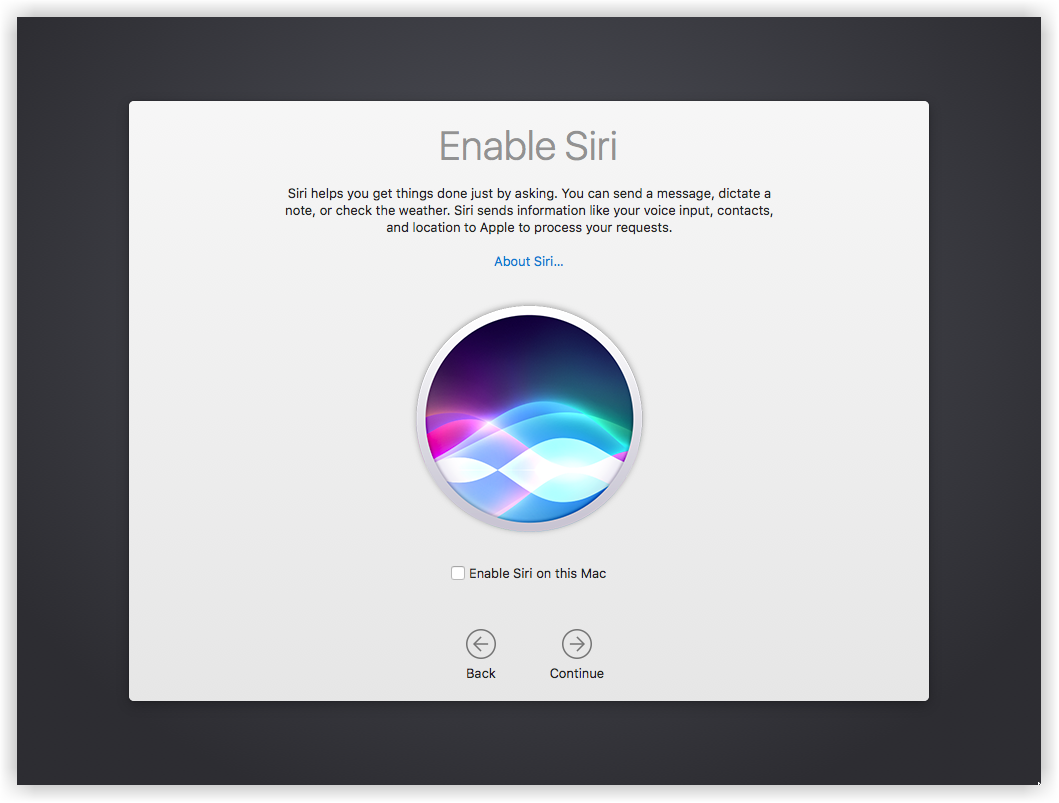
- Select the options for Diagnostics & Usage and click on Continue. Don’t set up Siri at this point.
- Wait a little while to Setting Up Your Mac. Then it will run on the desktop of the macOS Sierra.
Important: For any kind of error while installing Mac OS X El Capitan and macOS Sierra visit this article.
Step 7: Update macOS Sierra to the Latest Version (Optional)
You should do this step if your macOS Sierra is not updated and not the latest version. So, you can update it by following the instructions below.
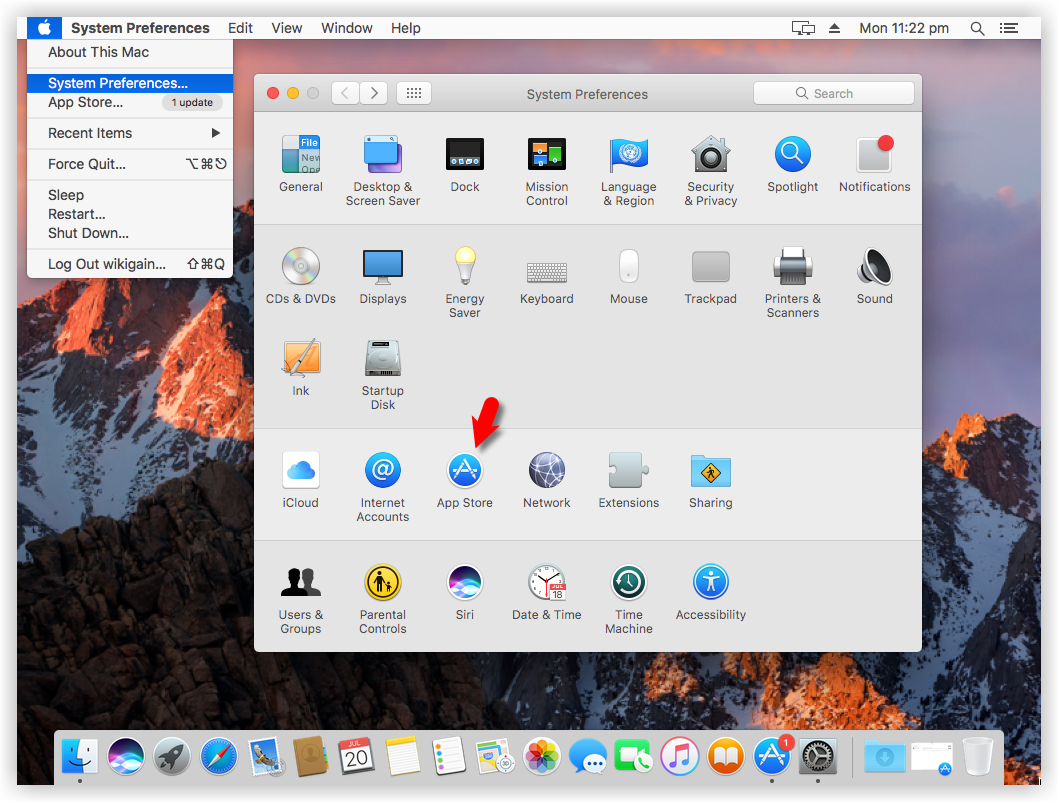
- Click on the Apple logo at the top-left corner of your screen. Select System Preferences from the list. Under System Preferences, click on the App Store.
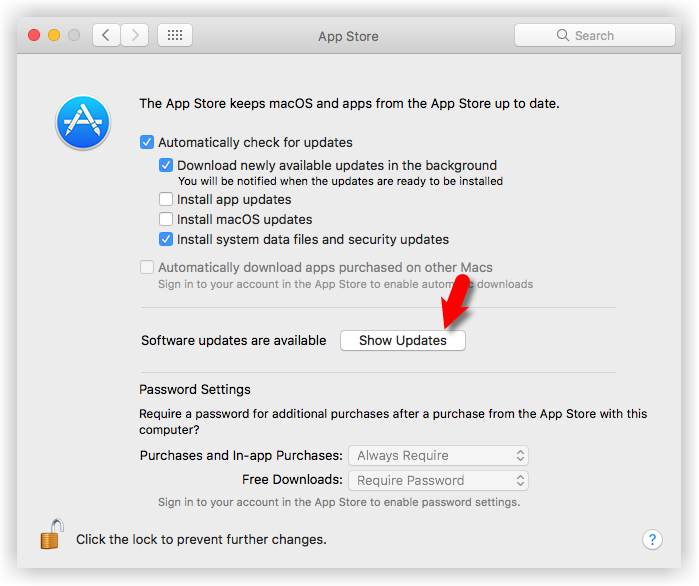
- On the App Store window, you’ll see Software Updates are available. Click Check Now/Show Updates.
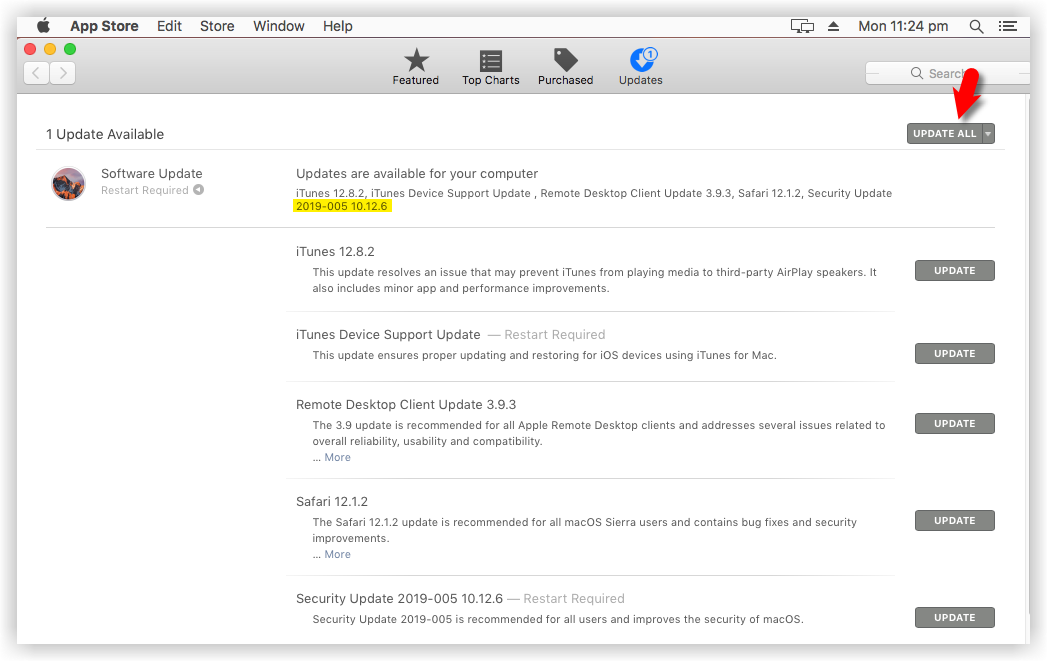
- Now, you should see different kinds of updates are available. Just click Update All. Click Download & Restart.
- Wait for couple of minutes so that the update should be installed. It might take 5-15 minutes to download all updates. However, it depends on your internet speed.
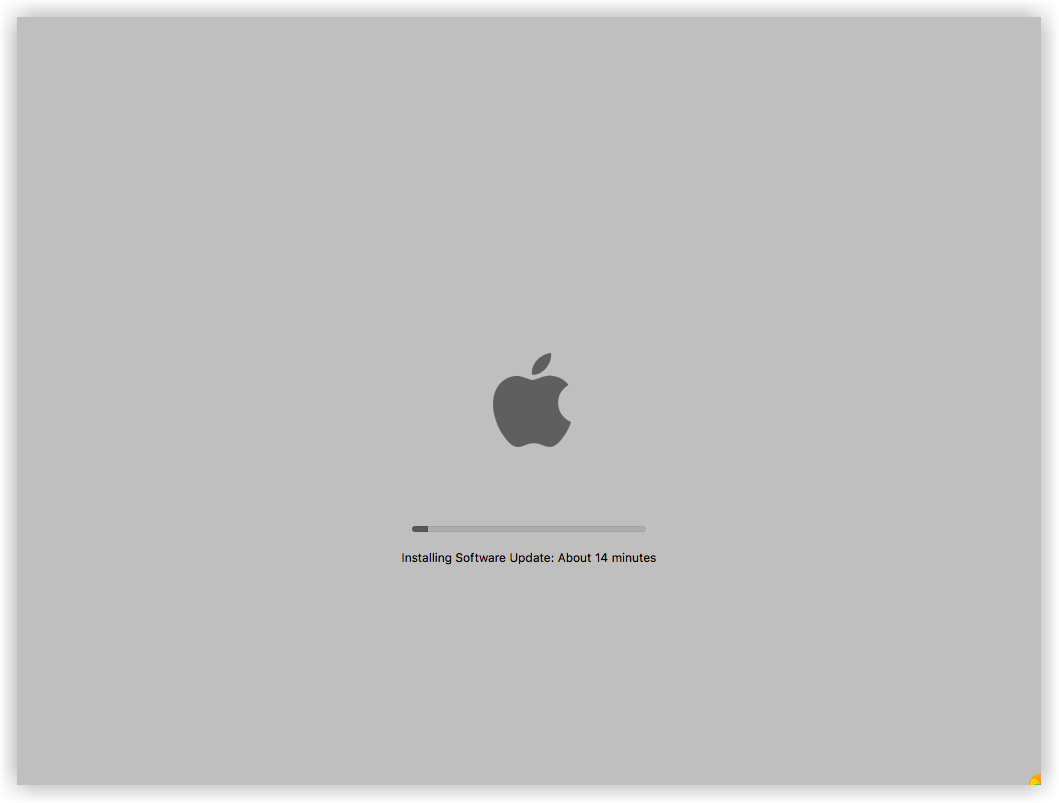
- Once the update is downloaded, your system will restart automatically. Again wait for 15-20 minutes for update installation.
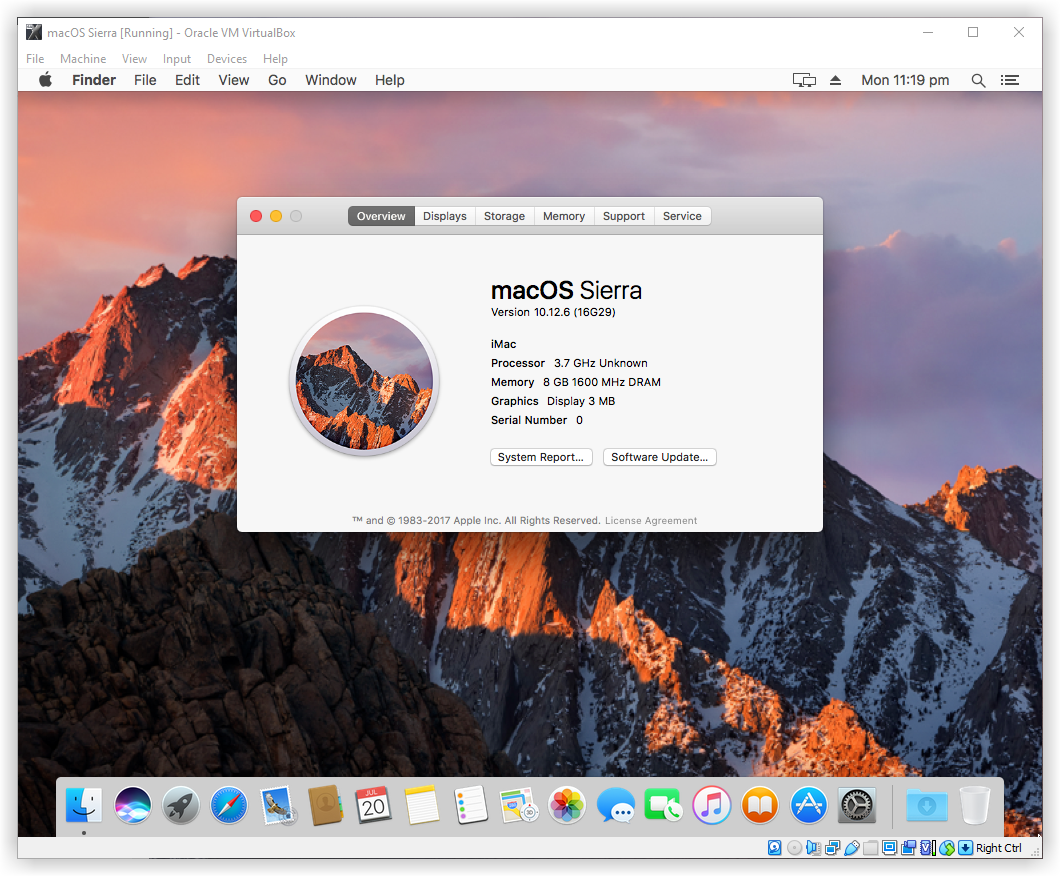
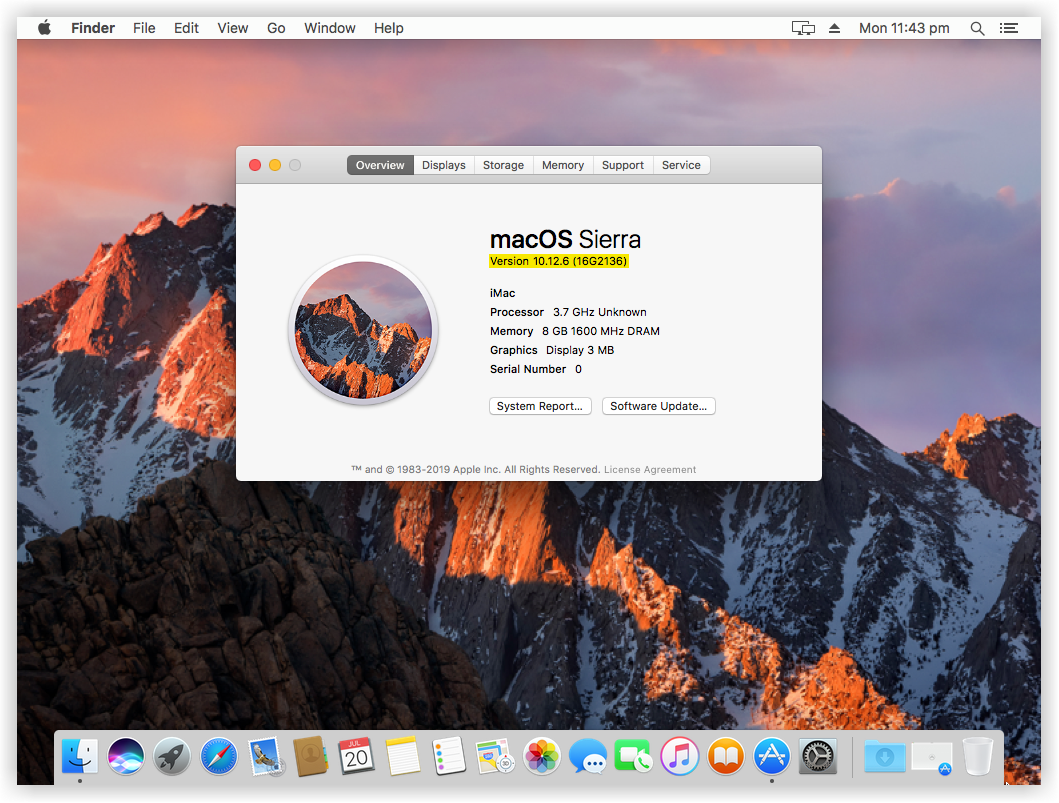
- Once the installation update process finishes, you’ll see the macOS Sierra login page. Type your user account name and password and log in. If you check our below screenshot with the one on Step #6 of this guide, the last screenshot. You can check that our macOS Sierra (16G2136) is updated to the latest version.
See Our other Useful Guides:
- Fix macOS Sierra Screen Resolution on VirtualBox
- Install macOS High Sierra on VirtualBox
- Install macOS High Sierra on PC Hackintosh 2018
- How to Install macOS Sierra on PC
- How to Dual Boot Windows 10 & macOS Sierra on PC
- Post Installation of macOS Sierra on PC
Conclusion
After performing a clean installation and Setting up your macOS Sierra then you should be able to see macOS Sierra wallpaper. In this step by step guide, I’ve covered the followings;
- Download the Prerequisites
- Install VirtualBox on Windows / PC
- Install & Update VirtualBox Extension (Optional)
- Create a New Virtual Machine for macOS Sierra
- Execute the VirtualBox Code
- Perform a Clean Installation of macOS Sierra
- Update macOS Sierra to the Latest Version (Optional)



Earning free money with download app
Click the the link and download app
https://cdnnd.com/srv.html?id=5530731&pub=2669668
You scammed me! It showed an error on boot.
First – could you move messages such as the one that says “You should exit the Virtual Box application” to be one of the FIRST things you read (instead of after you have run the batch file)? Thanks!
Here is your commands put into a single batch file which also makes it easier to use. Use it if you want. 🙂
cls
set vm_dir=C:Program FilesOracleVirtualBox
set vm_os=Mac OS X
set vm_res=1280×720
cd “%vm_dir%”
“%vm_dir%VBoxManage.exe” modifyvm “%vm_os%” –cpuidset 00000001 000106e5 00100800 0098e3fd bfebfbff
“%vm_dir%VBoxManage.exe” setextradata “%vm_os%” “VBoxInternal/Devices/efi/0/Config/DmiSystemProduct” “iMac19,1”
“%vm_dir%VBoxManage.exe” setextradata “%vm_os%” “VBoxInternal/Devices/efi/0/Config/DmiSystemVersion” “1.0”
“%vm_dir%VBoxManage.exe” setextradata “%vm_os%” “VBoxInternal/Devices/efi/0/Config/DmiBoardProduct” “Mac-AA95B1DDAB278B95”
“%vm_dir%VBoxManage.exe” setextradata “%vm_os%” “VBoxInternal/Devices/smc/0/Config/DeviceKey” “ourhardworkbythesewordsguardedpleasedontsteal(c)AppleComputerInc”
“%vm_dir%VBoxManage.exe” setextradata “%vm_os%” “VBoxInternal/Devices/smc/0/Config/GetKeyFromRealSMC” 1
“%vm_dir%VBoxManage.exe” setextradata “%vm_os%” VBoxInternal2/EfiGraphicsResolution %vm_res%
Have fun! Great write-up!
Yes – I know – you haven’t even said yes or no to my post – But……… I expanded on my bat file. Please replace my first one with this one if possible. Thanks! And thanks again for this write-up!
rem
rem ——————————————————————————–
rem Turn on echo so we can see everything
rem ——————————————————————————–
rem
echo on
cls
rem
rem Batch file to modify the Virtual Box program
rem
rem ——————————————————————————–
rem Batch variables used are placed here
rem ——————————————————————————–
rem
rem
rem ——————————————————————————–
rem VM_PROGRAM is where the Virtual Box resides
rem VM_OS is what the name of the folder where the Virtual Box Macintosh VBOX resides
rem VM_RES is the resolution. This is Horizontal width by (x) the Vertical width.
rem Like 1280×720 (NO SPACES)
rem ——————————————————————————–
rem
set vm_program=C:Program FilesOracleVirtualBox
set vm_os=Mac OS X
set vm_res=1280×720
rem
rem ——————————————————————————–
rem Change to where the Virtual Box program resides
rem ——————————————————————————–
rem
cd “%vm_program%”
rem
rem ——————————————————————————–
rem The set of commands that you are applying to the Virtual Box program
rem ——————————————————————————–
rem
“%vm_program%VBoxManage.exe” modifyvm “%vm_os%” –cpuidset 00000001 000106e5 00100800 0098e3fd bfebfbff
“%vm_program%VBoxManage.exe” setextradata “%vm_os%” “VBoxInternal/Devices/efi/0/Config/DmiSystemProduct” “iMac19,1”
“%vm_program%VBoxManage.exe” setextradata “%vm_os%” “VBoxInternal/Devices/efi/0/Config/DmiSystemVersion” “1.0”
“%vm_program%VBoxManage.exe” setextradata “%vm_os%” “VBoxInternal/Devices/efi/0/Config/DmiBoardProduct” “Mac-AA95B1DDAB278B95”
“%vm_program%VBoxManage.exe” setextradata “%vm_os%” “VBoxInternal/Devices/smc/0/Config/DeviceKey” “ourhardworkbythesewordsguardedpleasedontsteal(c)AppleComputerInc”
“%vm_program%VBoxManage.exe” setextradata “%vm_os%” “VBoxInternal/Devices/smc/0/Config/GetKeyFromRealSMC” 1
“%vm_program%VBoxManage.exe” setextradata “%vm_os%” VBoxInternal2/EfiGraphicsResolution %vm_res%
rem
rem ——————————————————————————–
rem Exit this batch file
rem ——————————————————————————–
rem
echo Fini!
Failed to open a session for the virtual machine macOS Sierra.
Failed to query SMC value from the host (VERR_INVALID_HANDLE).
Result Code: E_FAIL (0x80004005)
Component: ConsoleWrap
Interface: IConsole {872da645-4a9b-1727-bee2-5585105b9eed}
I got this after reinstalling everthing so that i could do it from my c: drive.
HOLY COW bat man, this isn’t your grandma’s etcher install of linux. I have linux vm’s before to before just build one.
PLEASE HELP: I’m a 100% service connected force recon scout/sniper and just want to run Garageband of a mac to record some music. I can’t afford snazzy software and a more costly interface than a simple usb to 1/4 inch guitar jack
Also would be truly thankful and appreciate it more than you know. with PTSD i’m trying to find joy in life aft 13 years of wanting the final peace. I have a young family and that should be enough but it’s not. trying to find the things the man before this broken thing used to enjoy.
hello im trying this but the result is like this.
failed to load boot0001 uefi vbox cd-rom vb1-1a2b3c4d
I’m using windows 7 64 bit, I hope you can help me thank you.
I share a folder in windows host
But I do not find it in the guest system Mac Os please help me
Thanks for the amazing tutorial, a happy mac user here :)!
System: Acceleration page:
The hardware virtualization is enabled in the Acceleration section of the System page although it is not supported by the host system. It should be disabled in order to start the virtual system.
and I can’t change the value for the processor
and don’t show else version 10.6
Hello Mukhtar,
Could u please help me to rid of issue…after complete set up when black screen comes with some text its looping again again msg like..
failed to boot…something
Unquestionably imagine that that you stated. Your favourite justification appeared to
be at the internet the easiest factor to
keep in mind of. I say to you, I definitely
get annoyed whilst other folks consider issues that they just don’t understand about.
You managed to hit the nail upon the top and also defined out the whole thing without
having side-effects , folks could take a signal. Will probably be back to get more.
Thank you
what means this message
System: Acceleration page:
The hardware virtualization is enabled in the Acceleration section of the System page although it is not supported by the host system. It should be disabled in order to start the virtual system.
and I can’t change the value for the processor
and dont show else version 10.6
Thank you Mukhtar Jafari!! It worked perfectly!
Hi, I am unable to download from the GDrive link. Can you help?
Display resolution is limited to 1024*768 any suggestions???
Here is a guide for doing that.
make a copy into your own google drive and download it, works for me
Doesn’t seem to work for me. I keep getting this error, no matter how often I re-download and re-extract it, following all the steps to the letter.
Call to WHvSetupPartition failed: ERROR_SUCCESS (Last=0xc000000d/87) (VERR_NEM_VM_CREATE_FAILED).
Result Code:
E_FAIL (0x80004005)
Component:
ConsoleWrap
Interface:
IConsole {872da645-4a9b-1727-bee2-5585105b9eed}
I had a very similar error, and it was because Hyper-V had to be turned off. Read the StackOverflow post – some of the suggestions may work for you.
https://stackoverflow.com/questions/39858200/vmware-workstation-and-device-credential-guard-are-not-compatible
Hello,
I am stuck at the beginning of this process. How do I extract the image file from the macOS Sierra when the download is in pieces as rar files
Worked with some considerable effort on my part to get it to work properly, such as using registervm to get the vm recognized, and downloading a newer version of virtual box, running as admin and deactivating my antivirus, thanks!
Hello,
I have a problem when starting the system. The following text appears on the screen: bsd process name corresponding to current thread kernel_task
I’m also attaching a screenshot: https://ibb.co/DbZ6yhv
I had follow the above steps but on running my machine it will open shell only how I can switch to GUI
I have tried to run it but I always get black screen and it stays there forever. How can I fix that?
Is there anyway to install it with more hard drive space. I was wanting 500 GB of space.
i think it worked
Thanks a lot. worked for me.
In Linux Debian Buster.
The Vm Starts, shows the virtual box Logo and then goes Black. there is no text shown and after waiting for about half an hour there`s still nothing. i did everythin that was shown in the guide above and i got virtualization activated in the bios (amd Phenom II x4 925) but the vm wont show me more than the virtual box logo and then a black screen.
Works GREAT!
changed to…? i dont have the network card showed in this how-to-do, so and I dont have network in my instance. what can i do?
I’m getting this error when unzipping macOS Sierra 10.12 Files. C:\Users\Desktop\macOS Sierra 10.12 Files.rar: Checksum error in macOS Sierra 10.12 Files\macOS Sierra 10.12 by wikigain.vmdk. The file is corrupt
C:\Users\Desktop\macOS Sierra 10.12 Files.rar: Unexpected end of archive
Here is a guide that might help you in this case. https://www.wikigain.com/fix-macos-mojave-imessage-icloud-app-store-vmware/
Thanks, I’m installing. Great tutorial
Hello,
I am at the step just after entering the new code via cmd prompt, where I have to start to power up masOS Sierra. I was given a prompt instructing me to select a drive, which was defaulted to E:/, which is my cd rom drive. When it tries to start I am getting the following error:
Cannot open host device ‘E:’ for readonly access. Check the permissions of that device (VERR_ACCESS_DENIED).
AHCI: Failed to attach drive to Port1 (VERR_ACCESS_DENIED).
Is there a way to change the drive to something else?
I keep getting stuck in the startup loop and it repeats itself. I followed your instructions as best as possible. I’m running linux (kali) and I think I just need instructions adapted to that. I deleted the .exe file and ran in !/bin/sh. I don’t fully know what I’m doing with linux or virtualization for that matter. I’m learning everyday. I have every other VBox machine working (kali within a kali host, mint, windows 10, so I did manage that). Just can’t get the Sierra running on linux, stuck in the loop.
I have the problem cant get beoned the black screen.
Its starting again and again…
The Apple Page and new install never shows up…
https://imgur.com/a/cXBc6OU
hey Im getting same issue did ur issue resolved?? please help me to rid of this
on settings of VM, it is taking only 2 GB max RAM and after that i have paste the code in command its showing me this error massege
The virtual machine ‘macOS Sierra’ has terminated unexpectedly during startup with exit code 1 (0x1). More details may be available in ‘C:\Users\Administrator\VirtualBox VMs\macOS Sierra\Logs\VBoxHardening.log’.
Result Code:
E_FAIL (0x80004005)
Component:
MachineWrap
Interface:
IMachine {85cd948e-a71f-4289-281e-0ca7ad48cd89}
It seems that you don’t have enough RAM. What’s your system specification?
If anybody ever sees the following UEFI Interactive Sheel (Black Screen) when starting up the Sierra
https://imgur.com/a/zSyQf1N
Here is how you can move from here to the installation process:
1-Go to Settings -> System and then to Processor tab at last uncheck the PAE/NX checkbox.
2-Go to General -> Basic tab then select (64bits version)
3-Close VirtualBox
4-Start your VM then you should see the installation process as mentioned in this guide.
Thanks to wikigain for this helpful tutorial
You’re welcome and thank you for sharing your nice feedback with other visitors.
thank you, it worked altough i have error thats its not supported on this device :/
HI,
after adding code in CMD i am started vmbox but it is not working.
It is displaying only CLI mode with shell how can I solve this.
thanks
Follow this guide to fix your issue: https://www.wikigain.com/complete-guide-fix-virtualbox-errors-installing-mac-os-x/
I try everything I did evy step slowly and nothing
I have windows 10
this is the error https://imgur.com/a/pTF9L0v
Follow this guide to fix it: https://www.wikigain.com/fix-macos-high-sierra-error-virtualbox-installation-proccess/
Restarts over and over again. I have followed directions to a T.
Before running the code to CMD make sure you quit VB otherwise, it’ll not work properly.
For more detail visit this guide.
I’m a Windows 7 computer.
From my computer to VirtualBox
When you install a Mac
Does not my computer ever crash?
Hello – I have installed Macos High Sierra 10.13.4 in VirtualBox on my Windows 7. My goal is to run Xcode on this machine to develop a simple iPhone app. However, when I go to unzip/expand the downloaded Xcode.xip, I get an error that says “The archive can’t be expanded because the selected volume doesn’t have enough free space.” If you are able to help, it would be greatly appreciated!
Hi, it seems that your disk storage is not enough for the task that you want to do. Move your VM files to a disk/folder which has more then 100GB free disk space and then try again installing the Xcode.
Thanks, but I have the VM files saved to my C drive, which has >110GB of free space. Any other ideas?
Thanks,
Joey
Hmm.. try this, create a new disk with higher capacity and attach it to your VM from the settings then try unzip your stuff on that drive.
Can someone give me solution of error at cmd???
‘VBoxManage.exe’ is not recognized as an internal or external command,
operable program or batch file.
Get help from this article: https://www.wikigain.com/complete-guide-fix-virtualbox-errors-installing-mac-os-x/
Try going to virtual box installed directory and run the same command there.
In my system directory is C:\Program files\Oracle\Virtual box\
and not need to run command line as administrator.
Hello,
I did everything as described in tutorial and i get this:
https://imgur.com/a/uWKS45T
Please Help,
Thank you
Hey follow the video tutorial and make sure that every step is the same as the video. Also make sure to enable VT from BIOS.
Updated: The video is removed from YouTube 'Sorry for the inconvenience guys'Thank’s a lot! Great topic!!!
You’re Welcome
I read in another tutorial that when running macOS in the virtual machine there wouldn’t be any audio. I was wondering if this was the case in general using a virtual machine or does the method in this tutorial result in enabled audio in macOS?
The audio most probably is not going to work on VirtualBox Virtual Machine but it does work on VMWare.
i get this error when i add the code to CMD (The system cannot find the path specified.) any solution
nice tut however mine does a continuous bootloop i don’t even get to install it
VirtualBox 5.2.12 on host WIN10 1803 Home.
Works fine for me.
Slow as any other VML installed (Fedora, WIN10 PRO). I suspect a problem beetween win10 & VB ….
Very neat and and staigtforward install & doc.
Thank you for sharing this.
Joel whatkind of System did you chose? and did you type on the cmd the vmbox text?
Missing file “macOS Sierra 10.12 Files.part05.rar” in download link to drive.google, where i can download this path please?
The file is still there please check it once again.
what is the password of files in google drive?
The password might be http://www.wikigain.com
Thanks for this,
I have a problem unfortunately, i can’t have the internet, any suggestion ?
I am trying to run the Mac code. For starters, I do not have ‘cd “C:\Program Files\Oracle\VirtualBox\”‘, my box is saved elsewhere. I am curious if this is the correct pathway that I should use instead? (C:\ProgramData\Microsoft\Windows\Start Menu\Programs\Oracle VM VirtualBox).
Also, no matter the pathway, I keep getting this error in the cmd prompt: “[line of code].exe is not recognized as an internal or external command,
operable program or batch file.” I cannot find the .exe lines in any files on my computer. How do I find them or redownload/extract them? Thanks
Hi,
I’m running VirtualBox 5.1.34 on Ubuntu 16.04.2. Every other VM I have works very well, but when I follow your instructions I get the crash show in the picture:
https://www.dropbox.com/s/23ht0l46jncmmmg/macos-crash-sm.png?dl=0
Any suggestions? I could not find any similar issues in the postings.
Im too! Have you a solution for this? :3
It’s Called the Kernel Panic.
I Get it Too!
Thanks for the tutoriel. But when i want to install xcode i got this error “xcode can’t be installed on MacOS Sierra 10.12 by wikigain” because MacOS version 10.13 or later is required”
Upgrade your macOS Sierra to High Sierra:
Updated: The video is removed from YouTube 'Sorry for the inconvenience guys'It not work. i get guru meditation:
00:00:04.145497 VGA Sequencer (3C5): SR index 3C4:00
00:00:04.145498 SR00:03 SR01:01 SR02:0F SR03:00 SR04:0A SR05:00 SR06:00 SR07:01
00:00:04.145500 !!
00:00:04.145500 !! {vgatext}
00:00:04.145501 !!
00:00:04.145501 Not in text mode!
Just have a look at this guide: https://www.wikigain.com/fix-macos-high-sierra-error-virtualbox-installation-proccess/
Thanxs for private message. It does not work too. maybe this is problem: the host is amd not intel. All others (freebsd, linux) VM’s runs correctly. But I are seen macosx in AMD host. it was snowleopard, what runs with specially created bootup (.img file) image.
It works! Everything absolutely impeccable, network management included. Here, the key workaround (and kudos to you, Mukhtar, for putting on this point all the due emphasis) was to select “Intel PRO/1000 MT **SERVER** (82545EM)”, in place of everything else.
As I said, everything is working fine (guest: macOS 10.12 Sierra, on Fedora 27 host), except for one detail (which, unfortunately, is very annoying): the screen resolution.
Alas, here, while at least I’ve been able to get out of the 1024×768 mode (“Suitable for this screen”), I’m still stuck with the 1280×720 mode the virtual system has put itself into, as a reaction to my attempt at forcing a 1366×768 mode via ‘VBoxManage setextradata “[VM_NAME]” VBoxInternal2/EfiGopMode N’…
Any idea?
Best regards 🙂
AIR
You can fix that here: https://www.wikigain.com/fix-virtualbox-macos-high-sierra-screen-resolution-1920×1080-4k-5k/
Yes: again, IT WORKS!!
For the record I repeat that I’m running MacOS Sierra as a guest, in VirtualBox 5.2.10, under Linux Fedora 27 as its host].
It goes as follows:
1. with VirtualBox turned OFF, open a NON ADMINISTRATIVE (i.e.: non root) terminal, and check the precise name of your virtual MacOS machine with
$ VBoxManage list vms
2. Assume the answer of VirtualBox is
“MacOSX” {xxxxxxxx-yyyy-zzzz-wwww-nnnnnnnnnnnn}
(where this latter line is the hex code for the virtual disk). Then you have to input (again, in the non-root CLI)
$ VBoxManage setextradata “MacOSX” VBoxInternal2/EfiGraphicsResolution 1366×768
and, IT WORKS! When you’ll log back into your VBox-ed MacOS, you’ll finally find the screen set up to the correct 1366×768 mode.
Thank you: great job!! ✯✯✯✯✯
You’re welcome and thank you for spending your time to share this useful information with other visitors.
Hello, how to update to MacOS 10.13.*? I cannot update with app store. thanks for response.
Got problem to start a virtualBox VM of Sierra declared as MAC OS X 10.11. No problem if declared as MAC OS X 10.10. Hope this can help users
right, just to leave this clear I am unsure this will work for everyone, but this is my fix :
So I have IOS in a vm and I have been receiving this dsmos issue for sometime. I found out that reducing the number of processors ( I have 16 ) to 2 somehow ( black magic i would say ) and resetting the NVRAM on the startup I made the whole thing to work, I wish i had more in-deep information about this, i hope this works for someone out there as it did for me. cheers
Thank you for sharing your feedback
hello, in the version column below the machine name column it showing only 32 bit how to change this?
Enable Virtualization Technology from your system BIOS.
Hello, i have installed sierra and it works. i also solved the problem with the display solution. but i have one question. how can i install the sierra version from macbook? i don’t have a PC. i use a laptop
This still does not work for AMD following the extra details here or on the page that you guys keep referring to for the Guru fix. Worse, you guys won’t simply place the extra step that says to close VirtualBox so that it doesn’t waste people’s time.
Sorry for the inconvenience. We updated the article. Thanks for sharing your feedback.
Hii, thanks to your great guide on Lenovo Ideapad i5 4G laptop, I could install it successfully. I just got the update by Appstore so soon as finished configuring it. I tried installing it. I failed the next boot. It seemded due to the update. This image doesn’t allow any update further?
No, you can update to the latest version. Sometimes it gives such kind of error.
I set 128Mb in VM but inside macOS shows only3 Mb video available. what should I do?
Fix the screen resolution. Follow this Video:
Updated: The video is removed from YouTube 'Sorry for the inconvenience guys'Does not work on a Surface Pro 4. Just keeps looping through the “white on black” commands. Actually let it run overnight and finally had to kill it.
hey there I would love some help with this. I did everything you told me to do i only installed the macosserria final 1 part do i have to download the 7 parts as well? every time I start it up it shows a black screen with the words
UEFI Interactive Shell v.2.1
EDK II
UEFI v2.40 (EDK II, 0X00010000)
Mapping table
BLKO: Alias(s):
PciRoot(0x0)/Pci(0x1F,0x2)Sata(0x0,0x0,0x0)
BLK1 Alias(s):
PciRoot(0x0)/Pci(0x1F,0x2)Sata(0x0,0x0,0x0)
Press ESC in 1 seconds to skip startup.nsh or any other key to continue.
Shell>
I was confused by this too. I did a checksum on the 1 part and the 7 part, and they are the same files. Just one is separate, smaller files.
Yeah, that’s the same file and it’s for those people who have a slow internet connection. If you’ve downloaded the 7 Parts just right click on one of the part and select extract to macOS High Sierra.
Did you get it to work? I’m having this same issue
Just Enable Virtualization Technology and make sure to choose the Version “Mac OS X 64 bit”.
Hi,
I followed every steps properly (VirtualBox), even re-did twice, but still I have a Panic crash at first startup.
See: http://oi64.tinypic.com/293jb5x.jpg
Any idea what could it be?
It’s an old I7-860 system.
I’m not sure what’s the problem but you can read this guide to fix most common errors
https://www.wikigain.com/wp-admin/post.php?post=12559&action=edit
hi Mukhtar
#3. If you wish, you can add a virtual hard disk to the new machine. You can either create a new hard drive file or select one from the last or another location using the folder icon. Here, you should choose the last option “Use an existing virtual hard disk file“. Select the file and click “Create“.
this step wont work bcus I downloaded macOS 10.13.1 High Sierra.dmg and here I cant choose dmg format .
I’ve createdd that by choosing “create a vitual hard disk now” . and after that steps Command Prompt . I start the VM and Insert the dmg file . but it dont work with this error :
http://tinypic.com/view.php?pic=141td82&s=9#.Wnsat6inGUk
does not recognize the network paclade, tried all
This worked for me:
VBoxManage setextradata VBoxInternal2/EfiGraphicsResolution=”1920×1080″
VBoxManage setextradata VBoxInternal2/EfiHorizontalResolution=”1920″
VBoxManage setextradata VBoxInternal2/EfiVerticalResolution=”1080″
Great and thank you for sharing your feedback
Hi, Can you help me? I followed all the steps, but I can’t make it connect to the internet.. would you know the problem?
You can select NAT Network Adapter from VirtualBox Settings.
The operating system works, you just have to follow the steps, it is important to exit VirtualBox before executing the commands. If you have Hyper-V installed, VirtualBox does not work
You’re right. Thanks for sharing your Feedback.
Hi,
Been trying to install XCode on Sierra for the nth time on VirtualBox, but everytime it reboots, it gets stuck at “IOGraphics flags 0x43” CLI. Not sure if missing something here, but any guide to accomplish the XCode installation would be really much appreciated.
Select the Version to Mac OS X 64 bit from VirtualBox Settings
I have excatly 4gb ram but why cant i run it. it wont let me
What’s the problem dear Calvin?
Hi Mukhtar,
I have followed the exact instructions but still getting the Guru msg. shred the log files as follows. Pls help.
https://drive.google.com/drive/folders/14ua4-jrYd4rLFlB6gI_ucGw9w_FKPYg8?usp=sharing
From VirtualBox Settings select the Verison Mac OS X 64 bit.
From VirtualBox, Settings select the Verison Mac OS X 64 bit.
Great guide! I got everything to work without issues the first time setting this up, thank you. I can now, finally, start experimenting with xcode.
I might add that the only thing I miss in this guide is how to scale the guest OS screen resolution to fit my screen size. I looked around and saw that you have another guide for this here, but it should be mentioned as a footnote.
Thanks again!
Here is another guide for fixing screen resolution.
https://www.wikigain.com/fix-virtualbox-macos-high-sierra-screen-resolution-1920×1080-4k-5k/
DOnt work!!!
What’s the error?
It’s working!
Thank you for sharing your feedback.
Hello – I am getting the following error-
Failed to open a session for the virtual machine High Sierra.
Configuration error: Querying failed (VERR_CFGM_VALUE_NOT_FOUND).
Result Code: E_FAIL (0x80004005)
Component: ConsoleWrap
Interface: IConsole {872da645-4a9b-1727-bee2-5585105b9eed}
I have done all the steps you mentioned (closing VB before running the commands etc). Any idea what this cloud be?
I think You have problem with macOS Sierra VMDK file. Try to delete the old one and Re-extract then try the same method. It’s gonna work.
Worked on my HP Pavilon m6 Running windows 10 Creators Update. Also when creating Virtual Machine in Virtual Box, You can choose Mac OS 10.12 Sierra as Version. Worked beautifull. However, How do I make it go full screen please?
Thanks for sharing your feedback, here is a fix for you: https://www.wikigain.com/fix-macos-high-sierra-screen-resolution-virtualbox/
Everything Working! Just used this tutorial to install on Microsoft Surface tablet. I can’t get iMessage working though, it says “failed to authenticate” when I try to log in. I’m sure this is because I’m running Mac on VM and my apple serial at this point is ‘0’, but is there any possible workaround for this?? Either way, thank you for constructing this tutorial. Also, after getting to installation screen, it was giving me error not enough space. Clicking on the disk utility and partitioning/erasing drive resolved this.
Thank dear for sharing your feedback. Currently, there is no fix for the iMessage and Facetime issue on VirtualBox.
Hi !
First of all thanks for this it worked perfect for me !
I have a little question : is it possible to have a better resolution ? I only have 1024 x 768 on the mac settings
Thanks !!!
Thanks for sharing your feedback dear James and here is a fix for you: https://www.wikigain.com/fix-macos-sierra-screen-resolution-virtualbox/
Video tutorial:
Updated: The video is removed from YouTube 'Sorry for the inconvenience guys'Thanks, and well done. This worked for me first time.
Welcome. If you apply this steps exactly, I’m sure it’s gonna work well.
Hello
I have carefully followed your steps and then read some of ppl’s problems listed above, but noone had mine’s problem.
When I launch VM, I have “Virtual box – Guru Meditation” error – “A critical error has occurred while running the virtual machine and the machine execution has stopped” window appears.
When I study log, a first line with [ERROR] header mentions extension pack: “No extension pack by the name ‘Oracle VM VirtualBox Extension Pack’ was found”
I have downloaded and installed Oracle extension pack and the same error appears.
I have tried on both Virtual Box 5.2 and 5.1.30 with the same result.
Any help would be appreciated 🙂
No need to install extensions or something like that. For guru meditation error just quit VBox before adding the code to cmd then run the code. If this method does not work just select the version Mac OS X 64 and try again.
those steps working with me and I installed macOS ok, but after use the system for about 3 min. find OS freeze, so i have to end task and open Vbox again and run, so any help ?
Increase the RAM
Dear Wikigain,
Thanks for taking time to post this well-structured tutorial for installing macOS on a Virtual Machine.
I have only 1 question before trying it out myself.
Is step 5, where you input the configuration code in CMD, going to interfere with my other Virtual Machines installed ? (Linux Ubuntu and Debian)
It’ll not interfere your other Virtual Machine. The advantages of VMware or VirtualBox is the same.
Thanks for great instructions. Like others, I couldn’t get it to work on virtualbox 5.2 but it works well on 5.1.30.
One question though – I’m having a problem getting the virtual machine to recognise my iphone, despite installing the virtualbox extension pack and iphone nominally being ‘passed through’ via the virtualbox ‘devices’ tab. I’ve tried uninstalling the windows usb drivers (which then enables the iphone to be seen in the guest (via about this mac/system report)) but it doesn’t show up in xcode or itunes. Any suggestion? Many thx
Hello! I successfully got Sierra running, but it is very low resolution and extremely laggy. How can I fix this? Thanks!
Follow this guide
Awesome thanks! How would I fix the severe lag problem? The mouse lags far behind my real mouse. Thanks!
Hi,
thanks for the instructions, but I when I try to boot to install, I just get a black screen. I don’t even get to the welcome page. I followed the instructions exactly and additionally played around with assigning more CPUs, changing the chipsets settings – but no luck. I noticed that some people here reported the same problem. Is it because I have an old AMD Phenom II X4 955 BE Quad-Core Processor , and if so, is there a workaround? . I desperately need to make this work. Thanks!
This method work on some of the AMD system as well. Did you quit VirtualBox before adding the code to the CMD?
Hi, I’m on Virtual Box 5.2 and it when I try to run the machine, it shows
https://gyazo.com/2892be251716ab544552d135d30209b8
Follow this guide
https://www.wikigain.com/fix-macos-high-sierra-error-virtualbox-installation-proccess/
Some of our visitor says “Does not work on VirtualBox 5.2, use 5.1.30 instead“.
I am at the point where you start putting in the CMDs on Windows to alter the VM. When I go to paste in the line after you cd into the directory, I get the following 3 error lines.
VBoxManage.exe: error: Could not find a registered machine named ‘High Sierra’
VBoxManage.exe: error: Details: code VBOX_E_OBJECT_NOT_FOUND (0x80bb0001), component VirtualBoxWrap, interface IVirtualBox, callee IUnknown
VBoxManage.exe: error: Context: “FindMachine(Bstr(a->argv[0]).raw(), machine.asOutParam())” at line 512 of file VBoxManageModifyVM.cpp
Change the VM name in the code. The code VM name and Virtual Machine Name should be the same.
Hey, I’m on Arch Linux and changed the VirtualBox code file to run on bash, and it definitely changed the VM extra data, but on boot it says This version of Mac OS X is not supported on this platform! Reason: Iloveapple.
Maybe it’s an incorrect board product data setting, I set it to iMac11,3 and it said the same but the reason was iMac11,3.
Windows 10
Core i7
The core problem of loop boot (incorrect key : 00000000000000000000*******Dont_Steal_MacOS.cpp:219”) is you don’t run code in CMD correctly.
How to fix:
Do Step4.
Close VirtualBox
Open Task Manager (Ctrl Shilf Esc)
Kill all process of VirtualBox Manager, VirtualBox Interface
Open the Command Prompt (CMD) in Administrator.
Run Code in Step5.
These things are being told in the guide as well but the people do not read the article carefully but again thank dear Lockevn for sharing your nice feedback.
Hello here,
I’ve seen that people already ask for this problem but NO solution has been given for it so I will ask again :
I have this error after all steps and even if i retry all steps a millions times perfectly, I always get the same error :
Failed to open a session for the virtual machine macOS.
Configuration error: Querying “UUID” failed (VERR_CFGM_VALUE_NOT_FOUND).
Code d’erreur :
E_FAIL (0x80004005)
Composant :
ConsoleWrap
Interface :
IConsole {872da645-4a9b-1727-bee2-5585105b9eed}
Follow this guide: https://www.wikigain.com/fix-macos-high-sierra-screen-resolution-virtualbox/
hello,
I have an issue i’ve done all steps ask many times restart them and always finishing with the same error message when i’m suposed to have finish i launch the vm MACOS and then i get that :
Failed to open a session for the virtual machine macOS.
Configuration error: Querying “UUID” failed (VERR_CFGM_VALUE_NOT_FOUND).
Code d’erreur :
E_FAIL (0x80004005)
Composant :
ConsoleWrap
Interface :
IConsole {872da645-4a9b-1727-bee2-5585105b9eed}
Hi,
You can follow this guide to fix all your problem: https://www.wikigain.com/fix-macos-high-sierra-screen-resolution-virtualbox/
I confirm AMD FX-8350 doesnt work with this setup. The same setup works without any tricks on a celeron machine with 2GB memory and 1 core. You could include the info that AMD FX is not supported rather than say everybody should test it themselves.
That’s good thanks for sharing your feedback.
Close VirtualBox, and execute paso #5
I went thru this rather long thread and tried about everything including the “complete” guide to fix things. Somebody said that it doesnt work with AMD FX and that might be the case with me too. I get guru meditation everytime, sometimes with “error allocation 0x14b6 pages….” or 0x800 pages followed by error loading kernel cache 0x9
This is the latest article that we published on our website to help you guys fix your problem.
https://www.wikigain.com/fix-macos-high-sierra-error-virtualbox-installation-proccess/
Hi, I followed your installation but I get the following error msg :
– waiting for DSMOS…
– HID: legacy shim 2
– unexpexted session: 100000 uid: -1 requested by: 31
– AppleKeyStore: operation failed (pid: 31 sel: 7 ret: ‘e00002c2 ‘-536870206’)
and then after some more lines it reboots again, and again, and again…
pls help 😉
Hello dear,
Please follow this guide to fix your issue. https://www.wikigain.com/fix-macos-high-sierra-error-virtualbox-installation-proccess/
I have noticed you don’t monetize your site, don’t waste your traffic, you can earn extra bucks every month because you’ve got high quality content.
If you want to know how to make extra bucks, search for: Mrdalekjd methods for
$$$
Hello from colombia
I’m really frustated because i need install whatever version of mac OS X but with unlucky for me still not working
I’m sure that this tutorial is the best
Some info of my PC base system:
– AMD FX(tm)-6300 Six-Core Processor 3500 Mhz
– RAM 8GB
– SSD 1 TB
– virtualbox Versión 5.1.28
Error:
– guru-meditation
log (i dont know if this help)
00:00:03.965977 EHCI: Hardware reset
00:00:03.966025 EHCI: USB Operational
00:00:04.122631 EFI: Adding variable 8be4df61-93ca-11d2-aa0d-00e098032b8c::’Boot0000′ fAttrib=0x7 cbValue=0xb2
00:00:04.122994 EFI: Adding variable 8be4df61-93ca-11d2-aa0d-00e098032b8c::’BootOrder’ fAttrib=0x7 cbValue=0x2
00:00:04.137182 EFI: Replacing variable 8be4df61-93ca-11d2-aa0d-00e098032b8c::’BootOrder’ fAttrib=0x7 cbValue=0x2
00:00:04.142736 EFI: Adding variable 8be4df61-93ca-11d2-aa0d-00e098032b8c::’Boot0001′ fAttrib=0x7 cbValue=0x42
00:00:04.143009 EFI: Replacing variable 8be4df61-93ca-11d2-aa0d-00e098032b8c::’BootOrder’ fAttrib=0x7 cbValue=0x4
00:00:04.150049 EFI: Adding variable 8be4df61-93ca-11d2-aa0d-00e098032b8c::’Boot0002′ fAttrib=0x7 cbValue=0x44
00:00:04.150319 EFI: Replacing variable 8be4df61-93ca-11d2-aa0d-00e098032b8c::’BootOrder’ fAttrib=0x7 cbValue=0x6
00:00:04.160067 EFI: Adding variable 8be4df61-93ca-11d2-aa0d-00e098032b8c::’Boot0003′ fAttrib=0x7 cbValue=0x5c
00:00:04.160498 EFI: Replacing variable 8be4df61-93ca-11d2-aa0d-00e098032b8c::’BootOrder’ fAttrib=0x7 cbValue=0x8
00:00:04.212278 EFI: Adding variable 8be4df61-93ca-11d2-aa0d-00e098032b8c::’BootCurrent’ fAttrib=0x6 cbValue=0x2
00:00:04.213807 EFI: Adding variable 4c19049f-4137-4dd3-9c10-8b97a83ffdfa::’MemoryTypeInformation’ fAttrib=0x3 cbValue=0x40
00:00:04.274849 EFI: VBoxDbg> loadimage64 ‘.efi’ 0x7ebf3000 LB 0x8d000
00:00:04.276807 EFI: Adding variable 4d1ede05-38c7-4a6a-9cc6-4bcca8b38c14::’ROM’ fAttrib=0x6 cbValue=0x6
00:00:04.279718 EFI: Adding variable 4d1ede05-38c7-4a6a-9cc6-4bcca8b38c14::’MLB’ fAttrib=0x6 cbValue=0x182
00:00:05.853880 EFI: Adding variable 7c436110-ab2a-4bbb-a880-fe41995c9f82::’platform-uuid’ fAttrib=0x7 cbValue=0x10
00:00:05.857818 EHCI: USB Suspended
00:00:05.857860 EHCI: Hardware reset
00:00:05.860328 IEM: wrmsr(0x8b,0x0`00000000) -> #GP(0)
00:00:05.860398 Changing the VM state from ‘RUNNING’ to ‘GURU_MEDITATION’
thank for your help
You may check once the following settings.
Set up your CPU Core: 1-2, VRAM: 128 MB. Change Chipset to PIIX3 or IHC9
If it works please let us know. Because we want to create an article regarding this issue and other problems
Thanks for this tutorial, it’s work ! 🙂
But I have crashes when I empty the trash or I remove dock icon ! Image is fixed and the mouse does not respond.
Your mouse is not working or the problem is with trash I did get you dear sorry.
Worked like a charm, just follow the steps as mentioned, many thanks
That’s great and thanks for sharing your feedback.
Hello,
Is there any chance that we can update OS to the 10.12.6 version? I was able to download the update from the AppStore but after the restart of the machine I am still on the older version and the update is still available to install.
Upgrade to the final version which is High Sierra 10.13.0
The guide will be updated soon on wikigain.com
This method don’t run with AMD systems ?
It works on some of the AMD systems as well.
For those with Guru error -> go to Settings -> General -> and set version to Mac OS X (64-bit)
For those with shell -> step 3.#3, don’t forget to select the .vmdk file you downloaded
Thanks for your nice feedback 😀
Thanks very much for this post. I was able to have Mac 10.12. How can I upgrade to 10.12.6. The reason I want to upgrade to 10.12.6 to install xcode 9.
You can follow this guide to upgrade to any version you want
https://www.wikigain.com/upgrade-mac-os-x-el-capitan-macos-sierra-10-12/
Thanks for the response. I did tried this. After the reboot of VM, the upgrade did not happen. am I missing anything here?
Hi, after clicking the Start button everything goes as planned until the “DSMOS has arrived” line, but then a next line “prevent idle sleep list: IODisplayWrangler+ (1) ” appears and after that nothing happens. What should I do?
Follow this article: https://www.wikigain.com/complete-guide-fix-virtualbox-errors-installing-mac-os-x/
After uninstalling my antivirus and restarting the server it worked without any issue.
Great. Thanks for sharing your nice feedback 😀
Hi, you’re awesome, great work!
Unfortunately I get following error:
Error allocating 0x14b6 pages at 0x0000000207900 alloc type 2
Error loading kernel cache (0x9)
Boot failed. mac Boot.
A critical error has ocurred while running the virtual machine and the execution has been stopped.
I’ve trying many times, even starting from scratch deleting the VM and starting again the procedure step by step, specially following carefully step #5, but all my attemps were unsuccesful
Your help will be greatly appreciated!
Thanks!
Hello dear, Please read this guide and get help from there: https://www.wikigain.com/complete-guide-fix-virtualbox-errors-installing-mac-os-x/
you are awesome dude its working perfectly thanks thanks alot
Welcome dear, and thanks to your for sharing your positive feedback with us.
thanks. this is very useful.
Welcome
Hi, thanks for this amazing tutorial that works very well.
However can I give you some advice?
The name of the virtual machine should not have spaces to avoid any problem. It could have the name of “Sierra” for example and if someone need to run the code on linux just remove de .exe from the first command and run all of them normally from terminal.
But once again thanks for that great work
Thanks for sharing your nice and awesome feedback with wikigain visitors.
Hi
I did the guide to the letter and im just getting to a UEFI INTERACTIVE SHELL.
I have Virtualization enabled, and every CPU settings are as they should be.
3 cores, 128mb video ram, virtualization boxes are checked, etc.
please help.
i unchecked the “USE EFI BOOT” in system settings. BUT. Now I get this error.
Configuration error: Querying “UUID” failed (VERR_CFGM_VALUE_NOT_FOUND).
Choose the VMDK file and also keep in mind that before adding the code to cmd, you have to quit the VirtualBox
choose the vmdk file? seriously? sigh. the problem is i use a amd fx processor. and i have to use /amdfx boot handle. BUT. there is no way to get to the point where i can use this boot flag. so this guide, in all, does not work for AMD. You should really put that in the guide mate, so people dont waste 2 hours of their time with this BS
Just stuck on Black screen during boot. tried changing video memory, chipset type,
VT is enabled in BIOS
http://imgur.com/eMoBwkY
(i3, 8 GB ram, Windows 10 creator, 2 GB Graphic)
Did you exit VirtualBox before adding the code to CMD?
works fine until step-6 but after that i got shell command prompt after that nothing happend
Enable Virtualization Technology from your system BIOS
After I insert my account pwd at the login screen, I got the busy wheel and beach ball running forever.
Any solution to this.
Try to increase the RAM.
The issue was fixed by starting Virtualbox in admin mode.
Have fun then
Thank you for the tutorial,
simple and easy to learn.
Have fun dear.
Thank you so much!!!! Worked and still working!!
That’s great dear, have fun.
Yeah !
Hi, Mukhtar, thanks so much, for your time and effort to contribute with us. All working pretty good, except audio.
Lenovo ideacentre B320, 5GB ram, 2TB HD, Win 10 Pro(64bit), Oracle VM Virtual Box, macOS Sierra 64bit.
Thanks in advance, have a good day.
Good luck dear
Same for me. Restarting boot again and again
While adding the code to the CMD, you must close the Virtualbox.
hello, do you have a tutorial for ryzen cpus? thank you
Just try once. This guide is working on most of the systems.
Hello, will this work on Ryzen CPUs? Thank you.
I have not tried before but you can try. It’s just virtual machine, you will not lose anything.
all files and CMD command list for virtual box and vmwar plus unlocker
https://drive.google.com/drive/folders/0B2GfNkTIqZ04S0gwUWxqMEpMOUk
yes… i got it…
Ohh, By the way, thanks for sharing your feedback. 🙂
hai, i followed the steps, i need some clarification..
1. where you got .vdi file ( you selected Existing Vdi )
2.Once finish everything, they ask ” choose virtual disk image” like..
please share your ideas…
It seems that you have miss understand the guide. Please read it again or watch the video carefully then you will get everything that is required.
Updated: The video is removed from YouTube 'Sorry for the inconvenience guys'Thanks its worked IM SI HAPPPPYYYY!!!
but is laging :I <3
Okay, so I changed the OS as suggested above to OSx 64 bit and I no longer get the Guru error screen, it works.
Good luck and have fun dear Kem 😀
Actually it never asked me that. All it says is “A critical error has occurred while running the virtual machine, the machine execution has been stopped” then a long message about checking the logs. I have even executed all the steps above including closing the VirtualBox, running the commands, etc… but not luck. If you want I can send you the logs.
It’s because of Virtualbox code. Try to edit the Virtual Machine Name inside the code. If again you failed, you should enable Virtualization Technology (VT) from your system BIOS.
Sorry for my ignorance but where can I find the Virtualbox code? Also, I used the same exact Virtual Machine Name.
You can find it on Install macOS Sierra on VirtualBox section
I just got what you meant by the Virtualbox code, I did edit it and changed the name to MacOS Sierra as the machine name in the configuration and ran the code while the Virtualbox is closed. The VT is enabled in the bios and the windows vbox is working fine. My main OS is linux.
If everything is working fine so how can I help you dear?
Okay, I have a new one. I am running Ubuntu 16.04, I installed everything and all works great, done some work/installations/configurations on the VBox with the MacOS. Now I bought a new laptop, I copied the vmdk file from the old laptop to the new as well as the .vbox and all the contents of the “MacOS Sierra” folder under “Virtualbox VMs” including the saved snapshot of the VM. I can resume the saved snapshot and it opens well, I can save it again and open but if I shutdown the MacOS and try to start it, it fails. Got any pointers?
I copied a windows OS and it works fine. What could be the problem and how should I fix it?
When for the first time you open it gives you an option to choose from. Did you moved the file or copied the file. Choose copied the file and after that, it should not ask you.
Its not working for me. my mac OS sierra its not running showing black screen only.please guide me to this…
Before running the code to cmd first exit the VirtualBox then try.
I really appreciate what you did here. Do you have a Windows 10 VBox that we can use in a similar way?
I’m really sorry what you mean Windows 10 VirtualBox?
Yes : do you have a pre-prepared Windows 10 VBox file that we could use to simply add to our Virtual Box system that is running in Windows 10
(would allow me to test changes to Win 10 from inside the safety of a VM)
Nothing to do with Mac
David
No, we don’t have but you can create yourself. It’s easy.
Thanks working fine .
Good luck 😀
I am still getting the Guru meditation screen with the critical error message.
I follow all the steps.I close VB before setting the commands and I have restarted my computer but still not working.
Any ideas?
To fix this error, you need to change the Mac Operating system version to OS X (64).
I follow all the steps and I still get the Guru meditation screen with the critical error message
To fix this error, you need to change the Mac Operating system version to OS X (64).
Hello, I followed the instructions and have sierra 10.12 running (I have only 4 gb of ram and i could reserve only 2 for the virtual machine but it work fine the same). The problem is that the updates to 10.12.5 (also tried offline combo update to 10.12.5, 10.12.4 and 10.12.1). All the update reach the reboot phase but the machine stop to update at 17 min left or 10 min left (always 10 min left for update to 10.12.5). I don’t found a way to boot in safe mode inside virtual box nor to issue COMMAND+L or similar…any suggestion?
When you update to the latest version it downloads the 4 or 5 GB file. So during this update, your internet connection should not be lost.
As I said, I tryed also with the offline combo updates! The internet connection seems not involved. anyway it is stable here. I also install OFFLINE updates from the commandline with sudo softwareupdate -iv “Mac OS….’ but it stuck at the install stage and when I reboot I always have the same os version. Any suggestion?
Virtualbox Version 5.1.22 r115126 (Qt5.6.2) on Win 10.
The virtual disk grow correctly. the quest os is ok under all aspect. I can sign in with my Apple ID. But no updates installation work
Did you try on VMware as well?
It does not work for me. I have followed the instructions, and also quit VB during the CMD phase.
I assume that the HD has to be the virtual disk provided (macOS Sierra… .vmdk file) . It is not entirely clear from the instructions.
All I get is an UEFI interactive shell screen where I can hit ESC to skip startup.nsh.
Did this process now 3 times very carefully following the instructions and ALWAYS the same result.
Enable the virtualization technology and also edit the virtual machine name
It is enabled. VM machine name was edited, commands executed.
Set your video memory to 128 MB, and change the operating system version to OS X (64).
wow it really works! in 2 hours i got it working. this is really helpfull
Thanks for sharing your positive feedback dear Federico.
I have installed successfully in the virtualbox but the mac is working very slow. I have 8 gb of ram and intel core i3 processor.Any solution for solving this ?
No dear, That all you can make out of macOS on VirtualBox but If you install macOS on VMware, then you can get pretty good performance.
Install macOS Sierra (10.12) on VMware: https://www.wikigain.com/install-macos-sierra-10-12-vmware/
Install macOS HiGh Sierra (Beta) on VMwware: https://www.wikigain.com/install-macos-high-sierra-vmware-windows/
Error:
https://postimg.org/image/e4dvpudkb/
Not working for me :/ i followed your guide step by step. I think not working with my AMD processor.
To Fix this error you need to change your operating system version OS X (64-bit) from OS X EK Capitan.
Hello, I have intel pentium G620 processor x64 bit processor and windows 10 64 bit and 8 GB of ram will it work ???
Not sure. You can give a try and let me know if it works.
Nice Article! Got it working pretty quick. Only thing is that it runs really slow. Any new tweaks for that problem? Maybe increase the CPUs or something?
Yeah to enhance it increase CPU and RAM but currently, it’s supported by the VirtualBox, and you can’t make the most out of it. Increase CPU and RAM may enhance the performance a little bit but not perfect.
But this is not the same on VMware:
Got it to work ! selecting MacOS 64 generic on version, instead of latest elcapitan. You should add this to the tutorial
Thanks for sharing your nice feedback
Hi, it is working well on my Ubuntu 16.04 LTS host but it seems I can not update Sierra. It downloads the macOS updates using the App Store then it reboots and no update are applied.
Works like a charm… Thanks Mukhtar
Welcome dear and have fun
hi,i have maximum 4gb ram with intel core i3
will the machine work with 2gb allotted ram
2 GB is not enough for macOS try to increase it to 4 GB
Work form me. Thanks
Good luck and have fun !
Can anyone help me?
VirtualBox Errors While Installing Mac OS X
link movies (install on virtual box)
Just Exit VirtualBox and repeat Step #5.
Hi, I’ve tried to install this virtual machine but every time I try to start it, it doesn’t boot giving an error after the first “HID: Legacy shim 2” in the black screen. The only things that pop up are this:
unexpected session: 100000 uid:-1 requested by 31
AppleKeyStore: operation failed (pid: 31 sel: 7 ret: e00002c2 ‘-536870206?)
IOGraphics flags 0x43
Previous shutdown cause: 3
Get help from this article: https://www.wikigain.com/complete-guide-fix-virtualbox-errors-installing-mac-os-x/
I’m going into Guru Meditation. I tried that extra line of code. Help?!
Guru Meditation 1155 (VINF_EM_TRIPLE_FAULT)
Here’s my log:
http://dumptext.com/l0K0ZDff/raw/
Did you edit the Virtual Machine Name inside the Code?
Edit the Virtual Machine Name and close VirtualBox completely then try copy and paste the code to CMD.
got it to work but my video ram only says 3mb even though I asked it to use 128mb, and how do I get it to cover the full screen ? 23.8@ wide screen, ty
Follow this guide it will help you to fix your screen resolution on macOS on VirtualBox
hmm moved my file to a new location and now it does not work even after I removed the machine and did a reinstall with the file in the new location
Hey dear, Watch the video tutorial:
Updated: The video is removed from YouTube 'Sorry for the inconvenience guys'hello, i have a problem with logging in to imessages, it comes up but when i submit my info the words go grey for a bit then goes back to sign in. any ideas? thanks!
You need to change your serial number of the MacOS after that it will work.
so does that mean I need to install clover or how should i do that?
i’m using it from past few days, Working Well
but the problems which i’m facing are:
1.) when i download applications (like iMovies) it shows that your system configuration doesn’t met the requirements even when i change the video ram to 256MB
2.) actually it is a question when i start the project from Virtual box it starts in verbose mode is there is any process for normal start.
rest of things are currently working fine.
Thanks
Hey dear, That’s all on VirtualBox 😉
AMD FX Processors Don’t Work For this
Xeon E5 Processors Works Just FINE (takes a little on start the first time)
Thank you for the information!!!
Thanks for your positive feedback.
VT-x/AMD-V hardware acceleration is not available on your system. Certain guests (e.g. OS/2 and QNX) require this feature and will fail to boot without it.
I’m getting this error , Please help,
Enable Virtualization Technology (VT) from your BIOS Setup.
There is no virtualization option in my BIOS, even after updating BIOS.
And it worked!!!! Thanks very much for the instrucitons. 🙂
You’re welcome dear Adrian
I did exactly as described but when i start the VM i get this error:
Failed to open a session for the virtual machine Mac OS X.
The virtual machine ‘Mac OS X’ has terminated unexpectedly during startup with exit code -1073741819 (0xc0000005). More details may be available in ‘C:UsersAdminVirtualBox VMsMac OS XLogsVBoxHardening.log’.
Result Code: E_FAIL (0x80004005)
Component: MachineWrap
Interface: IMachine {b2547866-a0a1-4391-8b86-6952d82efaa0}
Try again and before adding codes to CMD exit VirtualBox completely then move to the next step. Also, check this article if didn’t work: https://www.wikigain.com/complete-guide-fix-virtualbox-errors-installing-mac-os-x/
Thanks
Works perfect on my i7 6700k setup
Welcome dear 🙂
If you are having trouble it is because you may not have noticed there are two sets of instructions in the commands only keep for the version of Virtualbox you are using
Yes its working 100%, Thanks a lot.
Welcome 🙂
Perfect! . No errors , Thank you
Welcome
tried all steps a few times. didnt work
https://abload.de/img/dsc_0028i3ug0.jpg
asus zenbook UX310UQK intel i5 7200u
8gb ram intel hd 620 nvidia 940mx
Change operating system version from mac os x 10.11 El CAPITAL(64-bit) to just the mac os x 64, and it will work.
Hi Mukhtar,
great article and a neat help.
The Sierra installation works fine with a normally installed Virtualbox.
But how do I get Sierra in a portable virtualbox to run?
(Several error messages -> VBoxManage.exe: error: Could not find a registered machine named ‘Sierra’ etc.)
Is it related to the path to the virtual machines?
For my portable Version the Path is:
D:\Programme_Portabel\VirtualBox\Portable-VirtualBox\data\.VirtualBox\Machines
A small tip would be great!
Thanks in advance
Arnie
Hello dear, I am not sure if works on a Portable VirtualBox.
Hi Faiz,
many thanks for your response.
I had tried it several times and then I switched to the VMware Player.
Runs absolute smoothly.
Thank you for your help
Arnie
Welcome
For those who are getting the guru message, to fix this you simply right click the (macOS Sierra) virtual machine > Settings > General > Basic > Switch the version to MAC OS X (64-bit)
Yeah, That’s Right. Thanks for sharing your feedback with us.
Thnks for the work, got it run on Win10.
Maybe change something.
Before #2 say to quit VBox before run cms.
If its open it will not work.
Yes, that’s it.
Thanks for sharing your feedback.
I followed the directions to the letter and ran the commands several times but to no avail. It just keeps rebooting over and over again.
What’s your system specification and the VM Specification?
Thank you very much!! I owe you <3
Welcome 🙂
Error for me at the end:
https://i.gyazo.com/cde107be12a8280dc48af20b2022aaf3.png
Kindly change your Operating system Version to Mac OS X (64).
this is the ONLY hint what helped, and not be sure that vbox is closed, if its closed, its closed.
Thank you for all of your hard work. It works really well and I have Sierra up and running on my Windows 10 machine.
Sorry if this has been asked before – but Shared Folders and Clipboard do not seem to work for me..is that still a problem?
I’m not sure before this problem was not asked by anyone. It need a little bit research
Ok thanks. I thought I might need to install Guest Additions but could not install those – and perhaps you already did that in your virtual disk anyway?
But the 2 items i reported do not work for me at present
David
Here is my error after starting The V:
VT-x/AMD-V hardware acceleration is not available on your system. Certain guests (e.g. OS/2 and QNX) require this feature and will fail to boot without it.
Go to your system BIOS Setup and Enable Virtualization Technology (VT).
I do not have that option in my BIOS
Then you can’t install macOS on that system.
I get this (reboot loop) because of:
getCPUIDInfo: this is an unknown CPU model 0x3c
— power management may be incomplete or unsupported
Results in a kernel PANIC en reboot with the same error.
panic(cpu 1 caller xxxxxxxxxxxxxxxxxxx): DSMOS: SMC returned incorrect key.
Virtualbox: 5.1.22r115126
“because you are running the commands (Step# 5) while the Oracle VM software is open”.
I’ve closed all my VirtualBox instances (even in task manager) and runned the script/code for VBoxManage.exe and voilá!
My VM is now working!!!
Thanks for sharing your feedback.
Note also – USE YOUR OWN VM NAME in the script – the stuff that is in there is just a placeholder, not a real VM name.
Does anyone else experience issues with the sound? I can get sound but when I play someone on Youtube or in iTunes it sounds like someone has taken a song and slowed it down. Help please.
We can’t help because the VirtualBox doesn’t support this until now.
Thanks! It works finally!
After some flickings on boot, I check your step 5. I exited the virtualbox and re-run the command. The start vb and the machine. And it works!
Thanks for sharing your positive feedback dear Dat.
Great work! I installed on Virtualbox on Linux Mint Mate 18.0. It worked perfectly. Then I was able to update the screen resolution with the instructions at https://www.wikigain.com/fix-macos-sierra-screen-resolution-virtualbox/. Excellent instructions and very helpful web pages. Keep up the good work!!
It is generally working fine. However, in web browsers I get flashing artifacts popping up, for example, shadows around pop up boxes that flicker and then go away. Is there a resolution to this issue?
No dear, still there is no solution for those kinds of issues because the VirtualBox does not support it.
Thanks for your positive feedback.
It’s all black screen in Virtualbox
This is my visualbox log.
https://drive.google.com/open?id=0B9saAtSydzezYWlvdHQ0ZjVvRW8
What are problems? Can you help me??
Navigate to “Display option” then put the video memory to 128 MB.
This is my virtualbox log.
https://drive.google.com/open?id=0B9saAtSydzezYWlvdHQ0ZjVvRW8
What’s wrong with me. Can you help me??
Navigate to “Display option” then put the video memory to 128 MB.
HI, if we can;t sign with appple id, how we can download content such xcode from appstore??
Yeah, that’s the main issue people face on VirtualBox, but it’s not the same with VMWare workstation.
I used VBox 5.0.38 and I had to rename the vmdk file from macOS Sierra 10.12 by wikigain.vmdk to macos-sierra.vmdk. I don’t know why, but VBox did not recognize the file name.
Other than that, it worked great.
Thanks!
You need to rename it at the first not when you are using it. Also, you can rename the in macOS.
Has anyone had problems with the connection? I have to use Bridge because it’s working network. The problem is that in the network settings says that the cable is not connected, and in VirtualBox is.
Use NAT for the Network adapter to make the internet working.
Update iCloud works fine (account issue), however I’m assuming the SMBIOS settings must not be as required for iMessage to operate.. all the the guides I have seen assume your using clover and give you advice on the settings to set there.
I assume to have it work here you would need to set these same settings in the EFI of vbox..
Anyone got it working??
Thanks for sharing your feedback.
Has anyone got iCloud & iMessage login working with the sierra vmdk image provided by this site and these instructions?
If so please post some instructions…
I’ve tried with a working serial that shows fine in about this mac and the validates ok online.
Working like a charm in Virtualbox.
thank you!
p.s.
Follow the instructions step by step and remember to run CMD as ADMINISTRATOR
Thanks for sharing your positive feedback dear.
I’ve followed the guide and my virtual machine boots, but it runs very slowly.
My specs are:
I5 3570k
16gb ram
7850 gpu
Is it because I’ve got no 3d acceleration of the desktop or is there another reason?
Hey dear, If you want performance then you need to install maOS Siera on VMware.
Working on the first try.
Well done mate 🙂
VBox 5.1.18, Lenovo Y580
Thanks for sharing your positive feedback.
I’ve followed the guide and my virtual machine runs really slow 🙁
My hardware is
i3570
16gig ram
radeon 7850
Is is because I’m not getting any graphics acceleration? Or is my machine not powerful enough
If you need more performance, then I recommend you to install macOS Sierra on VMware.
Also – before executing the commands in step #5 – make sure no virtualbox processes are running with the Resource Monitor. I tried several times without luck, and when I used the resource monitor to verify that no vbox related processes where running and vbox related resources in use – it worked.
Thanks for sharing your positive feedback.
I was getting the SAME error as almost everybody, and my VM was rebooting somewhere after “Waiting for DSMOS”.
Then I`ve Carefull readed the article attached (https://www.wikigain.com/complete-guide-fix-virtualbox-errors-installing-mac-os-x/) and figured out the following:
“because you are running the commands (Step# 5) while the Oracle VM software is open”.
I’ve closed all my VirtualBox instances (even in task manager) and runned the script/code for VBoxManage.exe and voilá!
My VM is now working!!!
Mukhtar Jafari, maybe it should be great to add this info to this article just in the paragraph when you describe the VBoxManage.exe code steps. I think it will prevent many flood in the comments, as long as it makes all the diference!
Kind regards
Ok dear. Right now I’m not in a good location and I don’t have access to laptop or desktop. I reply all the comments by mobile and as soon as I get in a secure place I will add it
Thanks for informing
Fail, After do all step,
Start “MacOS Sierra” in Virtual Box,
Virtual Box appear Error message, Close or ignore.
So bad.
This because you have not enabled virtualization technology or miss used the code
Iam getting Guru Meditation Critical error, even if i done everything correctly with closing VBox during the cmd step. When i checked my log, its say something with CPU 0 changed to Meditation Mode: http://i.imgur.com/u28J3EI.png
My Specs:
OS: Windows 10 Pro
CPU: Intel Core i5 7600K 3.80 GHz (7th gen Kaby Lake)
GPU: ASUS Strix Geforce GTX 1060 OC6 (6GB version)
RAM: 16 GB Corsair Vengance LPX 3000 Mhz (2×8 GB)
Mobo: MSI Krait Gaming z270
Storage: (SSD: Samsung 850 Evo 250 GB) HDDs: WD Blue 1TB, Seagate Barracuda 1TB, WD “some shit” 400 GB.
Regards
I’m sure you have done something wrong
Once delete your virtual machine and create new one and use this guide carefully
A Good howto (tip: watch the tutorial video while downloading the vmdk)
Works like a breeze, just make sure to close Virtual box before entering the vboxmanage commands
This is the secret behind installing macos on Virtualbox
it works! thanks
Welcome and have fun
Awesome. All installed. I would recommend putting in GIANT BLOCK LETTERS IN YOUR TUTORIAL that you need to CLOSE VIRTUAL BOX BEFORE STEP 5. It was on a boot loop before that.
Ok we will do it
Works even in Virtualbox 5.x in Debian. Just note that the network card is an Intel Desktop and not Server (match the OEM).
Before Step 5, just close VirtualBox ! do Step 5 and run VB again
Yeah it right
Works on VBox 5.1.18 with an Ubuntu 14.04.5 host, thanks!
Good luck!
can i install it with less ram i am on intel core 2 duo because it’s giving me guru medication error
Change your Operating system version to Mac OS X 64-bit to Guru medication error.
I am having a problem. It says: A critical error occured while running the virtual machine and the machine execution has stopped. If you would like to know I am running and Intel i5-7200U 2.5GHz with Turbo Boost up to 3.1 GHz
and NVIDIA GeForce 940MX with 2 gb decidated vram
Follow up this guide
https://www.wikigain.com/complete-guide-fix-virtualbox-errors-installing-mac-os-x/
How to connect real usb in Virtual Macos Sierra on Virtual Box ?
Allow USB from it’s setting then you can connect usb
Make sure before connecting USB your mouse should be on macOS Sierra environment
Hi
I’m having the “Guru Meditation” error (A critical error has occured…) when I start the virtual machine.
I followed all the instructions carefully and even repeated all the steps twice – and increased processor count to 4, but it still is not working. Here is my log: https://pastebin.com/uuP8pHZM
Please can you help me fix it because I really want to run macOS. By the way, I downloaded the “macOS Sierra Final (1 Part)” file.
The secret to install macos Sierra on virtualbox before adding the code to cmd exit virtualbox and make sure you add the code to cmd
For guru meditation error you might have missed any step. Try to do every step exactly
Replace the virtual machine name in the code that is for virtualbox
Your virtual machine name should match with code otherwise it will not work.
Hey dear, Change your Operating system version to Mac OS X 64-bit.
Setup #6 error
Guru meditation
A critical error has occurred while running the virtual the machine execution has been stopped
You have to add the code to cmd correctly
I think you changed my comment. Anyways, I did add it correctly. What do you mean?
I didn’t get you dear can you explain what you want?
I am still getting the issue.
Sorry I forgot which kind of issue you have?
I had the same issue others were having with the bootloop, but that was fixed with me actually following the instructions.
Now I’m getting this, stuck at a Bash prompt with no idea what to do.
Doing Exit takes me to a menu, no matter where I go from there it always ends up back at this screen.
https://puu.sh/v4BgQ/7a67d3b47a.png
Enable virtualization technology from your bios and run the code to cmd
Make sure you exit the virtualbox before adding the code
Same exact problem.
Virtualization is enabled in BIOS.
All cmd commands run as Admin while VirtualBox was shut down.
Any ideas?
I don’t know but something is going wrong.
Can you make video how you install macOS on VirtualBox?
Is working perfectly. Step #5 is only working when you shutdown VirtualBox first.
Yh you are right
I’ve followed all the instructions, and I made sure to exit VirtualBox before using the commands, but when I start the VM to start installation it only shows a black screen and nothing else, and I’m not sure why that is.
Watch the video down below deeply.
Updated: The video is removed from YouTube 'Sorry for the inconvenience guys'Have Sound problem intel hd audio play sound in slow motion, have Intel i3 CPU youtube and other musik in virtual Box all slow motion. Linux say to my audio Hardware is Audio device: Intel Corporation 6 Series C200 Series Chipset Family High Definition Audio Controller
Yeah, it the most of out macOS Sierra on VirtualBox because you can install the guest addition and fix all the issue. But you can fix issues like the sound on VMware because there you can install VMware tools and fix the most common problems including graphics, sound, etc.
Check out how to install macOS Sierra on VMware workstation 12 here: https://www.wikigain.com/install-macos-sierra-10-12-vmware/
Updated: The video is removed from YouTube 'Sorry for the inconvenience guys'Is there any way to DIY build those vdsk Disk File from a specific version of MacOS?
Yes dear, It needs to be created manually.
Hi there. I am wondering where the macOS VM image (vdmk Files) comes from? Is there a DIY method to create such a file? Is it a patched version? Would be really interested in this! Thanks in advance
VMDK File has to be created and it not a patched version.
Hi. I’m having an error on Step 5 and I have the virtual machine off. I even rebooted my computer.
This is the error that appears:
C:\Program Files\Oracle\VirtualBox>VBoxManage.exe modifyvm “macOS Sierra” –cpui
dset 00000001 000106e5 00100800 0098e3fd bfebfbff
VBoxManage.exe: error: The machine is not mutable (state is Saved)
VBoxManage.exe: error: Details: code VBOX_E_INVALID_VM_STATE (0x80bb0002), compo
nent SessionMachine, interface IMachine, callee IUnknown
VBoxManage.exe: error: Context: “SetCPUIDLeaf(id, aValue[0], aValue[1], aValue[2
], aValue[3])” at line 742 of file VBoxManageModifyVM.cpp
Check out this article dear: https://www.wikigain.com/complete-guide-fix-virtualbox-errors-installing-mac-os-x/
I’m having this error when clicking start on VirtualBox
– Failed to open a session for the virtual machine
Details –
The virtual machine ‘macOS’ has terminated unexpectedly during startup with exit code -1073741819 (0xc0000005). More details may be available in ‘C:\Users\Owner\VirtualBox VMs\macOS\Logs\VBoxHardening.log’.
Result Code:
E_FAIL (0x80004005)
Component:
MachineWrap
Interface:
IMachine {b2547866-a0a1-4391-8b86-6952d82efaa0}
I have followed all the instructions, including the close the app before running cmd as an admin. However the only setting I cant follow is that I cant set my cpu to 2 which is the minimum, it’s stuck on 1.
Before running the code to cmd, exit the virtualbox and also increase your Processor
If it wouldn’t work let us know
Hi there, thanks for this great guide!
The only step which was unclear was from 4 to 5: Close VirtualBox before adding the code in CMD on Step 5.
Thanks for sharing your feedback
I followed the instructions exactly, including the code steps. but I get the error shown at the link.
https://drive.google.com/open?id=0B_51NGjsiBiXTVVsMmlqdFl3ZEk
I have VirtualBox 5.1.14 running on Windows 10, Intel Core i7-7700K with 64GB RAM. I limited myself to setting up the vb exactly as shown in the photos and I created a batch file from the included code. There were no errors when I ran the batch file. I even named my Sierra vb the same as the example. Other OSes run fine in VB (Win 7, Win 8.1, Win Vista) on this PC so I know VirtualBox is installed correctly.
Before adding the code to cmd exit Virtualbox it will work
Thank you, this actually works !! Make sure you close the Virtual Box while entering the code in the cmd prompt.
Yeah this note is being told several time but the readers do not pay attention to it.
It’s very important thing to install macOS Sierra on Virtualbox
Thank you.. works like a charm!
Welcome dear,
I appreciate for sharing your feedback.
Is there any way to install VirtualBox Guest Addition in MacOS Guest?
No, there is no way to install Guest addition, but you can install VMware tools for macOS Sierra on VMware.
https://www.wikigain.com/install-macos-sierra-10-12-vmware/
It worked without problem.
Thank you
Welcome dear Burak,
I appreciate your feedback.
I would like to ask how to edit the code in linux.. more exacly using Ubuntu .
What do you mean by editing the code?
Save this into a file, make it executable and run it. You have to adjust VMNAME if you use a different name for your VM.
!/bin/sh
VMNAME=macOS\ Sierra
vboxmanage modifyvm “$VMNAME” –cpuidset 00000001 000106e5 00100800 0098e3fd bfebfbff
vboxmanage setextradata “$VMNAME” “VBoxInternal/Devices/efi/0/Config/DmiSystemProduct” “iMac11,3”
vboxmanage setextradata “$VMNAME” “VBoxInternal/Devices/efi/0/Config/DmiSystemVersion” “1.0”
vboxmanage setextradata “$VMNAME” “VBoxInternal/Devices/efi/0/Config/DmiBoardProduct” “Iloveapple”
vboxmanage setextradata “$VMNAME” “VBoxInternal/Devices/smc/0/Config/DeviceKey” “ourhardworkbythesewordsguardedpleasedontsteal(c)AppleComputerInc”
vboxmanage setextradata “$VMNAME” “VBoxInternal/Devices/smc/0/Config/GetKeyFromRealSMC” 1
actually my problem is same as Amogh G
That’s due to VirtualBox code that you did not rename the Virtual Machine name in the code.
there is a error in my vm box that ” a critical error has occur while running the virtual machine and the machine execution has stopped”
Fix your problem Here.
Fix VirtualBox error while installing MacOS
I’m also having a isue with a critical issue has occured. The video doesn’t help. I’ve followed all the steps and pasted the cmd code in correctly.
Change The Operating System Version to Mac OS X 64-bit.
It doesn’t works on my PC. I have intel chipset.
The booting restarts again and again.
I’ve tried run commands from text files, issue still there.
Are you sure is it works? As i can see, there is a lot of similar problem. 🙁
I followed all the steps up until the booting up of the VM… For some reason it keeps giving me this “Guru Meditation” error.
I went into the log files to check, and here is what it said:
VCPU0: Guru Meditation 1155 (VINF_EM_TRIPLE_FAULT)
Here is a screenshot of the actual error pop-up uploaded to Imgur:
http://imgur.com/6AJOnJC
Please help me out! I would love to try out Mac OS.
Check out this post to fix VirtualBox critical error
Fix critical error while installing MacOS X on VirtualBox
Works – thanks.
Welcome dear, Have Fun 😉
Hi bro, thanks for great article. Btw I have problem after click power on wmware as mac os x is not supported with binary translation.
‘To run mac you need host on which vmware supports intel vt-x or amd…’
Any idea bro since Im new for this method. Thanks.
Enable virtualization technology from your BIOS or vmware settings
If didn’t work. You Should add the code which is Mentioned In The Article
thank
Welcome
Any updates on the iMessage fix?
Thanks!
Not up to now
Worked without an issue, just as advertised!
Thank you so much, very useful!!!:)
You’re welcome and good luck 😀
How can i create a vmdk macOSX siera and don’t need to use the vmdk in this article?
Its works very good.
Thx for help.
In this case can’t help you.
Sorry
HELP. I followed your guide until I booted the vm, but the vm white text on black is stuck at “VM Subsystem is ON”. Can you help me?
Did you apply the step by step guide with the video?
Most of the error occurs due to VirtualBox code. When you are entering the code to cmd make sure, you should quit the VirtualBox then it will work.
http://prnt.sc/e1robp
my snapshot of guru error…
plz help
For this error, your must add the VirualBox code to the CMD. Make sure you quit the VirutalBox before adding the code.
Does NOT work with i7-7500U!
Does work with i3-4020Y
And after a few restarts, i3-4020Y can’t start anymore, catalog file checking, and then can’t finish some file verification completely, shutdown in 3 seconds ….
Not worth it ~~~~
This work on most of Intel based system. You might have done something wrong. Keep in mind before adding code to CMD, you should quit VirutalBox.
Hi,
i only can chose “macOS X (32 bit)” or “mac OS X Snowleopard (32bit)”, what can I do? I tryed it with virtualbox 5.1.14 and 5.1.6.
my PC:
Win 10 64 bit
Intel i7-6700HQ
12GB RAM
Intel HD Graphic and G-Force 960M
Hey the VT is disabled from your BIOS Settings. Restart and to you system, BIOS then Enable Intel-VT (Virtual Technology).
Use this article to find out your system BIOS:https://www.wikigain.com/boot-menu-option-keys-for-all-laptops-desktops/
Hey Guys,
Just solved the reboot problem!!!!!
If you made the mistake, to do the cmd thing while vb was opened, you need to reinstall the whole thing! That includes reunarchiving the image and reinstalling virtual box (with reboot)! That worked for me! I hope, I could help some of you! Maybe you could add this to a troubleshooting part at the end of the tutorial 😀
Thank you 😀
Thanks for your nice feedback dear Nik 😀
hi, I have tried making this machine through the video tutorial, but I keep on getting this guru message. if you need a snapshot of that message please tell me how to send it to you?
thanks.
You Post the Snapshot here:
http://prnt.sc/This worked for me running VirtualBox on a Debian Linux host following the steps almost 1:1…Just have to modify the commands a bit – don’t need to “cd” – vboxmanage is already in your PATH on Debian when you install VirtualBox via apt. Also, obviously remove the .exe extension from any of the other commands.
Screen resolution fix also worked, although I would love to know how to set custom resolutions (namely 1080p). I think it would require also modifying some configs in the guest OS. I tried to work it out from some other info I found online, but nothing has worked so far.
Greatly looking forward to the tutorial on getting iMessage to work, as I see mentioned above in a comment from Jan 7 2017!
THANKS FOR THIS!!!!!!!
Custom resolution is not made yet. If you found let us know
Also just learned that USB pass-through works! Although, so far doesn’t seem to like having more than 1 device connected at a time….
That said, though, Xcode works flawlessly and I”m now able to create, build, and deploy my app to my iPad via iTunes right on my Linux workstation!
This has been a great day…WOO!
Good luck then dear Mike
Trying this setup on both VirtualBox 5.1.6 and the latest 5.1.2 and am getting the same
“”A critical error has occurred while running the virtual machine and the machine execution has been stopped””
If I change the Paravirtual type to None – I get
““This version of Mac OS X is not supported on this platform”
I have tried to remove all VirtualBox installations and start from scratch at least a dozen times and not getting this going anywhere.
Any thoughts? or specific parts of the VBox.log I can post to help get this going?
* I have tried the latest code and run CMD as Administrator
Host machine is an HP Spectre x362 w/
* Intel Core i7-7500U @ 2.7 GHz
* 16 GB RAM
VBox.log
Guru Meditation 1155 (VINF_EM_TRIPLE_FAULT)
You’re email is replied
Hello
Same laptop:Host machine is an HP Spectre x362 w/
same error:Guru Meditation 1155 (VINF_EM_TRIPLE_FAULT)
Find a solution ?
thanks in advance
To fix this error just check out this post. https://www.wikigain.com/complete-guide-fix-virtualbox-errors-installing-mac-os-x/
I’ve got it
spectre x360 wooo ( I7-7500U kaby lake)
virtualbox 5.1.14
Guru Meditation 1155
error to read msr: rdmsr(0x35) -> #GP(0)
Just run extradata (cmd command):
VBoxManage setextradata “your VM” VBoxInternal/CPUM/MSRs/MsrCoreThreadCount/First 0x00000035
thanks
Welcome dear 😉
Magic – this extra CPUM command got me through the critical error on startup. No idea what it does or the conversation that led you to post it, but thanks!
Thanks for sharing your feedback.
Did you ever get this figured out? i am having the same problem and cannot seem to find a fix. Host is DELL i5, 8gb RAM, trying to run sierra
Check out this guide https://www.wikigain.com/complete-guide-fix-virtualbox-errors-installing-mac-os-x/
Check out this post to fix VirtualBox critical error
Fix critical error while installing MacOS X on VirtualBox
ubuntu 16.04 and virtualbox 5.0.24
working fine but how to change display resolution ?
Use this guide to fix screen resolution of macOS Sierra on VirtualBox.
Very nice article, thanks for the helpful instructions! Can I install Sierra on my PC also, or it won’t be running because of the DSMOS?
Yes, you can Install if your system is compatible with macOS.
Use this article to Create USB Installer: https://www.wikigain.com/create-macos-sierra-bootable-usb-installer-windows-10/
Check this article for Installation: https://www.wikigain.com/install-macos-sierra-pc/
Hi,
Here functioning but what i do for adjuste resolution for 1280x768x32 or 1366x768x32 on Sierra OS. Here only show 1024x768x16.
I have executed one clean install after load the VM downloaded here reinstall one clean copy and functioning all minus update resolution for display.
Thank you for that work! Great work!
Thanks for your Postive feedback dear Josenildo 😀
Host:
* Windows 7 SP1 x64
* Intel Core i7-4770
* 16 Gb RAM
VirtalBox: 5.1.12
Works fine
Ok Good 😀
During Step 3, there are no 64 bit versions in the drop down list. Step 4, part 3, I cannot go over 1 processor.
Any suggestions ?
Go to your System BIOS then Enable Intel-VT or AMD-VT (Virtual Technology) after that you will have the 64-bit options.
Hello! I’ve successfully got this done on my machine, thank you. On my wife’s, I am having issues.
Virtualbox 5.1.12 ( same as the one I successfully used on my system) but when I run it, there are no 64-bit options on the list. I also can not go past 1 processor.
Any suggestions?
Go to your System BIOS then Enable Intel VT or AMD-VT (Virtual Technology) after that you will have the 64-bit options.
THANKS MUKHTAR BHAI,
Initially I stuck but I tried many times. The best thing I did is I updated my virtual box & extension pack, then removed old machines and repeated carefully all steps guided by you, religiously.
Hola ! now I am running mac os sierra.
Only one problem is SLOW VOICE FROM SIRI
Increase your system RAM & Processor or better performance.
Having issues with the unlocker. cannot get the “el capitan” option in the drop down box
For the VirtualBox, you don’t need a Unlocker because the options are already there.
When Unzipping I get a CRC Error on both versions
Send me the snapshot plz
it works! thanks!
You’re welcome
iMessage is not working. I consistently receive an authentication error.
You need to change or set a MAC Address to your VM. We will have an article for that ASAP.
I stucked with macOS recognizing my host as non-Mac PC…(
https://postimg.org/image/wlctul083/ – screenshot just before looped reboot
——
* i7-6700 last gen, host win10x64, VirtualBox 5.1.12
—–
And while trying another macOS (El Cap) I’ve managed to reach OS installation process, but I’ve got an error after 3-5 clicks with the message “hfs: unmount initiated on untitled on device disk1” and returning me to the first screen of installation process.
Try again from Step #5. Add VirtualBox Code to the CMD but this time use this updated code Download VirtualBox Code “Updated.”
If didn’t worked the let me know.
it worked, tnx!)
Welcome dear
UPD: Fixed this error by rebooting host machine and re-entering commands to cmd
(donnow which action actually fixed the problem)
Now everything works fine.
Tnx, wikigain!
Thanks for sharing your feedback.
I followed the steps but i get the Considerrebuildofkernel notification wich it stays on.
Could anyone assist me?
Thanks in advance
Use this guide: https://www.wikigain.com/complete-guide-fix-virtualbox-errors-installing-mac-os-x/
Everything worked OK.
Please remember to close Virtualbox before proceeding to step’s #5 coding.
Otherwise you’ll get some problems while booting the VM.
Thanks
Thanks for sharing your feedback.
Hi!
I did everything acording to the video and after I start my virtual machine it gives me this error: “A critical error has occurred while running the virtual machine and the machine execution has stopped.”
Have I made some mistake?
Read this guide: https://www.wikigain.com/complete-guide-fix-virtualbox-errors-installing-mac-os-x/
Hi. Help me!
I have an error at run, out the black window with the text “fatal no bootable medium found system halted”
Did everything according to instructions. How can I fix it?
Watch this video carefully then go according to the video.
You might have missed any step.
Updated: The video is removed from YouTube 'Sorry for the inconvenience guys'what should i do ?
http://prnt.sc/do3lv8
Try step #5 and make sure that before adding the code to the CMD, you have to quit VirtualBox. Otherwise, it will not work.
Thank you for this tutorial!
For those who are getting the message
“This version of Mac OS X is not supported on this platform”
I had to enable some settings not specified in this tutorial (but were visible in the authors VirtualBox screenshot luckily!)
System -> Processor -> Enable PAE/NX
System -> Processor -> Acceleration -> Paravirtualization Interface -> Select Minimal
System -> Processor -> Acceleration -> Enable VT-X / AMD -V
System -> Processor -> Acceleration -> Enable Nested Paging
Boom! Then I got it to boot into the installation screen 🙂
Thanks for sharing your feedback dear Shazam.
Hi, my computer is running a Intel(R) Celeron(R) 1017U @ 1.60GHz 1.60 GHz 4.00 GB (3.89 GB usable). Is it possible? I tried once installing it and all I got was a black screen. If it is not possible on VM are there any workarounds. If it IS possilbe to run this without an i7 then I did something wrong. Please is someone can reply. I would be highly grateful.
The main and most important thing to fix this issue. You must apply step #5 and make sure that VirtualBox is exit before adding the Code to the CMD.
Asalum alikum brother
I did everything by following the video but i get the following error when click on ‘Start’ :
” Failed to open a session for the virtual machine macOS Sierra. ”
Details of error:
“VT-x is disabled in the BIOS for all CPU modes (VERR_VMX_MSR_ALL_VMX_DISABLED).
Result Code: E_FAIL (0x80004005)
Component: ConsoleWrap
Interface: IConsole {872da645-4a9b-1727-bee2-5585105b9eed} ”
I also wanna mention that i downloaded macOS Sierra in parts.
Thanks for your kindness.
Turn off your Computer and Enter the BIOS Setup and then Enable Intel Virtual Technology (VT) then the problem will solve.
something going wrong here :
EFI: VBoxDbg> loadimage64 ‘E:/tinderbox/efi2-5.1/out/win.amd64/release/obj/VBoxEfiFirmware/amd64/RELEASE_VS2010/X64/
I’m not sure about this error I think you might have missed any step. Read the article, and try once again. One thing I have to mention for you that you should exit VirtualBox while entering the code to the CMD (Step #5).
This tutorial works like a charm.
Thanks for sharing your feedback.
I have the Virtual Machine up and running perfectly, unfortunately, I seem unable to mount USB flash drives to the VM. I get the error (“Failed to create a proxy device for the USB device. (Error: VERR_PDM_NO_USB_PORTS).
Any advice?
Did you mean you couldn’t connect the USB to macOS Sierra Virtual Machine?
hello,
Is french language included in this rar ?
Particularly No. When you install macOS Sierra on VirtualBox, you can add the French Language in order to type something.
thanks gan…
its work… 100%
Worked for me! After two years of previous attempts at getting a Hackintosh to work on VirtualBox.
As others have said, Step 5 should include the instruction to quit VirtualBox before running the commands. I didn’t the first time and the Hackintosh failed to boot properly.
As an IT admin with twenty years of Windoze experience, it’s great to finally experiment and learn about Mac OS X without shelling big $$$ for hardware.
It’s 100% working on most of the systems. Again good luck & have fun
Step 5
#2 CMD
YOU need to be the administrator. Otherwise you get an error message.
Are you talking about account type to be an administrator?
This no longer works as of 11/27/2016. The first issue you will run into is that the mouse will not be captured by the guest (MacOS) up on booting into first configuration menu. You can get around this by capturing your mouse directly in the VBox menu. The next problem you will run into is that the first time configuration menu will not allow you to login with your Apple account. It will give you a message stating that this machine is no longer authorized to do so.
OK, let’s see what will happen. Again there is always a third option.
Works flawlessly. The “warning” message is merely that “this machine cannot create any more Apple ID’s”. Just ignore and continue. Can still log in with an existing Apple ID..Just go to the Apple website and create an ID.
I started up the Virtual Machine and got
UEFI interactive shell v2.1
EDK II
UEFI v2.40 (EDK II, 0x00010000)
Mapping table
BLK0: Alias(s):
pciroot(0x0)/pci(0x1F,0x2)/sata(0x0,0x0,0x0)
BLK1:Alias(s):
pciroot(0x0)/pci(0x1F,0x2)/sata(0x1,0x0,0x0)
Press ESC in 1 seconds to skip startup.nsh or any other key to continue.
Shell>_
I have an AMD A6 Quad core (Notebook)
Most of the time this error happens due to Virtualization Technology which is disabled from your BIOS.
Make use that this option is enabled then try again.
One more thing I have to mention for you. In step #5 when you want to add the code to the CMD, you must exit the VBox.
If you did not fix the problem let us know.
The same error. I unistalled virtual box, I downloaded and installed Virtual Box 5.1.10. I repeated all the steps but it says me again first a thing with “OS/2 acceleration etc.” and after “UEFI interactive shell v2.1
EDK II
UEFI v2.40 (EDK II, 0x00010000)
Mapping table
BLK0: Alias(s):
pciroot(0x0)/pci(0x1F,0x2)/sata(0x0,0x0,0x0)
BLK1:Alias(s):
pciroot(0x0)/pci(0x1F,0x2)/sata(0x1,0x0,0x0)
Press ESC in 1 seconds to skip startup.nsh or any other key to continue.
Shell>_”
Well I was gonna say that the VM is permanently rebooting without ever getting to the welcome screen and ask for an explication, but obviously this is the case for everyone… So my question: Did this work for anyone here ? Cuz it really looks like this is simply another non-working tutrial you can find on the internet
Installing macOS Sierra on Hackintosh PC is simple and easy in case you apply each step exactly.
I suggest you repeat step #5.
Before adding code to the CMD you must exit the VBox completely. If you don’t exit, it will not work.
Also use the updated code for VirtualBox.
https://drive.google.com/open?id=0B-VXG64GOoM-ZWJmd0l3YVNERGs
hi, my system is looping reboot, the last message i can see is kernel extensions in backtrace
Use the updated code from the article then try step #5
Keep in mind that exit VirtualBox then add the code to CMD. If you don not exit the VBox, it may not work correctly.
If this method did not work, let me know.
Good luck! 😀
hello,
can you help me, my vm don’t whant to start.
this is a screen.
https://drive.google.com/open?id=0B1WN0bW_uDW8Tll2b1JWY3BhVU0
it’s ok i just have a bad version of VBox.
Try again “Step #5. Add VirtualBox Code to the CMD” but before adding make you sure that you exit VirtualBox. Also, this time use this code: https://drive.google.com/open?id=0B-VXG64GOoM-ZWJmd0l3YVNERGs
Thank you everything worked ok, is there any way to change screen resolution? i only have 1024×768.
Yes dear, you can change it here: https://www.wikigain.com/fix-macos-sierra-screen-resolution-virtualbox/
I started up the Virtual Machine and got
UEFI interactive shell v2.1
EDK II
UEFI v2.40 (EDK II, 0x00010000)
Mapping table
BLK0: Alias(s):
pciroot(0x0)/pci(0x1F,0x2)/sata(0x0,0x0,0x0)
BLK1:Alias(s):
pciroot(0x0)/pci(0x1F,0x2)/sata(0x1,0x0,0x0)
Press ESC in 1 seconds to skip startup.nsh or any other key to continue.
Shell>_
could someone help me out?
It may be noted that I am trying to do this on another drive not the C: drive it is the M: drive the vbox is stored on this drive and so are all of the recommended download files. I also changed the command prompt code to M:\ instead of C:\
It’s because your Virtualization technology is disabled from your system BIOS. You must enable it.
I’ve got this working on Ubuntu. It was crashing at first, but then I skipped two first lines from code.txt file(change directory and modifyvm) and all other worked like a charm. Thanks for a tutorial and files! 🙂
Welcome and Good luck Dear Mindaugas
Hi Mukhtar,
Im stuck at this page whenever I start the VM. Here’s the screenshot: http://imgur.com/4lKlUMT
Have you Enable Virtualization Technology from your BIOS?
You should enable Virtualization Technology from your BIOS then Follow step by step guide
Also use the updated patch tools.
I have done all the steps correctly but when I start Virtual Machine it does not show anything. It shows only black screen without any running code. Can you help me please?
Fix your problem Here
https://www.wikigain.com/complete-guide-fix-virtualbox-errors-installing-mac-os-x/
The same happens to me. I have done all the steps (correctly!), but I just get the black screen as well.. I’m using VB version 5.1.8
Hi dear Petter. It’s because of the VBox code. We have updated the code just download the new version from the link in the post then try step #5 one more time. It will work completely.
Thanks Mukhtar! With the new updated VBox code it worked 🙂
Hello
I made a Vm and it works thanks to you.
But I have a problem of his it is cut and the sound serious voice deformed and slowed down.
He does not have a fix for it. You do not have a line of code that resolves the problem.
Cordially
Sorry dear, Until now we don’t have any solution for Virtualbox but all works fine on VMWare. You may give a try on VMware: https://www.wikigain.com/install-macos-sierra-10-12-vmware/
Everything works fin until step 6. I get no errors during step 5. When I then start the vm in step 6 I just get a black screen.. Nothing happens.. My system is Lenovo W520 with Intel Core i7.. Any ideas ? Thanks !
Because you did not add the code thoroughly. Just add the code correctly
What do you mean by not adding the code corrertly ? I ran all 6 lines without any errors..
Same here… Followed all instructions but got stuck at a black screen
Maybe because I am running virtual box 5.1.8 instead of 5.1.6?
No that’s not a big deal. Just repeat Step #5 once again. Because most of the people have this error when they add the code to the cmd correctly.
The problem will be solved. Open cmd normally “Not as administrator”. copy and paste the VB code to cmd then open VirtualBox.
Keep in mind that before adding code, you must exit VirtualBox and it should not be opened while adding the code to CMD.
Also, don’t forget to set the video memory from Virtual machine settings to 128 MB.
Sorry Mukhtar, but I have now repeated step #5 multiple times.. I shut down VirtualBox, open cmd normally and enter er 6 lines. No errors. I then open VirtualBox again, check that video mem is set to 128MB, and start the vm.. Same result.. Just a black screen.. I’m running version 5.1.8
Hi, My system is AMD(AMD E2-2000 APU with Radeon(tm) HD Graphics 1.75 GHz), can intall macOS in VirtualBox ?
Hello dear Jose,
Sorry dear, I can’t tell that you can or can not but you can give a try it’s free. Also, it works on most of AMD but not at all.
Gee whiz, and I thuoght this would be hard to find out.
Thanks ! 🙂
Welcome dear
P.S. be carefull with the ISO file, mine has a trojan in it (use Eset to detect it)
Just found the answer for my edit problem. I was missing a file. You can get it here
https://goo.gl/pDehcA
Maybe you guys can update this page and thanks again for the help you gave me…
what were you missing? The link you provided just shows this, which isn’t helpful to me at least… New Code is Updated!
Install macOS 10.12 Sierra Retail on VirtualBox on Windows PC (Download links)
Updated: The video is removed from YouTube 'Sorry for the inconvenience guys'The code is the same there is not much difference. macOS Sierra 10.12.2 is linked in this guide. 10.12.3 is the update one. It means it’s not very old version.
Hello !
Thank you for this guide. It seems that your download limits for the “macOS Sierra” file has been reached (on google drive). I can’t download it.
Don’t worry we will upload new file just wait plz 🙂
Hello, you can create a copy of the file into your G-drive account and download it from there if the download limits for the file has been reached
Good advice this is the solution for download limits
Well , I did read thoroughly… Still have no clue how to edit the code before going into the cmd prompt.. Would love to get some more help.
First of all thank you very much for this guide! I am absolutly new to this so forgive me if I have ignorand questions.
I get stuck at step 5
I understand I have to edit the VM -name .
In the on-screen I can see a file being edited in notepad called “virtualbox code”.
Maybe I just don’t get it but I can’t find any such file on my machine.
Please help
Please read the step #5 thoroughly and add the VirtualBox code to the cmd like step #5
This is not an answer. Where is the file “virtualbox.code”. Eric is right. I cannot find this file and this step is absolutely unclear. On top of that, your answer is equally confusing.
With VMWare version is there a way to add multiple resolutions within the OS? Upon boot, my only option is 1024×768. If I go full screen from VMware, it changes to 1920×1080, but within macOS, I don’t have multiple resolutions to choose from.
To get full-screen mode you need to have install VMware tools. Follow this article step by step to install VMware Tools on macOS Sierra: https://www.wikigain.com/install-vmware-tools-macos-sierra/
Stuck on Step 6 part 2.
Never achieved loading of macOS Sierra continues to reboot through “white text” over and over.
Please try to step #5.
Keep in mind that before adding the code to the CMD, you must close the VirtualBox completely.
If it did not work let us know
Good luck!
Thank you! I definitely had a sticky note on my desk to remind me of that…
Can i get the same file using torrent. 5 GB in one sitting without pause is not possible for me to download …. please help me provide a valid torrent link
No dear until now the torrent file isn’t available. You can download from the link above it’s working.
Hi all
I was also stucked in the VM booting point, with the rebooting over rebooting error reported by some of us. Just to share my experience, to me it worked to close all VM and the program virtualbox and redo step 5, then open it again and run the VM
Thanks dear Alessio to share your positive feedback. We will add this solution to in the post
Your solution worked for me. It just got stucked at booting but doing what you wrote worked like a charm!
Thanks for your sharing feedback and have fun.
Hi, everything is working great. I have W10 host and MacOS Sierra guest. How could I create a shared folder between them? Thank you 😉
Great then and have fun. For sharing files just read this step by step guide
https://www.wikigain.com/share-mac-os-x-el-capitan-files-with-windows-10/
Well it is not working, it’s crashing at some point and going to loop
https://youtu.be/kRyV38jANT8
Apply Step #5 once again and be aware of increasing the Ram size as well.
Before adding the code to the cmd, do remember that exit the VirtualBox then add those codes.
Good luck!
Okay.. you didn’t mention that for those CMD’s you need yo shutdown VirtualBox.
After that only VM booted properly, but i don’t understand RAM part, i’ve set-up 4gb as you told 🙂
Also for some reason system is detecting only 3MB of video ram and got poor resolution (1024×768)
http://imgur.com/a/TkB6D
I try make it in VirtualBox, but the process is stopped in the screen https://dl.dropboxusercontent.com/u/42875927/Display.JPG
My pc is: Intel i7, 6 Gb RAM
Follow step #5 thoroughly once again and you might have done any mistake
I has repeat the step #5, but the problem continuos, the last line executed is “System uptime in nanoseconds: xxxxxxxxxxx” and then, restar the process: https://dl.dropboxusercontent.com/u/42875927/sierra.jpgv
Correct link: https://dl.dropboxusercontent.com/u/42875927/sierra.jpg
It’s OK. The problem was “remember that exit the VirtualBox then add those codes” Thanks
Good luck and enjoy using macOS Sierra 10.12 🙂
Thanks! Was it.
Good luck
alos tried vmware 10 and vb but no luck
I am sorry, but you really don’t have any luck with installation.
vid mem is set to 128 and i have tried the vmdk from here but just wont run. i tried a few others as well but they do not run either. i can only select 2 x cpu as this is all my machine has. i’ve tried adding the smc.ver line and changing vrhw to 10. when i tried an iso i get cpu has been disabled ……
spent a lot of hours on this but getting no where. have used aqnd created lots of vm’s before but this one has got me….. help !
additional log:
https://drive.google.com/open?id=0B_85kRRhQVNeSzNkcXhuM05WV2cHello,
I’ve got the following error as in the screenshot.
https://drive.google.com/open?id=0B_85kRRhQVNeVWZNTjFFck42dFkAny suggestions?
Sorry for late reply
Just follow step #5 thoroughly once again because you might have done any mistake.
btw. ive got a perferctly good running el capitan on vm. i downloaded a sierra iso and tried with that but no luck ….
Download the VMDK file of macOS Sierra from the link that mentioned above and it will work.
hi, ive followed this procedure 20+ times now to the letter and just get a quick flash of ‘Found HFS” and I cannot read the rest it is so fast, then a black screen that does nothing. ive tried all the above but still the same. ive got a 1tb hdd, e6700 cpu, 4gb ram and win 10. any thoughts?
Increase the Video Memory to 128 MB from Virtual machine setting and it should be okay.
If you are in a boot loop, make sure you QUIT VirtualBox BEFORE running the CMD commands.
This did the trick for me!
Thanks guys!
Yeah, I think it’s mentioned in the post 🙂
I have the same problem as Goechi
Hello 😛
I get a problem on the first boot where i get the error :
unexpected session: 100000 uid: -1 requested by: 31
AppleKeyStore: operation failed (pid: 31 set : 7 ret: e00002c2 ‘-536870206’)
IDGraphics flags 0x43
I’m not sure about this error but I suggest you follow step by step guide
https://www.wikigain.com/complete-guide-fix-virtualbox-errors-installing-mac-os-x/
Hi! I have absolutely the same error (“unexpected session: 100000 uid: -1…”). And get infinite reboot then with this error. Don’t know what to try.
Update: manual closing of “VirtualBox Interface” process and #5 redo helped.
For some reason this process was running even after closing VirtualBox.
So now it’s working. Mukhtar, thanks for the work! But why it shows only 3mb video?
You need to install the a high resolution display then it will work perfectly.
Please restart Virtualbox as Admin. First I had the same problem, now it works.
Restart VirtualBox as Admin. First I had the same problem, now it works. I hope, I could help you.
I followed the instructions and installed Sierra virtual machine with no problem. For my purposes i had to change the Network settings but other than that everything else works fine.
Good luck then dear Vlad! 🙂
Hello, here I have a little problem with installation to begin 🙂 I followed step by step your tutorial. Unfortunately, this one does not work for me :’-(
First : I have a laptop Asus Rog with a i5 6300 HQ, an Nvidia 960M and 8go DDR4.
And when i try to install macOS, my virtualbox do that :
Updated: The video is removed from YouTube 'Sorry for the inconvenience guys'(it’s an private youtube video). And he did the same loop again and again…Can you help me ?
Hello dear, I am sorry but right now I can’t give any solution for this error. It’s the one it faced myself with my laptop and till now wasn’t able to figure it out. So I suggest you try once on VMware and it works or not. You can get help from this article for VMware:
https://www.wikigain.com/install-macos-sierra-10-12-vmware/
I solved the infinite boot loop by selecting the correct CPU spoof:
******************************************************
For some host systems eg those with Haswell and newer CPUs, you might have to spoof an older CPU to avoid VirtualBox errors. You can try from one of the following if this happens:
To spoof Lynnfield i5 750 CPU
VBoxManage.exe modifyvm “El_Capitan” –cpuidset 00000001 000106e5 06100800 0098e3fd bfebfbff
To spoof IvyBridge CPU
VBoxManage.exe modifyvm “El_Capitan” –cpuidset 00000001 000306a9 04100800 7fbae3ff bfebfbff
or
VBoxManage.exe modifyvm “El_Capitan” –cpuidset 00000001 000306a9 00020800 80000201 178bfbff
source: http://www.insanelymac.com/forum/topic/309654-run-vanilla-os-x-el-capitan-sierra-or-high-sierra-in-virtualbox-5034-on-a-windows-host/
***********************************************
My environment:
Windows 7 with 4 Gb ram and 2 core Intel Celeron E3300 2.5Ghz
VirtualBox 5.0.40
When I applied: VBoxManage.exe modifyvm “Mac OS X” –cpuidset 00000001 000306a9 00020800 80000201 178bfbff
+ all the other changes:
VBoxManage setextradata “Mac OS X” “VBoxInternal/Devices/efi/0/Config/DmiSystemProduct” “iMac11,3”
VBoxManage setextradata “Mac OS X” “VBoxInternal/Devices/efi/0/Config/DmiSystemVersion” “1.0”
VBoxManage setextradata “Mac OS X” “VBoxInternal/Devices/efi/0/Config/DmiBoardProduct” “Iloveapple”
VBoxManage setextradata “Mac OS X” “VBoxInternal/Devices/smc/0/Config/DeviceKey” “ourhardworkbythesewordsguardedpleasedontsteal(c)AppleComputerInc”
VBoxManage setextradata “Mac OS X” “VBoxInternal/Devices/smc/0/Config/GetKeyFromRealSMC” 1
it worked and stopped looping on boot.
NB I tried on another machine but didn’t work cos of the AMD processor – only works with Intel processors
Very good article – well done indeed!
I have the same issue as MANIKANDAN and others. DSMOS: SMC returned incorect key … Dont_Steal_MacOS.cpp:219
Any solution yet
No dear, I am sorry but right now I can’t give any solution but I suggest you to try to install macOS Sierra on VMware if you’re unable to install it on VirtualBox. Usually, on VirtualBox it’s a little bit sticky also the App Store does not work on VirtualBox but on VMware it does.
https://www.wikigain.com/install-macos-sierra-10-12-vmware/
Got it all working, great manual, thank you. Easier than ever. To solve my problem, I switched off ‘Nested Paging’. Funny. My Yosemite installation used ‘Nested Paging’.
Now what can I do to get a full screen resolution?
If you want to fix the resolution then follow this article: https://www.wikigain.com/fix-macos-sierra-screen-resolution-virtualbox/
you saved my live, I just disabled nested paging and voila!
Good luck and have a fun 🙂
Sounded really too easy. Step 5 goes right into guru meditation. Using VB Version 5.0.26 r108824 on Debian Jessie 64bit.
Hey I have a problem wit the installation. i7 8gb ram
i only see console ext and it reboots. not sure where the problem is but i have some lines that may be wrong:
sound assertion in applehda[…] (maybe 10 times
ans DSMOS: SMC returned incorrect key: 00000000000[…]00000
Fix your problem here
https://www.wikigain.com/complete-guide-fix-virtualbox-errors-installing-mac-os-x/
the VM keeps looping (rebooting) before it even gets to the Sierra screen. What could have I missed?
Is there any error if you can mention to guide us what’s the problem. Also send your system information in reply.
It doesn’t works, the vm es reload again and again after waiting DSMOS. Ps: I following the steps correctly
Try once again and read the article carefully. Or visit the topic below to solve your problem.
https://www.wikigain.com/complete-guide-fix-virtualbox-errors-installing-mac-os-x/
The CMD stucks an the last step: …getkeyfromrealsmc” 1 and if I start the VM it is in a bootloop. Can you help please?
Hi dear Thomas,
First, edit the VM name then paste it to the CMD. If you don’t do it, it’ll not work.
This is super helpful — I followed every step, and it worked great!
I’m running a Windows 7 host, and I’d like to get my mouse work smoothly in the guest macOS Sierra.
But something went wrong as I tried to get VBoxGuestAddtions installed on the guest macOS Sierra, please see screenshot:
https://www.dropbox.com/s/asx7m43ohtli90w/_vbox_macos.png?dl=0It’d be great if I could get some help. Thanks!
My Enviroment:
Host: Windows7 + Intel i7-4790
VBox: 5.1.6
VBoxGuestAdditions_5.1.6.iso from
http://download.virtualbox.org/virtualbox/5.1.6/VBoxGuestAdditions_5.1.6.isoStill, there is no support on VBoxGuestAddtions on Virtualbox for macOS Sierra or El Capitan. We’re sorry for that but as soon we got it then we will cover it with an article. If you want to fix the resolution then follow this article: https://www.wikigain.com/fix-macos-sierra-screen-resolution-virtualbox/
Hi, Machine doesn’t boot to setup, It goes directly to UEFI Interactive Shell.
Hello dear, Sorry can you explain in details and send your system information also.
Hi. I got the same UEFI interactive Shell. Can you help? I have HP Pavilion Notebook i7 windows 10
Increase video memory, chipset type,
VT is enabled in BIOS
Hi,
memory is 128MB
Chipset: ICH9 and now I changed into PIXX3
VT in enabled in BISO
Still same situation 🙁
Create new virtual Machine and go according to this guide and I’m sure you can install without any problem. Pls read the guide thoroughly
No getting this error;
VirtualBox – Guru Meditation
Follow this guide to fix your issue: https://www.wikigain.com/complete-guide-fix-virtualbox-errors-installing-mac-os-x/
Is there a reason I can’t sign into my apple account in the VM?
Yes dear, It has problem with all to sign in with apple ID on VirtualBox but you can sign in on VMware.
Thank you!
Welcome dear, hope that I was helpful
Worked great! Thank you man.
Welcome dear, We’re happy that you found this helpful.
Hey,
I dont know why but after following the same process I am having this thing where it says waiting for DSMOS… and then it repeats the process again and again. Here is the link where you can see my problem.
https://drive.google.com/open?id=0BwEStMaQkcDQU1lfSnZqa3pXUUEHey! I was trying to download the Complete Zip file with IDM (Internet Download Manager) Since Its a fairly big file I can not download it in one session, IDM allows you to pause and resume downloads but when I try to resume this one… I get an error message saying that my session as expired…. Can someone please assist me.. Thanks!
-Pop Club
Yes dear, try different times when you have the capability to resume the downloading files of macOS Sierra then keep downloading. Otherwise, don’t.
Hi. I have a Apple Key Store error. Can you help me please?
Screenshot: https://drive.google.com/open?id=0By79EAF-NRD9Z2RaNWVLTkZrdEE
You might solve your problem here. Visit the article below and read it carefully.
https://www.wikigain.com/complete-guide-fix-virtualbox-errors-installing-mac-os-x/
Thanks very much! The VBoxManage commands really helped me boot Sierra. I was getting “dsmos: smc returned incorrect key” and was in a boot loop.
Welcome dear, hope that you’ve found the article helpful.
Good luck!
Highly appreciate what this site is doing, thanks for helping everyone.
Welcome dear, hope that it was helpful.
I’m having an issue with my Virtual Machine. I followed all of the steps carefully but this is what I see upon startup of the VM. https://www.dropbox.com/s/lf45f2dwyo6iw5x/Screenshot%202016-09-26%2008.45.26.png?dl=0
Any suggestions?
You might solve your problem here. Visit the article below and read it carefully.
https://www.wikigain.com/complete-guide-fix-virtualbox-errors-installing-mac-os-x/
I’m getting the following message on step 7.5
“This Mac is no longer eligible to create Apple ID accounts. Create an Apple ID using a different device”
I’m trying to login with my existing account
I’m able to click continue en everything seems to be working
So that’s okay. Skip that and when you logged in then once try again to join with your Apple ID to manage your account.
same error as MANIKANDAN:
macOS startup exits in between and starting again
Error : “DSMOS : SMC returned incorrect key : 00000000000000000000*******Dont_Steal_MacOS.cpp:219”
screenshot link:
https://s12.postimg.org/f7qengbdp/sierra.png
processor: intel core i3 4130
virtual box 5.1.4
Same here, I’ve a boot loop and smc always returning incorrect key.
VB updated and correct commands.
Any help?
It works on the latest version of Virtualbox also if you install it correctly or your system support.
Where can I check supported systems?
(i7 4720hq, gtx 965m, 16gb)
Bump!!
It works on PC’s the are fully intel supported but if you are using AMD then it might have a problem with that.
@Faiz Orz Thanks for no help, wrong info and next time open your eyes. Find a way to fix the problems instead ofgiving wrong info. Fixed here.
how did you fix it?
Quit virtualbox then try once again step #5
Hey all. When I get to Step #5 and go to enter the first VBoxManage.exe line, I get this message:
:\VBox>VBoxManage.exe modifyvm “Sierra” –cpuidset 00000001 000306a9 04100800 7fbae3ff bfebfbff
VBoxManage.exe: error: Could not find a registered machine named ‘Sierra’
VBoxManage.exe: error: Details: code VBOX_E_OBJECT_NOT_FOUND (0x80bb0001), component VirtualBoxWrap, interface IVirtualBox, callee IUnknown
VBoxManage.exe: error: Context: “FindMachine(Bstr(a->argv[0]).raw(), machine.asOutParam())” at line 500 of file VBoxManageModifyVM.cpp
What is causing this? The machine name is correct. I am trying to do this process using Portable-VirtualBox. Could that have anything to do with it?
You can solve your problem here. Visit the article below and read it carefully.
https://www.wikigain.com/complete-guide-fix-virtualbox-errors-installing-mac-os-x/
For Windows 10, I had to add this line after changing to the \Oracle\VirtualBox directory:
VBoxManage.exe registervm “C:\Users\user\VirtualBox VMs\macOS Sierra\macOS Sierra.vbox”
just replace “user” with your actual user directory name
Thanks for sharing your feedback.
Hi,
This tutorial works well for me, thx you 🙂
The thing is that my guest screen resolution is like 1024*768, and i would change it to a higher resolution.. Is that possible ?
Thx 🙂
You can fix the screen resolution by visiting this article, my dear.
https://www.wikigain.com/fix-macos-sierra-screen-resolution-virtualbox/
I fixed this bug by using VMware instead of VB… It works with better performance and I can have a real “fullscreen” mode. VM ware is by fare batter then virtual box, but is harder to setup ! 🙂 Thx
By the way, I actually reply to your post on my Mac VM :p
Yh, VMware is somehow better but the only problem is this that VMware is not free and VBox is open source.
You can use it for free. Any way that’s good that it worked for you.
Good Luck! 😀
Yh, VMware is somehow better but the only problem is this that VMware is not free and VBox is open source.
You can use it for free. Anyway that’s good that it worked for you.
Good Luck! 😀
I get this error on VirtualBox, and the VM won’t even load because of it:
Configuration error: Invalid config value(s) for the EFI device (VERR_PDM_DEVINS_UNKNOWN_CFG_VALUES).
Result Code:
E_FAIL (0x80004005)
Component:
ConsoleWrap
Interface:
IConsole {872da645-4a9b-1727-bee2-5585105b9eed}
Can someone help?
Hi, dear PW. You might have missed any step or your system is not compatible with Mac operating system.
Try once again and read the article, carefully. Or visit the topic below to solve your problem.
https://www.wikigain.com/complete-guide-fix-virtualbox-errors-installing-mac-os-x/
Hi Mukhtar,
I have gotten several Mac VMs to work successfully before with VirtualBox, from Mountain Lion up through Yosemite.
My Intel i7 system is Mac-compatible. The error above is generated by VirtualBox, which fails to boot my VM with that error message.
Can you send me the screenshot?
I have the same problem sir please help
What’s your problem can you mention?
i too have same problem sir please help>>
Failed to open a session for the virtual machine macOS Sierra.
Configuration error: Querying "UUID" failed (VERR_CFGM_VALUE_NOT_FOUND).
Result Code: E_FAIL (0x80004005)
Component: ConsoleWrap
Interface: IConsole {872da645-4a9b-1727-bee2-5585105b9eed}
Sorry dear, I did not get when you face this problem. I mean in which step this problem come to you?
Time to face the music armed with this great iniromatfon.
For this error on my Ubuntu 18 VirtualBox, I had to add my user to group vboxusers, as it looks like I am not a group member by default
After following the steps and booting it up, it just shows a black screen.
What is your system details?
Is it AMD or Intel?
Hi Mukhtar,
I have gotten several Mac VMs to work successfully before with VirtualBox, from Mountain Lion up through Yosemite.
My Intel i7 system is Mac-compatible. The error above is generated by VirtualBox, which fails to boot my VM with that error message.
Select the Version Mac OSX 64 bit from the VirtualBox Settings. Also, make sure before running the code to the cmd, quit VirtualBox Completely.
Mine is a AMD Athlon II X2 255 dual core clocked at 3.10 GHz
What’s your issue my dear?
macOS startup exits in between and starting again
Error : “DSMOS : SMC returned incorrect key : 00000000000000000000*******Dont_Steal_MacOS.cpp:219”
What is your system? Is it AMD or Intel?
After following the steps and booting it up, it just shows a black screen. Please help me fix this issue.
Sorry for the duplicate comments. It posted like 3 of what I said.
I’ve got the same issue on my Surface Pro 3 (Intel)
Which kind of problem dear Quirin?
A good many valaubles you’ve given me.
Same issue. My processor is i5 6200u.
Apply Step #5 once again.
Keep in mind, before adding VB Code to the cmd quit or exit the VirtualBox. It should not be opened. Most of the time it’s not working when you let open.
Good Luck!
I had the continuos reboot problem, but solved after exiting and relaunching VB, in fact the VB code needs a restart to be activated. Proceeding to Sierra install!
Thanks for sharing your positive Feedback
Restart didn’t do the trick for me & it kept restarting. To fix, I closed VB and then I runned the VBCode from command promp all while VB was closed. Start VB & install
Yeah, you’re right dear Asd
many thanks!
(you should write in the article that you should restart or close VB, i didn’t though about it too :P)
Thanks for your nice feedback, We will update the article ASAP.
make sure virtualbox is completely closed before running commands to avoid “DSMOS : SMC returned incorrect key” error.
That’s the problem. Thanks man, you saved my day.
I am stuck at the first run the virtual machine (pre install), it appears to keep rebooting at a certain point and starting all over again…….
You might have missed any step and run the command correctly
Good Luck!!! 😀 😀 😀
same thing happening with me…i followed all steps correctly on first boot it’s rebooting constantly…not even welcome screen appearing…
Have you solved it?
I’m not sure why it’s not working for you dear ABhi
Is your system AMD or Intel? This method most of the time does not
work on AMD systems.
How was the experience ? Does it lag if i have 6 GB ram and allocated 4 GB ram on i3 processor?
If your system is Intel based you can run macOS Sierra on VirtualBox and VMware.
4 GB RAM is enough to run macOS Sierra 10.12
What about AMD?
It works on some AMD system, but some don’t.
Hello Mam,I have a problem regarding in opening a mac os in virtual machine.It always shows the Guru meditation that tells there was an critical error.Ive been following your steps in your website especially in putting a virtual code in cmd but it keeps showing it Guru meditation.What do you think is the problem mam? For me is my RAM is only have 4GB maximize only.Please kindly help me mam regarding to this problem
Hey dear, Change the operating system version to Mac OS X 64-bit.
Hello,
I have followed all steps and now I am stacked with DSMOS has arrived or waiting for DSMOS. What should I do?
Thanks
Edo
Can you put the screenshot link?
Hello,
I have tried this How To, however I am stucked with Waiting for DSMOS or DSMOS have arrived. What should I do?
Thanks
Edo
If you have Mac Operating system so just go to beta.apple.com then download macOS Sierra.
One day ago it’s published as public. Now, you can download it. If you don’t have MacBook or iMac.
For now download the developer preview then Install on VirtualBox. The link is mentioned inside the post.
Did anybody get this to work?
Don’t you believe this? Just try to test it.
IF you have got any kind of problem, please share with us.
Good Luck 🙂 🙂 🙂
Hello, I have tried this and others like it. I can’t get it to work and I don’t have a mac of my own. I have a custom built machine with a 6700k and it starts to load in the vm then does this:
http://imgur.com/qgNhLIT
Would you be able to help me, because I am trying to install mac os on my other ssd and this simply isn’t working. I followed your steps to the T. closing virtualbox in order to put the commands in, setting everything the way it was supposed to as well. I am at a loss
Make your sure that you exit VirtualBox before Step #5. Add VirtualBox Code to the CMD.
Try again from Step #5. Add VirtualBox Code to the CMD Then use these codes linked below.
#1. Dowload VirtualBox Code
#2. Or use this
Code for Virtualbox 4.x.x:
cd “C:\Program Files\Oracle\VirtualBox\”
VBoxManage.exe modifyvm “Your VM Name” –-cpuidset 00000001 000306a9 04100800 7fbae3ff bfebfbff
VBoxManage setextradata “Your VM Name” “VBoxInternal/Devices/efi/0/Config/DmiSystemProduct” “MacBookPro11,3”
VBoxManage setextradata “Your VM Name” “VBoxInternal/Devices/efi/0/Config/DmiSystemVersion” “1.0”
VBoxManage setextradata “Your VM Name” “VBoxInternal/Devices/efi/0/Config/DmiBoardProduct” “Iloveapple”
VBoxManage setextradata “Your VM Name” “VBoxInternal/Devices/smc/0/Config/DeviceKey” “ourhardworkbythesewordsguardedpleasedontsteal(c)AppleComputerInc”
VBoxManage setextradata “Your VM Name” “VBoxInternal/Devices/smc/0/Config/GetKeyFromRealSMC” 1
Code for Virtualbox 5.0.x:
cd “C:\Program Files\Oracle\VirtualBox\”
VBoxManage.exe modifyvm “Your VM Name” –-cpuidset 00000001 000106e5 00100800 0098e3fd bfebfbff
VBoxManage setextradata “Your VM Name” “VBoxInternal/Devices/efi/0/Config/DmiSystemProduct” “iMac11,3”
VBoxManage setextradata “Your VM Name” “VBoxInternal/Devices/efi/0/Config/DmiSystemVersion” “1.0”
VBoxManage setextradata “Your VM Name” “VBoxInternal/Devices/efi/0/Config/DmiBoardProduct” “Iloveapple”
VBoxManage setextradata “Your VM Name” “VBoxInternal/Devices/smc/0/Config/DeviceKey” “ourhardworkbythesewordsguardedpleasedontsteal(c)AppleComputerInc”
VBoxManage setextradata “Your VM Name” “VBoxInternal/Devices/smc/0/Config/GetKeyFromRealSMC” 1
I have already tried those commands. I’ve done all of the steps and still won’t work.
Can you take a short video of what you’ve done?
upload on youtube or any other place. Let me see what you’ve done.
I followed step 5 and closed VirtualBox before entering the commands and I keep on getting the same error. The error says that it can’t find that registered virtual machine. I double checked the name and it is correct.
Please send a screenshot if possible.
Same for me. Restarting boot again and again
Repeat step #5 carefully. Make sure that you exit VirtualBox before adding the code
Thanks Mukhtar Jafari, my issue was that I didn’t exit VirtualBox when executing step 5
Good luck my dear
It helped me too. Thanks!
Thanks for sharing your positive feedback.
I keep getting the guru message, I have tried 5 versions of the os 10 different ways. I’m on Zorin OS, I can run all windows versions with VB also I tried several Linux flavors all working fine. just seems to be an issue when I try a Mac OS. Even a retail ISO install throws an error.
What’s the error can you send me the snapshot?
this is what I am getting I don’t know what the problem is I made sure I close the VB before step 5 and placing the code in CMD. Can you please help me asap. Thank you
What’s the error?
I did everything EXACTLY like in the video and the pictures and the text but when I start the machine, I just get a blackscreen, no white text or something, just pure blackness 🙁 please help me
Navigate to “Display option” then put the video memory to 128 MB.
Hey I’m getting the same black screen when I start up my VM but I checked and I have the display option set to 128 MB, any other helpful hints to solve this problem?
Enable 3D acceleration and change the operating system version to Mac OS X (64-bit).
Thank you.
It works perfect.
Regards
You are welcome and have fun my dear
my computer is 64 bit icore 3, 3.3 machine still after installing virtual box it is showing 32 bit mac machine ; so i am unable to proceed the machine creation please do the needful
Enable Virtualization Technology from your main system.
Amazing. Thank you so much, Mukhtar! I have been struggling for 2 days trying to installing Yosemite 10.10.5 on Virtualbox.
I was going to give it up, then to my pleasure, I came across your post this morning. It took me only 3 hours to set it up. And now, I have macOS Sierra up running on my HP Probook.
Thanks again & Have a GREAT weekend!
We’re happy that you found this helpful.
It worked for me. After starting the OS I also proceeded to do an update. I’m running 10.12 Thanks for the MOP