Installing Kali Linux operating system on various machine need some skills. I’m sure most of the PC (Personal Computer) users don’t know, how to install Kali Linux on Virtual Box or other virtualisation software. In this article, I want to show you how to install Kali Linux on VirtualBox in PC. The upcoming article, I’ll lead you, how to install Kali Linux on VirtualBox in a Mac environment.
How to Create a New Virtual Machine?
We have explained in details to create a new virtual machine on VirtualBox. In today’s article, I will do it once again that you should understand it easily. First, you must download the following requirements.
Step #1. Once the downloading is completed, install the VirtualBox on your Windows PC. The installation is straightforward and simple. Double-click on the setup then hit continue until it gets finished. Now, open up the VirtualBox then click on the “New” at the upper left-hand side of the window.
A new window will pop up, choose a proper name for Kali Linux. Next, you have to select the type of operating system. When you type the Kali Linux, it’ll automatically set up all the necessary options. If it does not set up, so you have to do it manually. Click “Next” button.
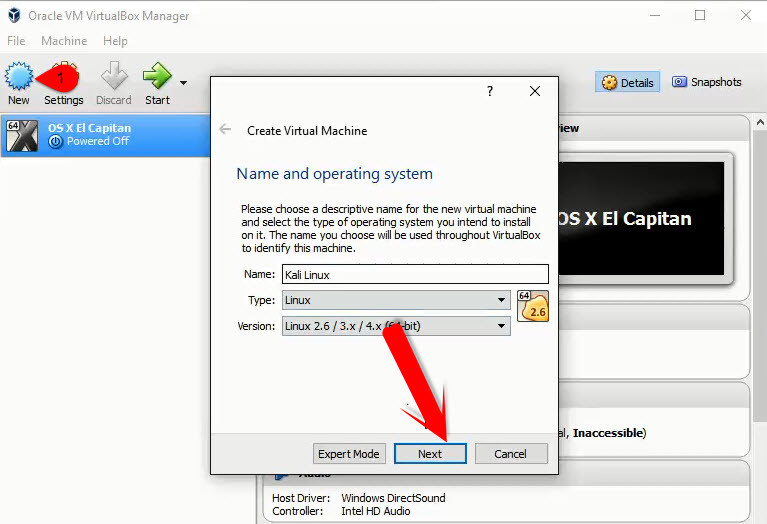
Create a New Virtual Machine
Step #2. Choose at least 2 GB of memory size then hit the “Next” button.
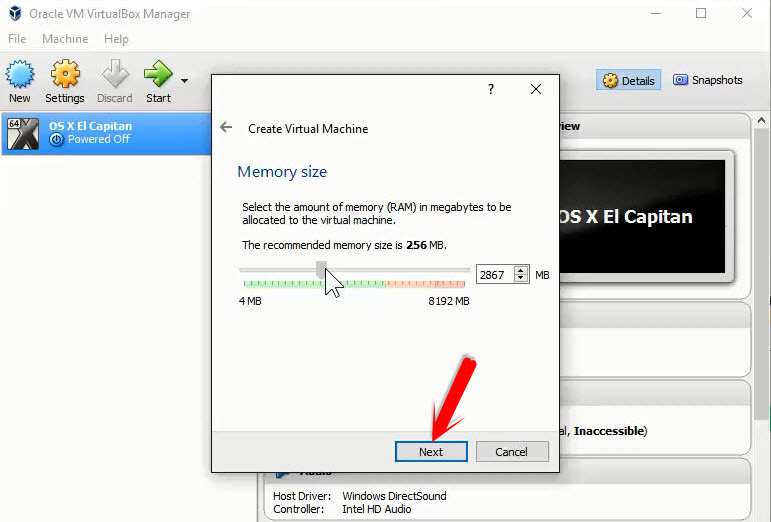
Choose Memory Size
Step #3. Create a new virtual hard disk. Select the second option “Create a new virtual hard disk now“. Hit the “Create” button.
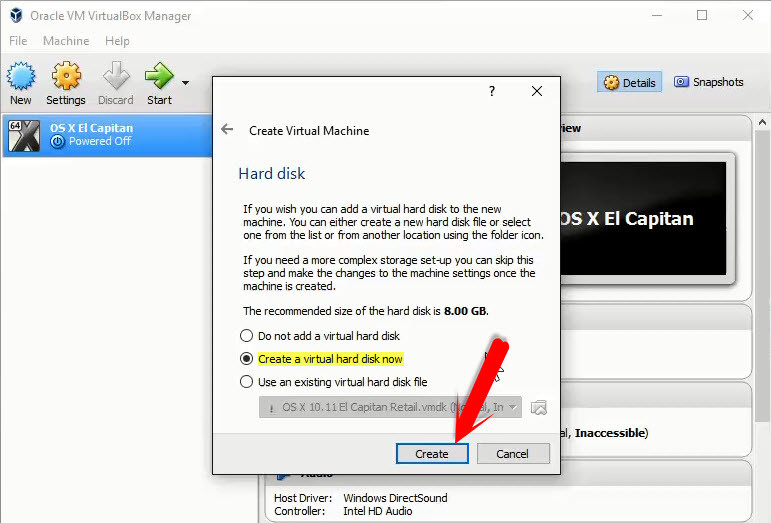
Create a New Virtual Hard Disk Now
Step #4. A new window will be shown to you and choose the first option “VirtualBox Disk Image” then tap on the “Next” button.
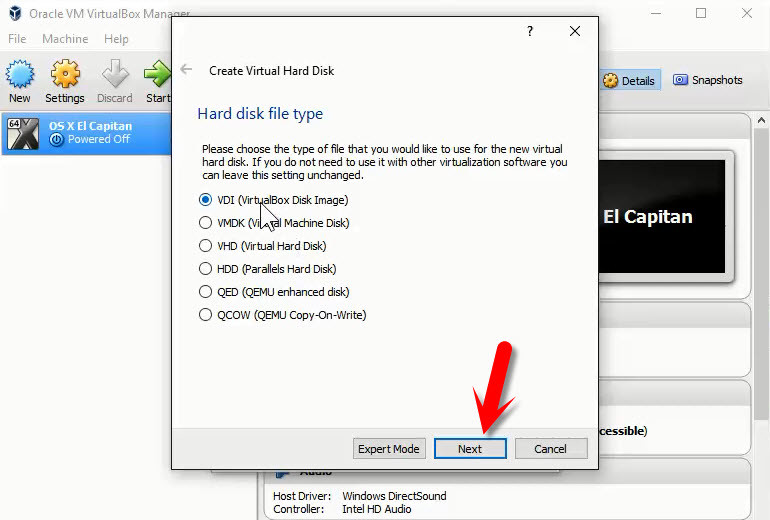
Har Disk File Type
Step #5. Here, you have two options “Dynamic and Fixed Size“. A dynamic allocated hard disk file will only use space on your physical hard disk as it fills up it’ll take space from the main hard drive. If you choose the “Fixed Size“, it’ll cut some space from the physical hard drive when the size is filled. You can’t get space from the physical hard disk. I recommend you to choose the dynamic hard disk.
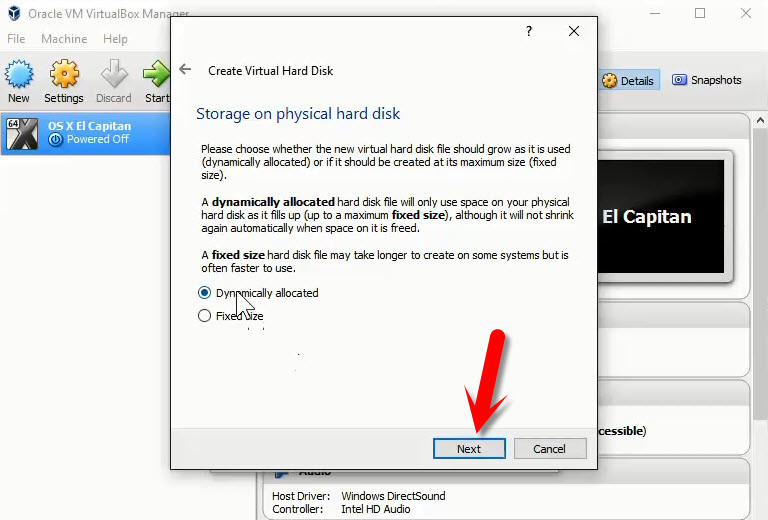
Storage on Physical Har Disk
Step #6. In this step, choose the amount of space for the hard disk. If you’ve selected fixed size hard drive so at least 15 GB, you should select the size of the hard disk.

File Location and Size
Step #7. Now, you’ve successfully created a new virtual machine, but it’s not finished yet. Click on the VirtualBox “Settings“. Navigate to the “Display tab” then increase the “Video Memory“.
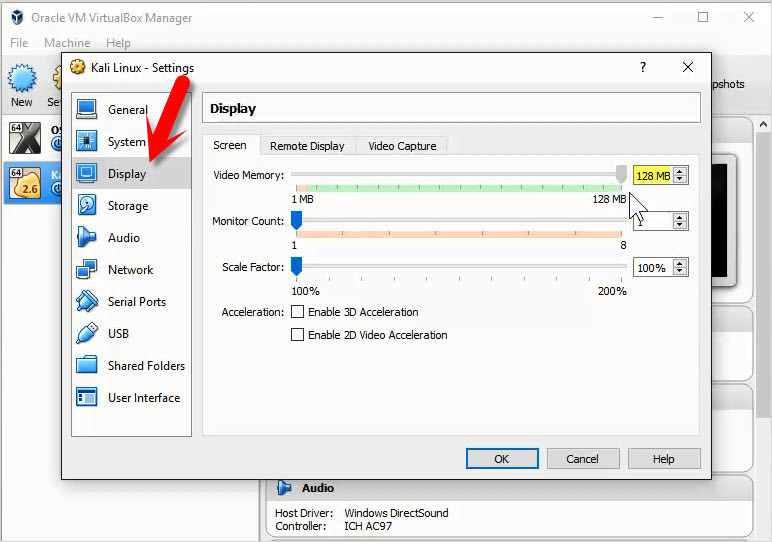
Setting Video Memory
Step #8. Click on the “Storage tab” then tap on DVD icon. A small window will pop, choose “Choose Disk“. Now, Choose the Kali Linux ISO file that you’ve downloaded from its site.
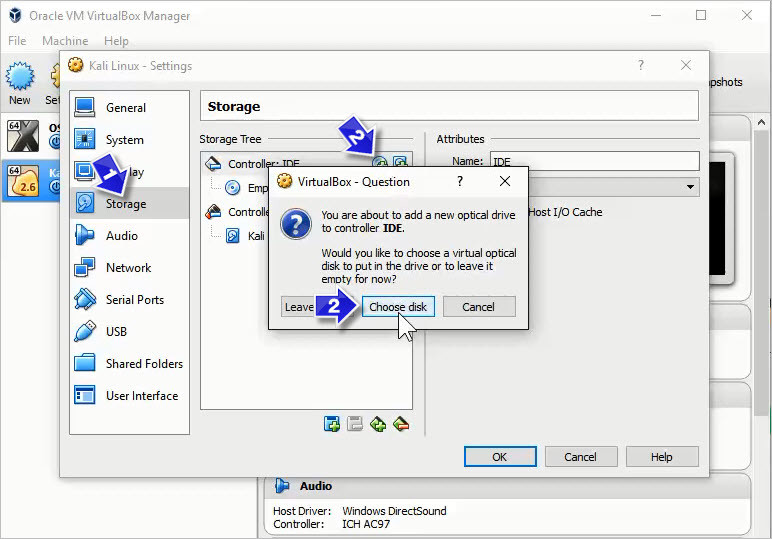
Choose an Operating System
It’s done now. Click the “OK” button to end up the creating a new virtual machine process.
Install Kali Linux on VirtualBox
Now that you’ve successfully created a new virtual machine let’s get started that how to install Kali Linux on VirtualBox in PC. Open the VirtualBox then select the Kali Linux virtual machine. Tap on the “Start” button at the top.
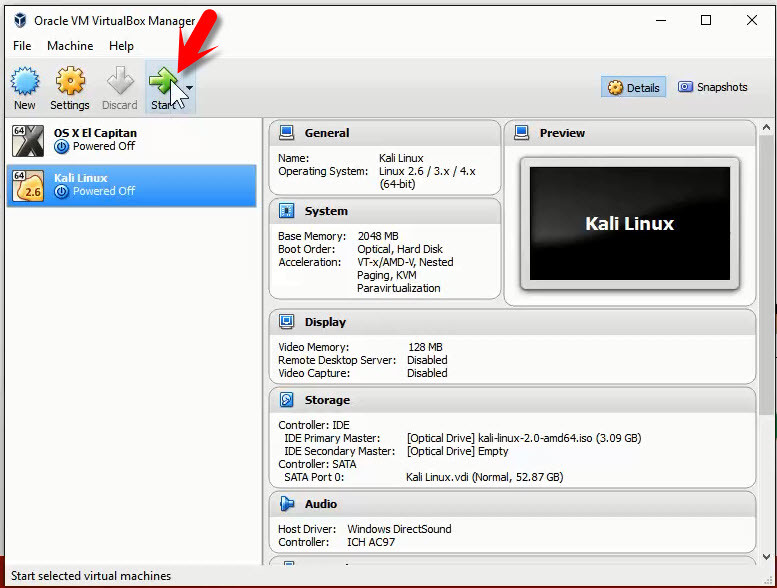
Start Virtual Machine
Step #1. When you start the virtual machine, the Kali Linux will pop up. They’re three options to choose.
- Use Kali Linux live
- Install
- Graphical install
Here, I’m going to show you a clean graphical installation of Kali Linux. So I’m going to choose the third option “Graphical Install“. If you choose the only “Install” options so you’ll not see a pretty nice graphical user interface instead there will be black with a terminal user interface.
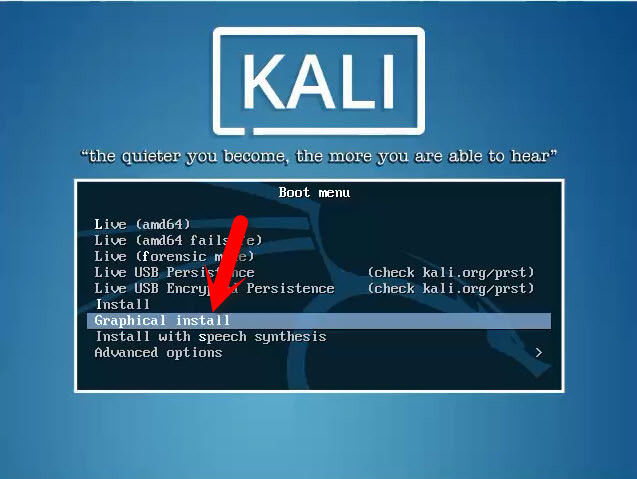
Graphical Linux Installation
Step #2. In this step, you’re going to choose a language, keyboard, and Location. Hit the “Continue” button.
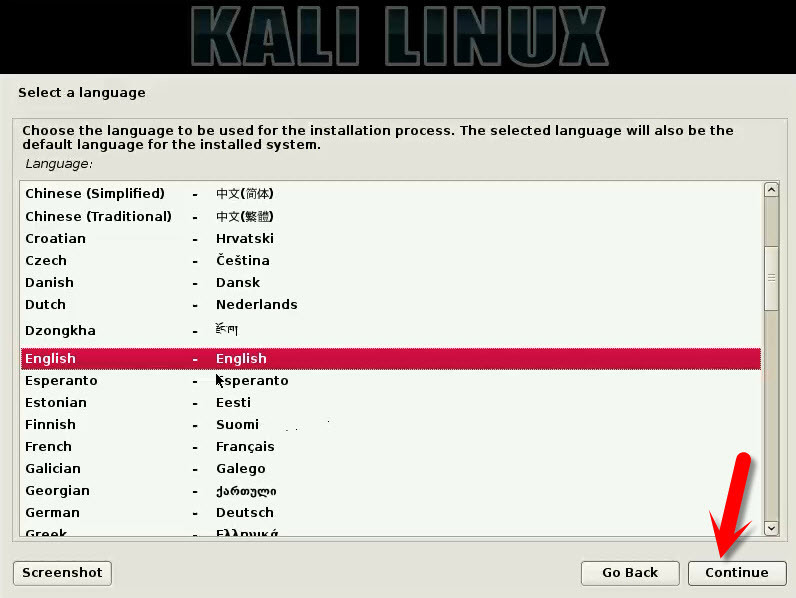
Choose Language
Step #3. Choose a hostname. The hostname is a single word that identifies your system to the network. The hostname is the person who will use the operating system and have full control over it.
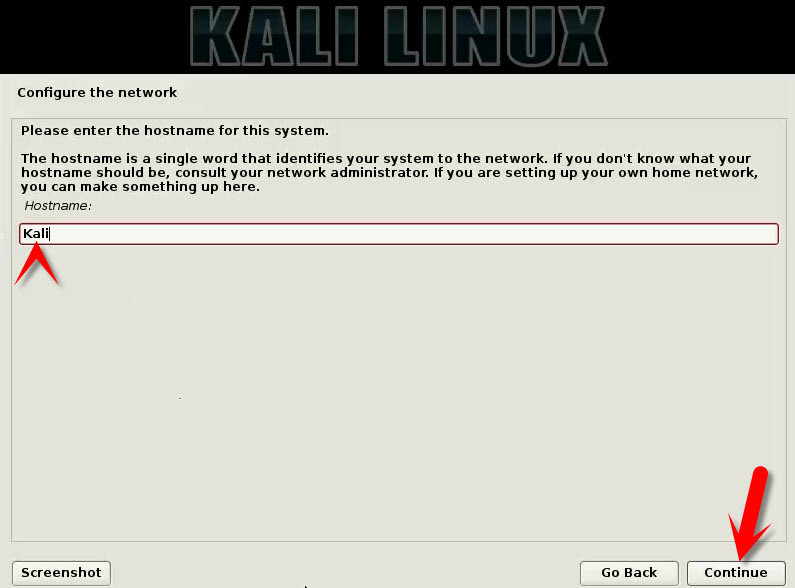
Choose Hostname
Step #4. Choose a domain name. If you don’t have a domain, then skip this process.
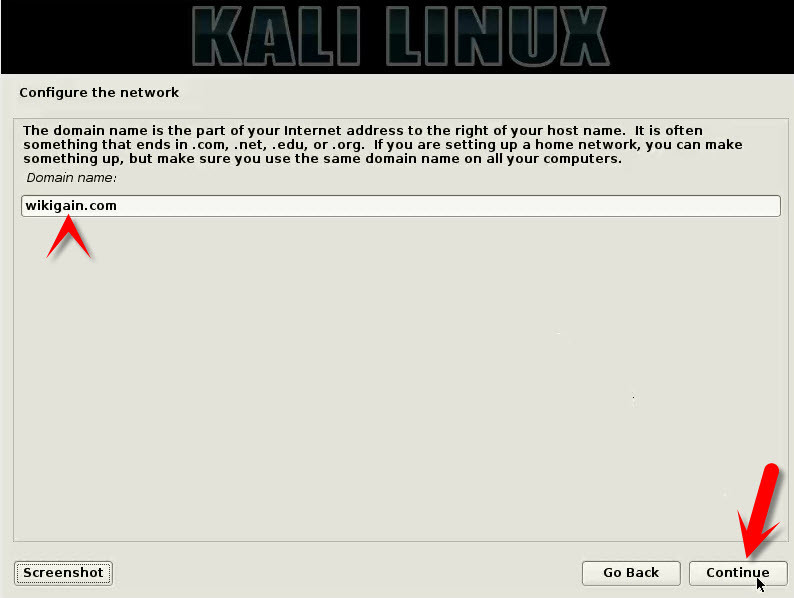
Choose Domain Name
Step #5. Try to type a strong password for the root user. A strong password contains upper case letter, lower case letter, and symbols.
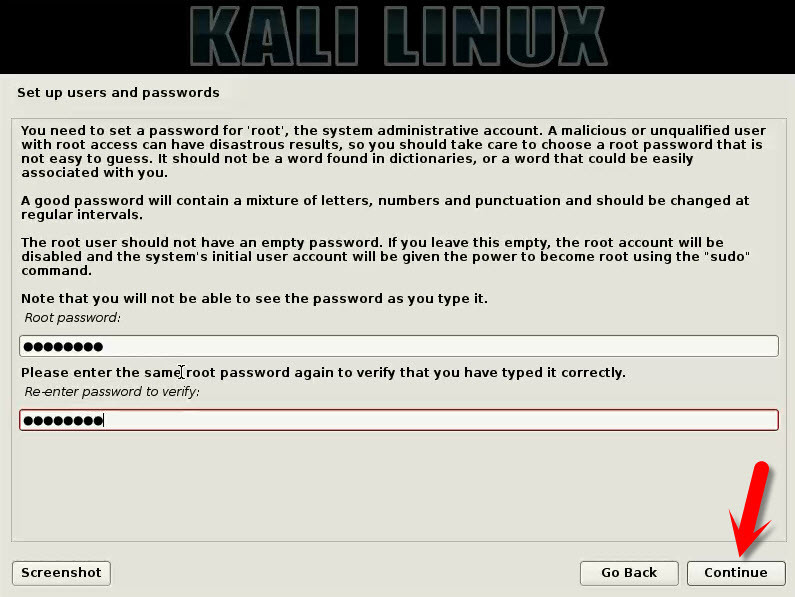
Enter Password
Step #6. Select a proper time zone for your operating system.
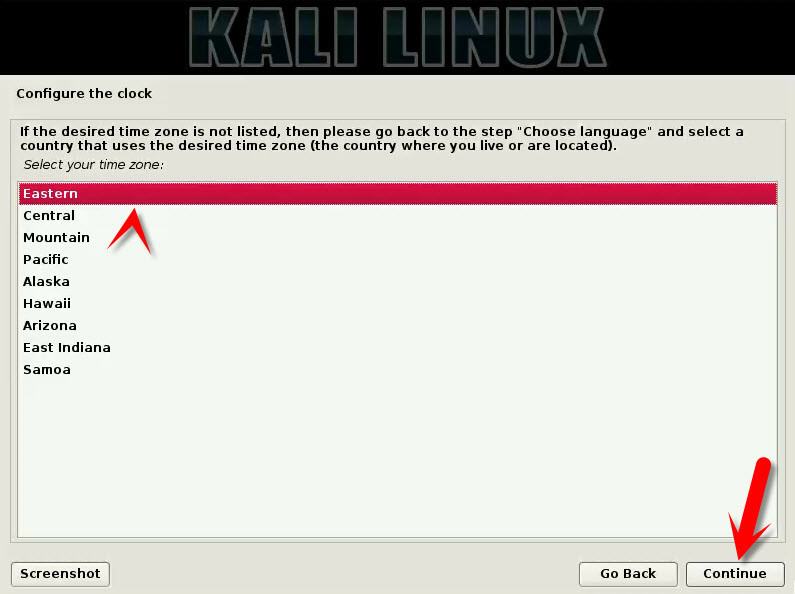
Select the Time Zone
Step #7. Now, you need to create a new partition. Click on “Manual“.
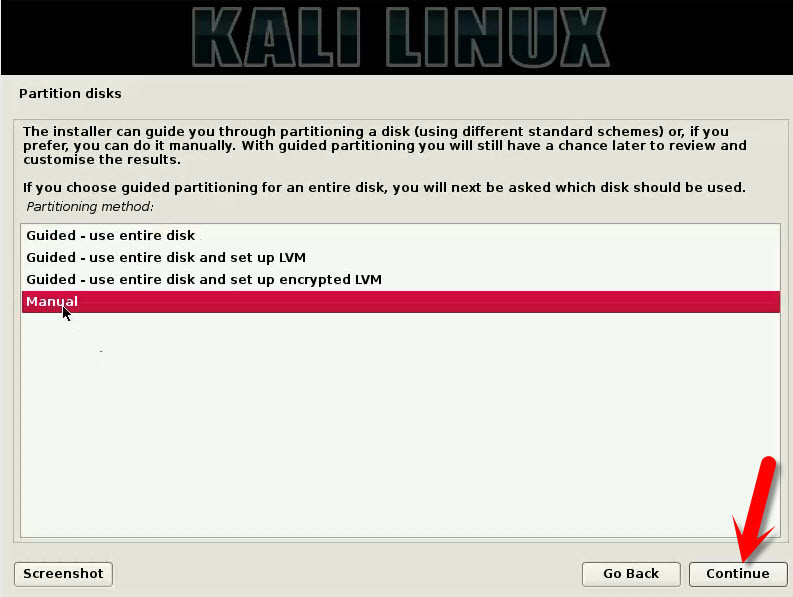
Select Manual Partition
Step #8. Once you’ve chosen the manual partitioning. Now, select the third option “SCSI1 (0,0,0) (sda) -56.8 GB ATA VBOX HARDDISK“.
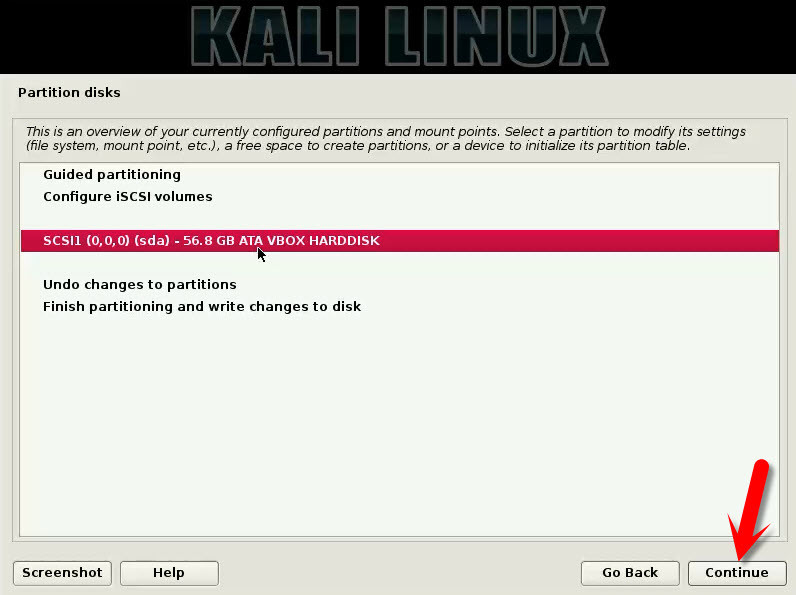
Create a New Partition
Step #9. In this step, select the “Yes” button to continue the partitioning process.
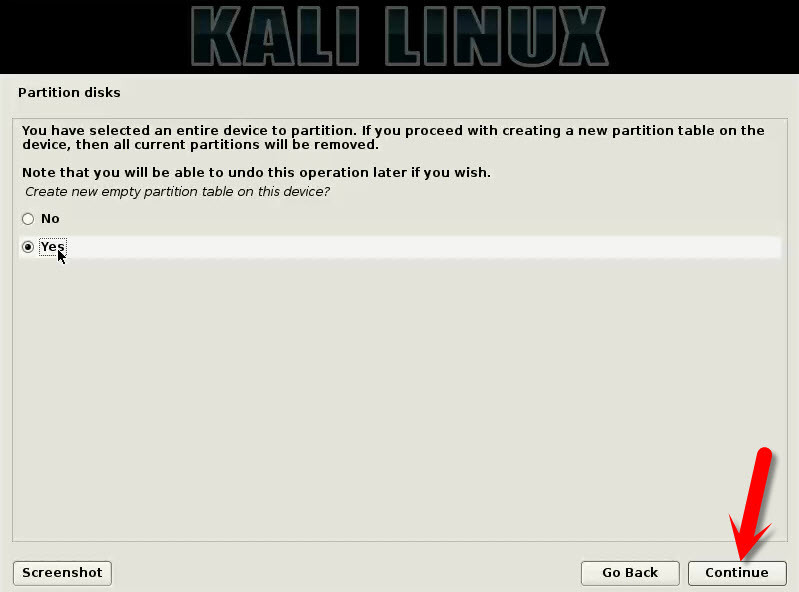
Create New Partition for Kali Linux
Step #10. Choose the free space then hit the continue button.
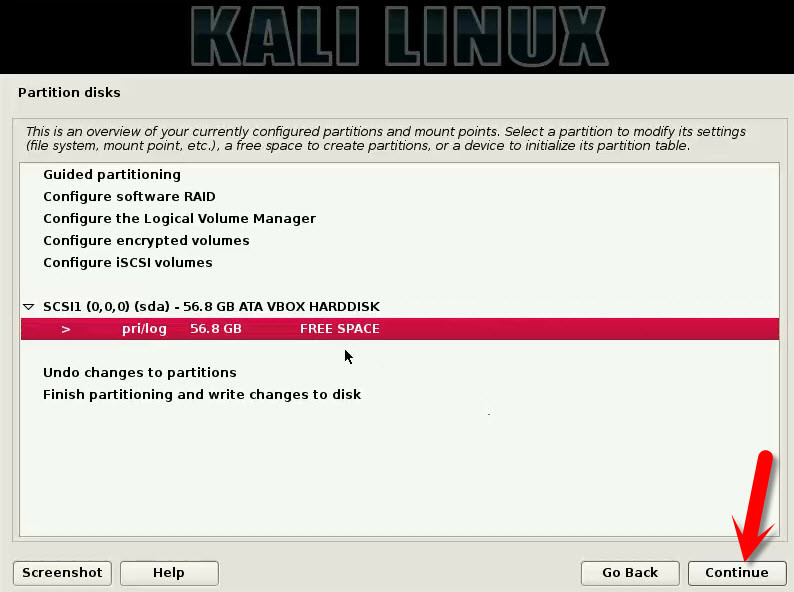
Select the Partition
Step #11. Select “Create a new partition” then hit the “Continue” button.
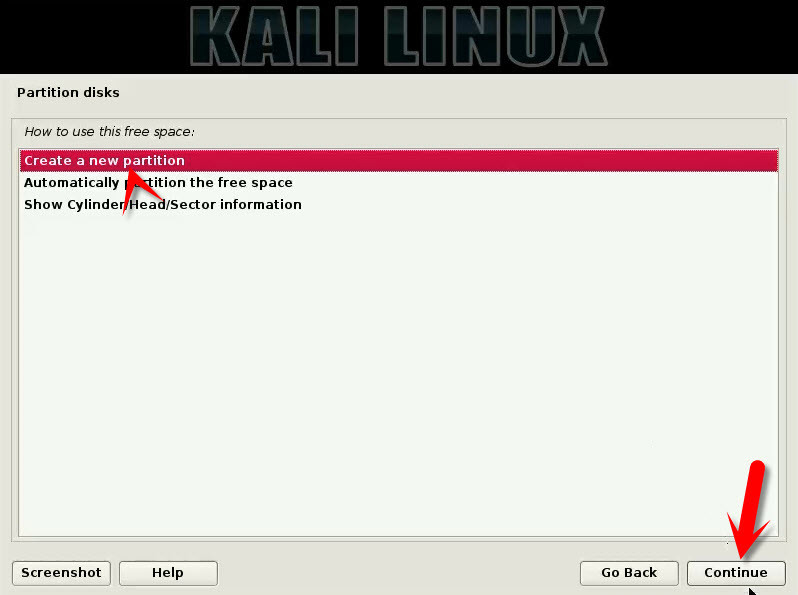
Select Create a new partition
Step #12. You can create a partition or create multiple partitions. Choose the size of the partition. Here I’ll create three partitions. So my first drive will be 40 GB.
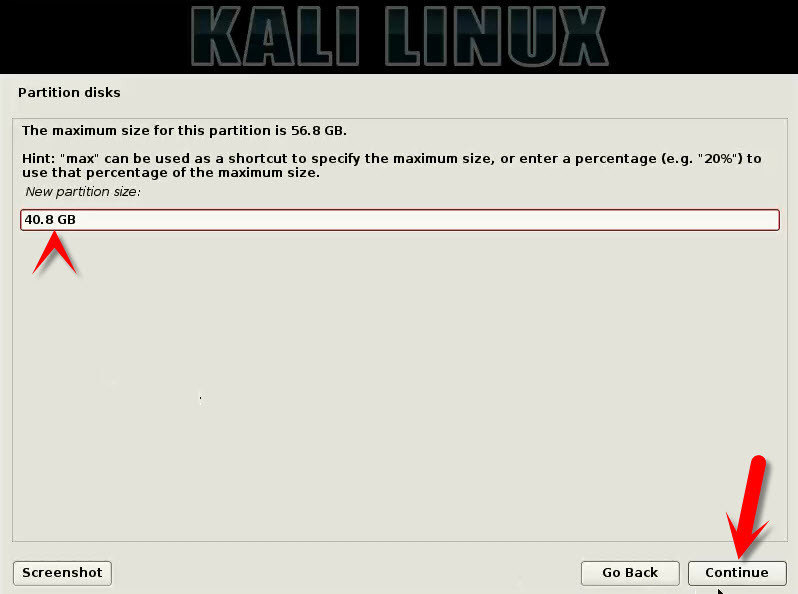
New Partition Size
Step #13. Choose primary or logical, then hit the “Continue” button.
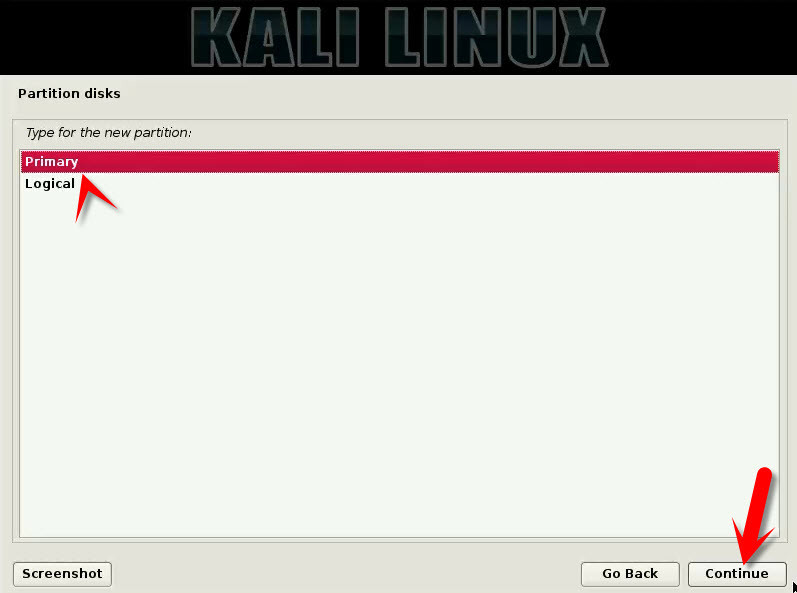
Primary Partition
Step #14. Please select whether you want the new partition to be created at the beginning or at the end of the available space. Choose the first option “Beginning” then hit “Continue“.
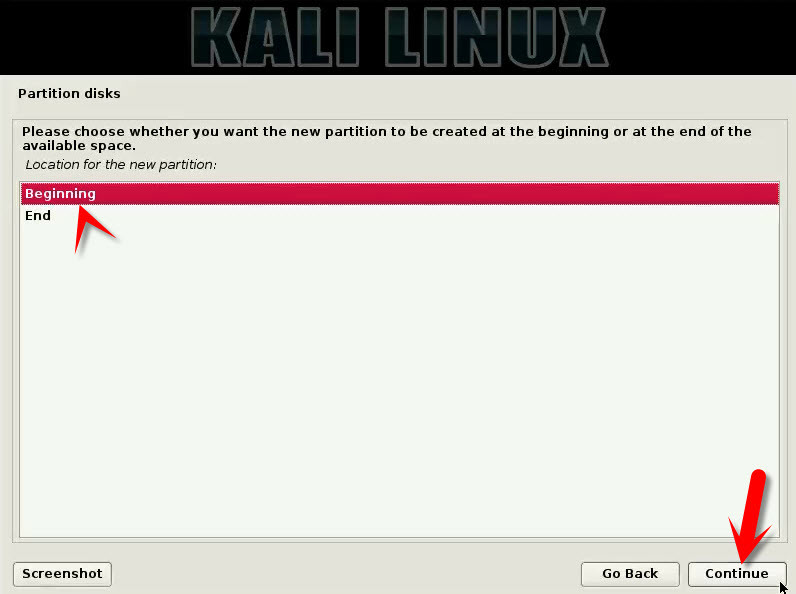
Location for the New Partition
Step #15. Now, choose “Done setting up the partition“.
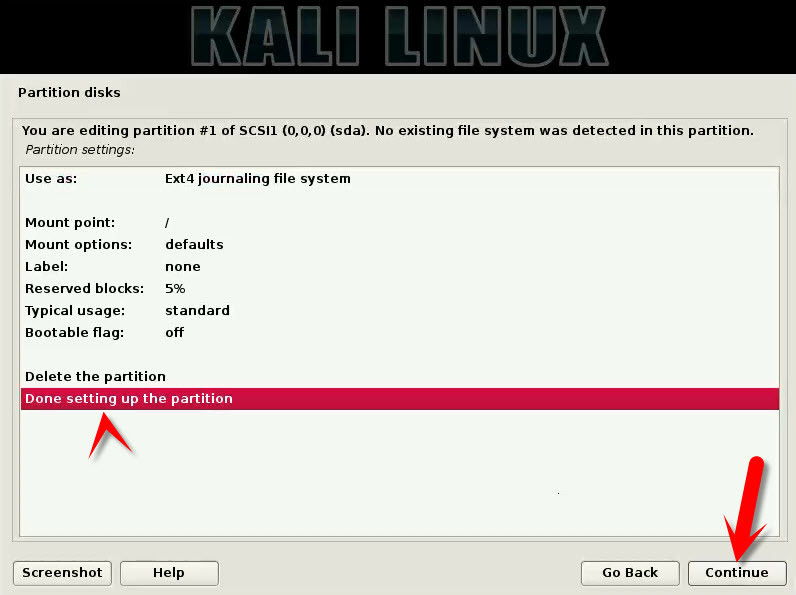
Done Setting up the Partitioning
Create the other partition the same. Please remember one thing that creates one partition for “Swap area“. This partition should be at least 1 GB.
Once you created all the partitions. Choose “Finish partitioning and write changes to the disk“. Hit the “Continue” button.
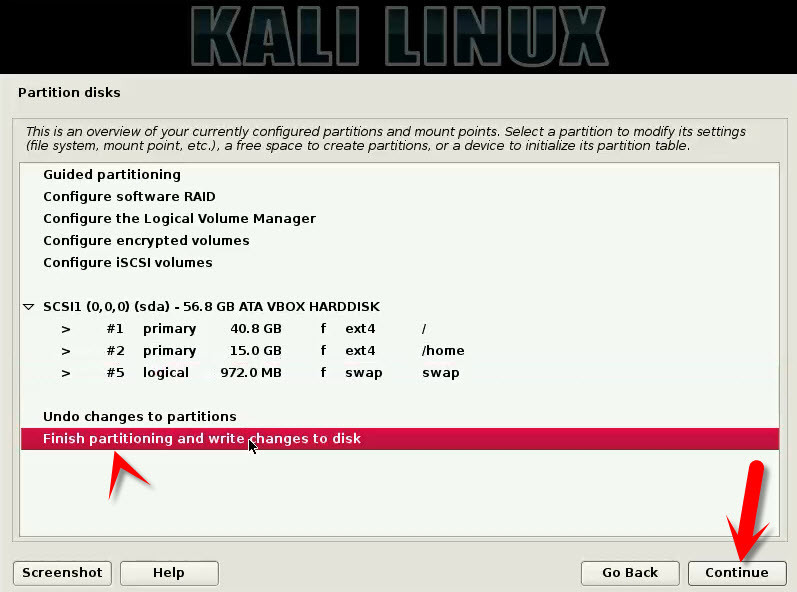
Finish Partitioning
Step #16. Do you want to write changes to the disk? Click “Yes“.
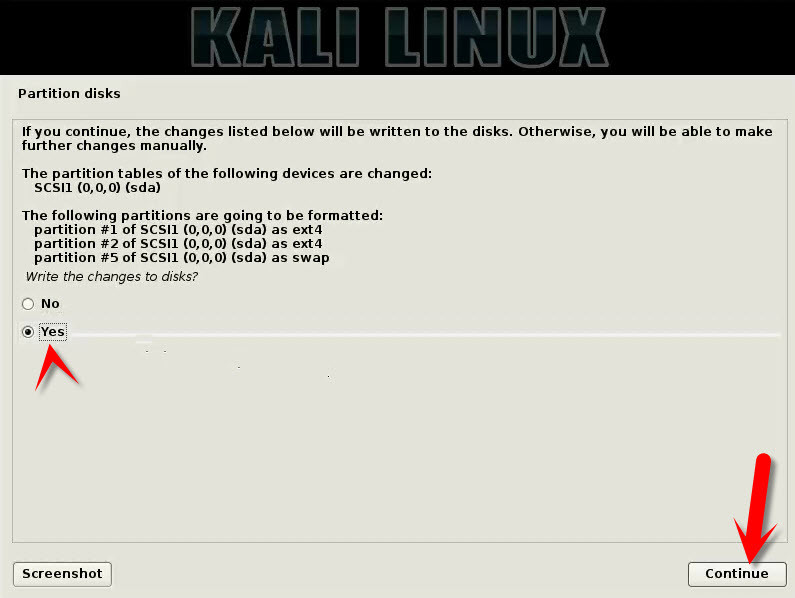
Write Changes to the Disk
The operating system will start installing. Wait for some minutes. It’ll take around 10 to 20 minutes. This depends on the speed of your computer.
Step #17. Do you want to use the disk mirror? Click “No“.
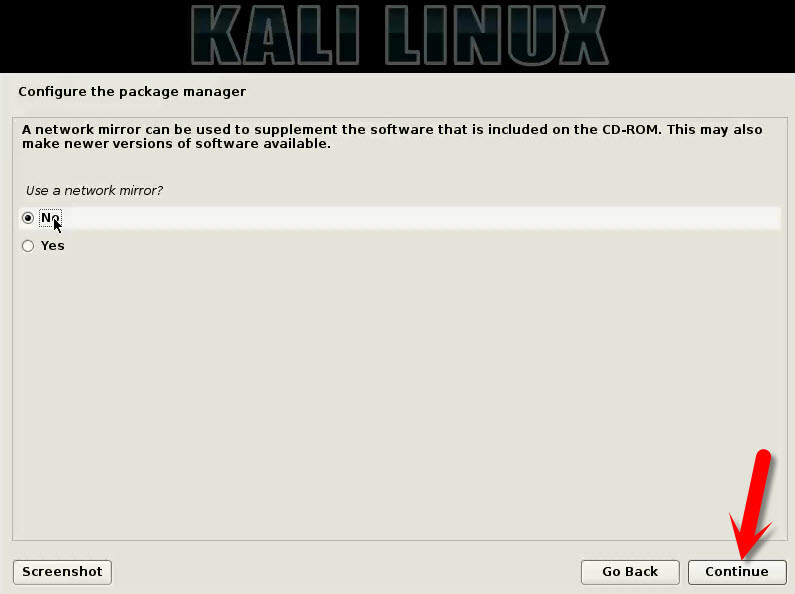
Use a Network Mirror
Step #18. Install the GRUP boot loader on the hard disk. Click “Yes“.
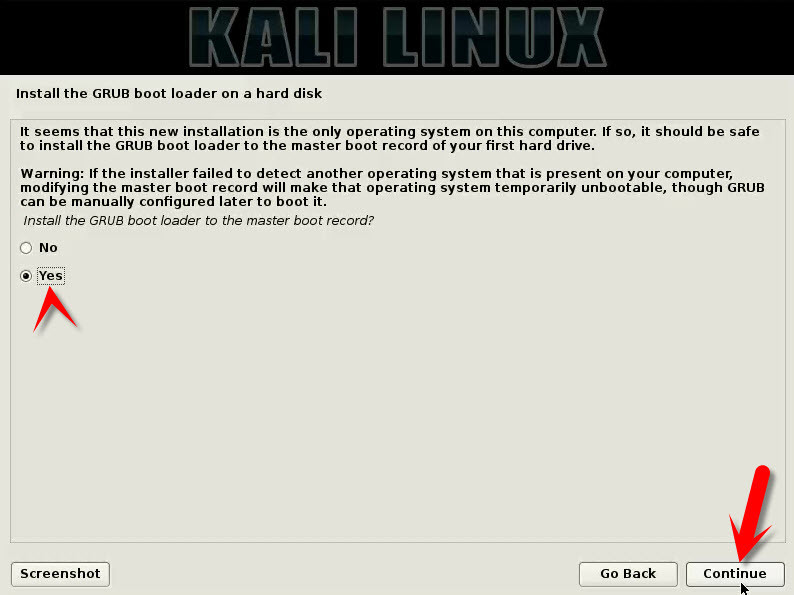
Install the GRUB Boot Loader
Step #19. When you clicked “Yes“, a new window will be shown to you. Choose the second option and hit the “Continue” button.
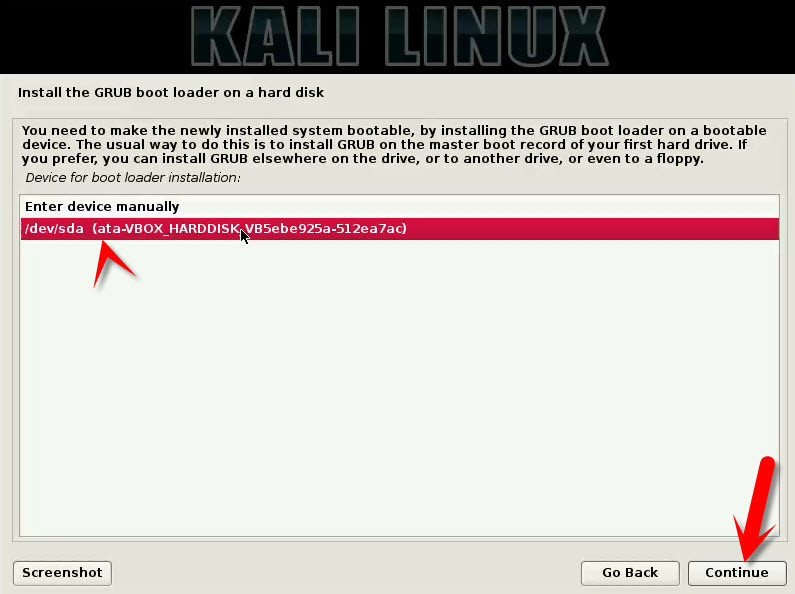
Device for Boot Loader Installation
After this, your computer will restart, and you’ll be asked to enter the username and password. The username is “root“, and the password is whatever you’ve entered in step 5.
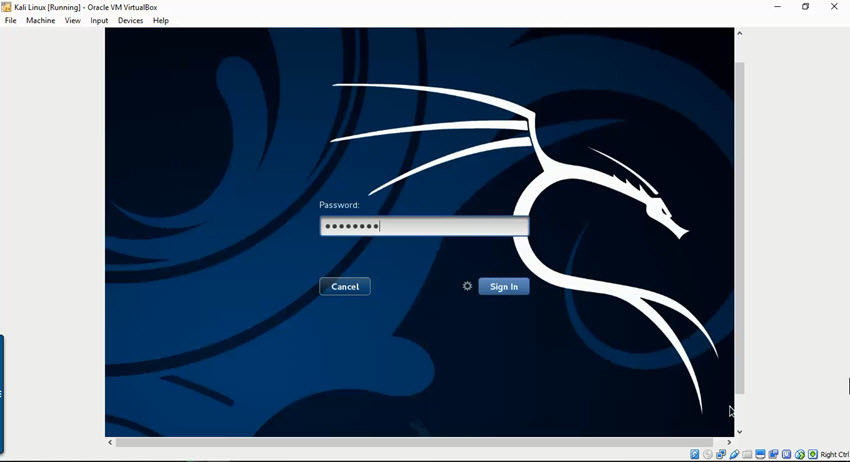
Kali Linux Installation
Conclusion
This was a complete guide on how to create a new virtual machine and install Kali Linux on VirtualBox in PC. If you have any question regarding this article, feel free to ask below this post. Thanks for being with us.


Its working
It shows me the guru medidation error after clicking graphical Install.
it displayed the error GRUB installation failed.
the grub-pc package failed to install into target
hey jafari when i install kali linux on virtualbox so when i boot its showing blank screen and nothing going ahead !
Hey, i am having the same issue.
Did you find a solution to this?
Hello,I log on to your blog named “How to Install Kali Linux on VirtualBox – PC? – wikigain” like every week.Your humoristic style is witty, keep up the good work! And you can look our website about daily proxy.
I installed vmbox + Linux Kali on my Windows 7 64.
I switched of Hyper-v and avtivate Virtual disk in Bios. Despite i installed it correctly according to the instalkation guide, Windows does a
Startup repair. I installed it twice but Windows keep booting in startup repair. Is there a possibility to boot Linux Kali from a Usb without Windows interfere or is there another solution? Can you please help me out?
Have dual booted Windows & Kali Linux?
It only lets me make one partition!! Someone Help!
I mean 2 (sorry)
NVM my friend helped me on discord
Am using 32bit windows 8 laptop. i have downloaded the Kali linux ISO, any time i try the settings running with Oracle VM the feedback i get is “failed to open the disk image file C:\Users\Users\Downloads\Kali-Linux-2017.1-i386.img.iso.
Make sure the file is not corrupt, and it’s healthy.
in the first step, only appears 32 bits and then at graphics install says that i need 64 bit
it appears that this kernel requires an x86-x64, but only detected an i686 cpu unable to boot – please use a kernel appropriate for your cpu
Go to BIOS setup of your System and Enable VT (Virtualization Technology) to fix the issue.
Go to BIOS setup of your System and Enable VT (Virtualization Technology) to fix the issue.
Please help me,
I have created a virtual machine for kali linux as per the instructions and when I click on start it shows me an error saying,
“Failed to open a session for the virtual machine Kali.
The virtual machine ‘Kali’ has terminated unexpectedly during startup with exit code 1 (0x1). More details may be available in ‘C:\Users\XXXX\VirtualBox VMs\Kali\Logs\VBoxHardening.log’.
Result Code: E_FAIL (0x80004005)
Component: MachineWrap
Interface: IMachine {b2547866-a0a1-4391-8b86-6952d82efaa0}”
What should i do?
please help…
When it starts it said
Kali GNU/linux
Advanced options for Kali GNU/linux
What to choose
In which step you stuck I did not get?
I get this message “installation step failed. You can try to run the failing item again from the menu, or skip it and choose something else. The failing step is: install the system” please what can I do?
Check out the link down below to fix this issue
https://forums.kali.org/showthread.php?18382-step-failed-installing-the-system
I’m pretty pleased to discover this website.
I wanted to thank you for your time for this particularly fantastic read!!
See also
http://www.primedon.com/www-facebook-com-delete-facebook-account/i get an error saying installation step failed. Please contact me and help me for this.
In which step you get this error?
How do I use dual boot (Kali & windows).
If you have already installed Windows just create a bootable USB installer for Kali Linux and connect it to your system. Boot via USB then goes ahead.
Hey john,
Wikigain is sharing amazing articles and they already mentioned about
<a href="http://teletrickmania.com/how-to-make-dual-boot-kali-linux-with-windows/" rel="nofollow">dual boot kali linux in windows.</a>Thanks to themThanks man it worked for me, i tried to run kali on my machine for past 4 months but only this article was able to help to me. Thanks man, thank you so much, i wish i could learn more from you, do you have an email id where i can contact you? Well thanks again 🙂
Thanks dear for sharing your positive feedback. You can find out at contact us page.
how do i create the swap partition?
It’s mentioned on the guide above once read it if you did not get let me know
i hve got a error saying choose appropriate kernAl
Try again step by step from the article.
Hello sir, is there need of 2 GB ram? Is 1 GB not enough?
You can go with 1 GB also, but the performance will be slow.
Hi Mukhtar, I have installed the kali linux but now I want to use windows as my default operating system. How can I do that, its becoz I do occasionally use linux but I want to keep my windows as tge default platform. Will uvplease help me??
Btw superb article n its so detailed…. …thank u so much
Do you have installed Kali Linux on VirtualBox on Windows?
bro I ‘m seeing 32bits only in versions..there is no 64bits…. while my PC is 64 bits.what’s wrong????
Nothing, it will work for 64bit also.
enable intel virtualization in bios
Sir it shows Installation step failed
what should I do to get it done
Where did you face the error, please let me know with full details?
Sir it shows ” Installation step failed”
what should i do to get done
What’s the error you faced?
I have windows 10 in my laptop automatically while buying and if i install kali Linux then does it harm the windows 10? Windows 10 will be lost?
Yes in cause you remove the Windows file but if you install Kali beside Windows then no it will not harm.
Whem im open kali linux in virtual box and go to install graphics then always show this “This kenral requires an x86-64 cpu ,but only detected an i686 cpu. Unable to boot- please use a kenral appropriate for you cpu.
Watch the video on our YouTube channel for this guide
YouTube.com/c/wikigain
What’s your system specification?
https://hereirestinremorse.wordpress.com/virtualbox/this-kernel-requires-an-x86-64-cpu-but-only-detected-an-i686-cpu-unable-to-boot-please-use-a-kernel-appropriate-for-your-cpu/
Goto Settings–>General–>select Linux 64 bit.
Hlo sir help me
How can I help you dear what is your problem? ??
thanks for the great guide. I want ask you, what is minimum storage in hard disk who i can put?
Minimum 25 GB is enough
25 GB is enough
Hi Mukhtar, are the Kali Linux guest additions part of the ISO that I have to download?
great article btw, very helpful.
Knytro
Thanks for appreciating wikigain team. You can install VirtualBox Guest Additions on Kali Linux. Get help from the post down below.
Install VirtualBox Guest Additions on Kali Linux
Great Article bro!!!! i t works.!! thanks!!!
Good luck Dear Justin
Sir in this we can’t use both our window and kali linux?
At the same time you can’t use both.
Sir….I deleted virtual box and Kali directly…..they left a local disk on my PC. Sir how to remove that local disk..??
Okay, now open Run window then type diskmgmt.msc and hit enter. From the disk management console delete the local drive.
Watch this video for more update.
Updated: The video is removed from YouTube 'Sorry for the inconvenience guys'thanks bro u made it happen
Good luck then have fun 🙂
is this a dual boot sir?
No dear, It’s installed on VirtualBox and it’s Virtual Machine.