You may have used Linux inside the virtual machine on your Windows operating system. In fact, if you have looked at the resources then you know that how much amount of resources a virtual machine can use. So, basically, it’s loading another operating system over an operating system. With the help of the windows subsystem for Linux, you can install the Linux application on your windows without using a virtual machine. When you install Windows Subsystem for Linux (WSL) in Windows 11, windows is going to install a custom custom-built Linux kernel. Later WSL can allow you to install Linux software directly in windows. So, in this article, you are going to learn How to How to Install Windows Subsystem for Linux (WSL) on Windows 11?.
Install Windows Subsystem for Linux (WSL) on Windows 11
it is not like the windows subsystem for Linux is not available in Windows 10, it was arrived already with the previous updates of Windows 10. However, installing the process was a bit time-consuming. However, with windows 11 arriving on the market, Microsoft has really made the windows subsystem for Linux really simple. All you have to do is just simply type a single command on the PowerShell, terminal, or CMD and then execute the command, and then it’s going to install WSL.
To install the WSL in Windows 11, run PowerShell as Administrator and type the following command.
wsl --installWhen you type the provided command on the PowerShell, it is not just going to install the Windows subsystem for Linux, it’s also going to install Ubuntu, the default Linux distribution for the WSL.
After everything is installed, you need to restart the PC.
How to Install WSL with a specific distro in mind on Windows 11?
It is obviously clear when you install the WSL, it is also going to install the default Linux distro. However, if you have a specific Linux distro in your mind and you want to install it directly in Windows 11 then you better have to follow the following steps.
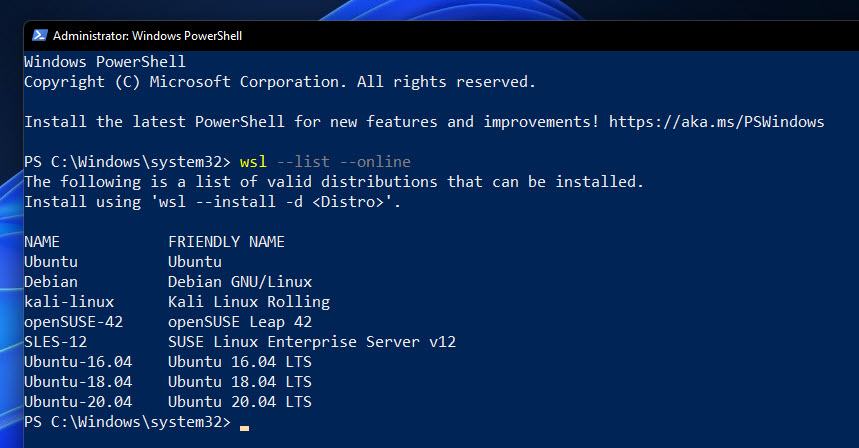
Step #1. First, we have to find out which Linux distros for the WSL are available, to find out type the following command.
wsl --list --oStep #2. Now type the following command to install a specific Linux Disto with the WSL.
wsl --install -d DistroNameRemember to Replace the DistroName with the name of the Distro you want to install.
Note: To update a Linux Kernal, type wsl –update and execute it in PowerShell.
Conclusion:
You can still use the old-fashioned way to install WSL on windows 11. To use it hold windows+ R on the keyboard then type “optionalfeatures“, in the windows feature enable the “Virtual machine platform” and “Windows Subsystem for Linux”. Then Restart the PC, after that download Ubuntu or other Linux Distro From the Microsoft store.


Leave a Reply