Microsoft office applications contain many Different options of quick access. Here you have another option in which you can Customize toolbar in your document to quickly click on them and use them. In this article, you are going to learn that how to customize quick access toolbar in Microsoft office 2016. Customize quick access is an option on the top of your office window below the Ribbon. This option let show some important options to apply and use them quickly without wasting your time. Here you can Mark them to show and move the position to the bottom of the Commands and also you can hide this option from the top and below the commands.
Click to Show the Option Customize Quick Access Toolbar
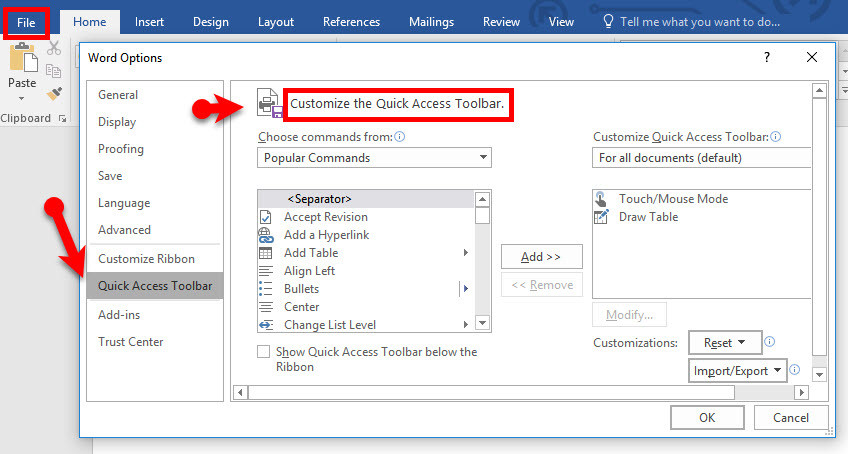
Step 1. At first step of this article, you are going to tick mark the option to show it below the Ribbon. To do that, go to File option and Click on Word Options. Here you have many options about your word document but you need the quick access toolbar Click on and see the new window.
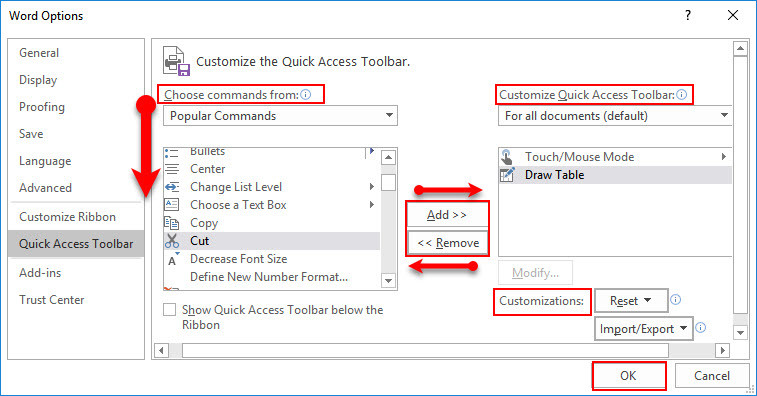
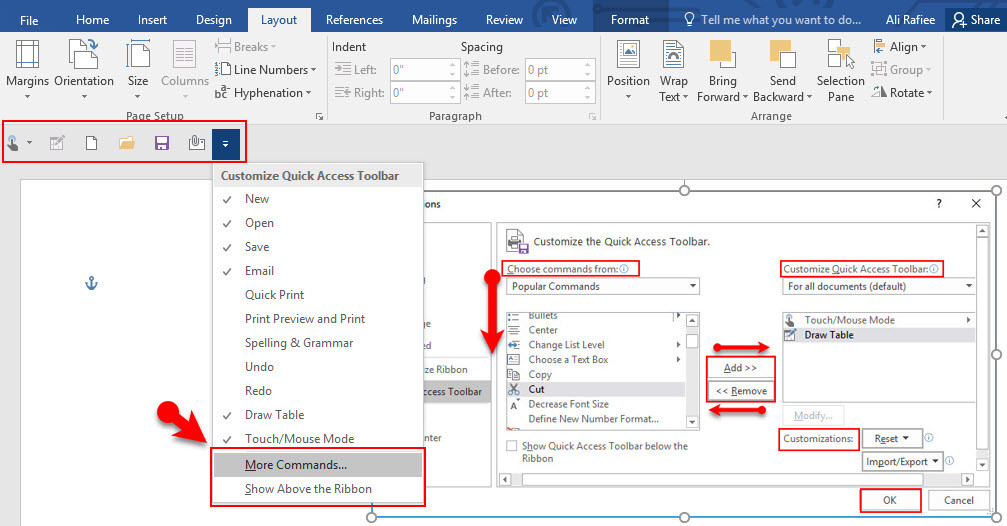
As you see the new window here you have all the Popular commands and group of options. You can select one of them and on Separator part, you can select each option to add them on Customize Quick Access Toolbar option. When you don’t need any of the options you can remove that from the list easily. After that, you have Customizations(Reset) Option, and Import/Export option. Through to these options, you can reset the Customize Quick Access Toolbar and move it to the first position. And also you can import and export all customizations files.
Now when you have added your options from the Popular commands you can show the Customize Quick Access Toolbar on the top of the office window. Now click OK and go to your office window.
How to Show/Hide and Move the Position of Options list
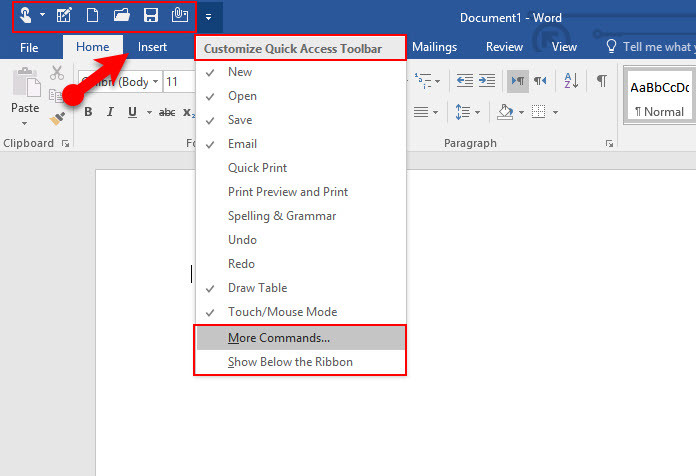
Step 2. Now you are on the main page and here you can tick mark the options to show and use for your document. The most important and popular options here are
- Optimize Spacing Between Commands: – This option let you have two kinds view of commands with different space between them.
- Draw Table: – Here you can click and directly draw your table in your document.
- New Blank Document (Ctrl+N): – Through to this option you can open one or many new blank documents. You can directly click on the option or use the shortcut keys.
And again some more popular options which you can show them and use them in your documents.
Here you have two more options at the bottom of the list,
- More Commands…: – This option moves you to the first options settings to add and remove more commands in your list.
- Show Below the Ribbon: – This option moves your list and options below the commands.
Now you can move it back to show above the Ribbon, or where ever you want you can show or hide them.
Conclusion
Here it’s all about that how to Customize Quick Access Toolbar and how to add and remove some commands. It makes your task or project quickly to done without any wasting time, just click on them and do your job. Microsoft Office tried to make it easy to use from office applications. Right now office applications are the most important and useful applications for offices and companies. Because according to Forrester Research Company around 80% people are using the different version of office application in their office and business. For any question just write down and comment it. Thank’s for flowing us.

Leave a Reply