In this article, I am going to continue the explanation of how to create mail-merge-send envelope in Microsoft office word 2016. As I explained in the first article about this title in Microsoft office word. Here I am explaining the second type of sending an email. In fact between this two types of sending emails and envelopes have a bit different. Not too much different. In the first step of sending emails, we can start sending email directly by clicking on one option. To open the next steps on other windows on the right site. But in this type we don’t need to open a new window we can write or email then, go to other steps and continue directly from office page. To explain them we will have a bit long article. Here we have four options to finish our sending email which is:
- Start Mail Merge
- Write and Insert Fields
- Preview Results
- Finish
Here each of them has their own options for each step completing the mail merge which will explain step by step each of them.
Start to create mail-merge-send envelope in Microsoft word 2016
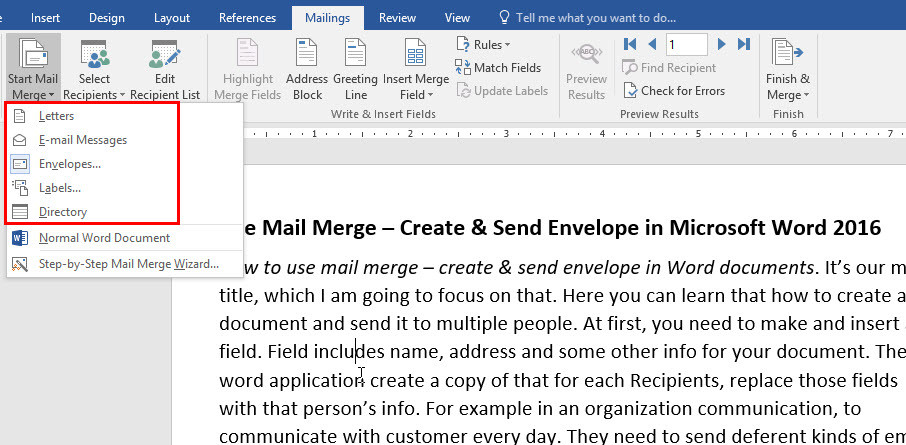
Step 1. To create mail-merge-send envelope, at first, you need to select that what kind of bulk mailing Document you want to create. here we have some types of them such are:
- Letters: – Create and print a batch of personalized letters for everyone on your mailing list. Each letter prints on a separate sheet of paper.
- E-mail Messages: – Create and send email messages for each person on your mailing list, with custom information inserted from the mailing list.
- Envelopes: – Create and print a batch of envelopes for mailings.
- Labels: – Create and print sheets of mailing labels; each label is a unique mailing address.
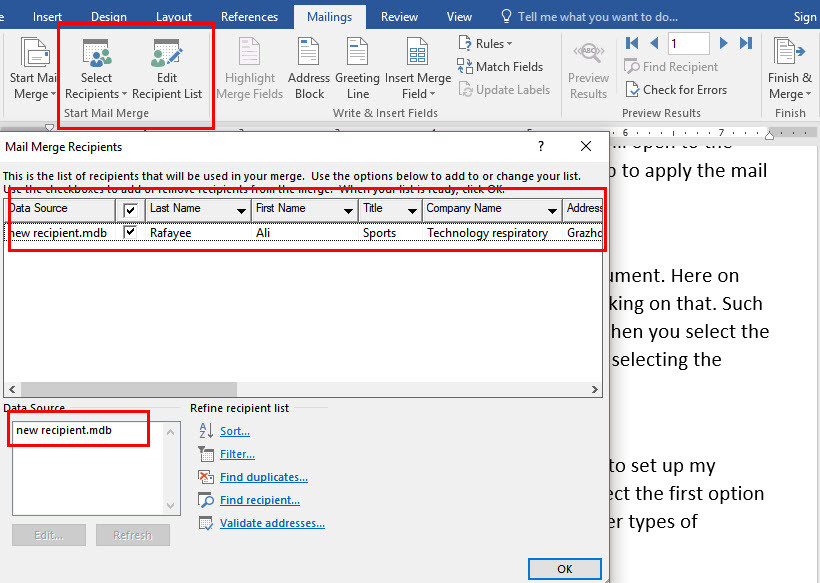
Select your Recipient, Edit and Remove, in MS Word 2016
Step 2. Here through to Select Recipients, you can choose. Those people you would like to send the document or your envelope. Here you can make a new recipient or use the existing recipients, you can remove anyone or add any new one. your recipients will save to mdb, odc, mde, or some other formats. Here you can pick specific persons to receive email and you can filter, add, or remove duplicates and validate address on your recipient’s list.
Write and Insert Fields in Your Document
Step 3. Through to this step, you will learn that how to make or insert a field in your document. To introduce and show easily each part of your Document and to add some new rules, greeting line, address and some others. These new Content will be inserted into your document as a field from your recipient and make an interesting document with a good field for your customers or staff in your office or company.
- Highlight Merge Fields: – This option works when you already inserted your field and highlight your field to easily recognize it in your document.
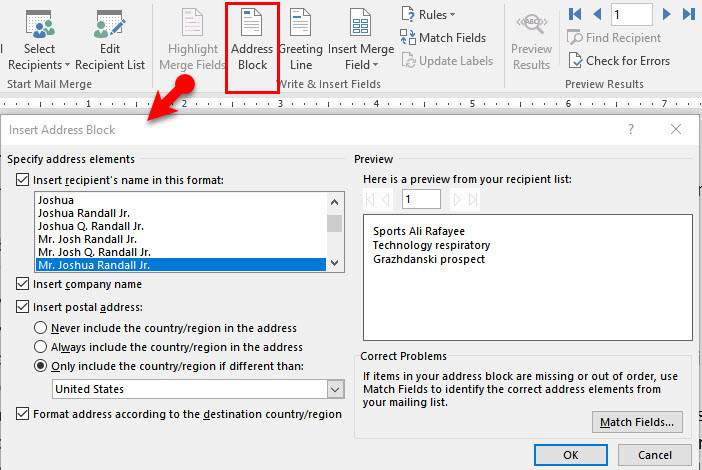
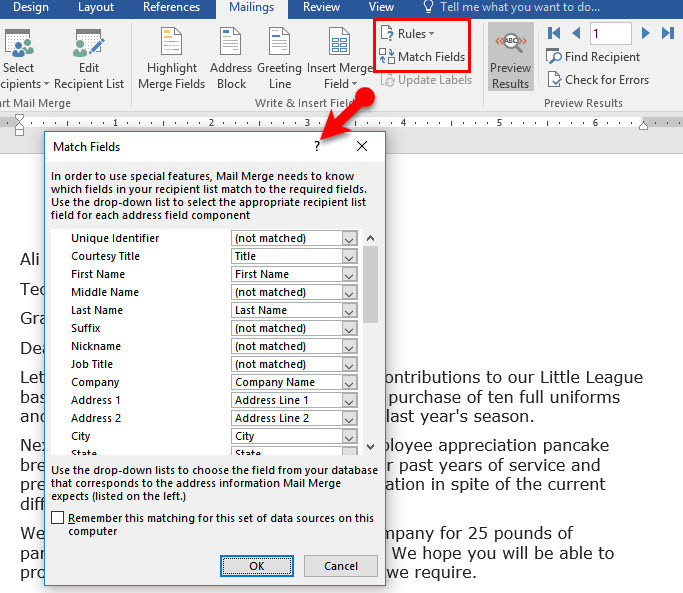
- Address Block: – It’s the option which can Add, Replace, or Remove address and specify address elements. Here you can change the format of your recipient’s name and insert company name or postal address. To know that your items in address block are missing or not use Match Fields, and preview.
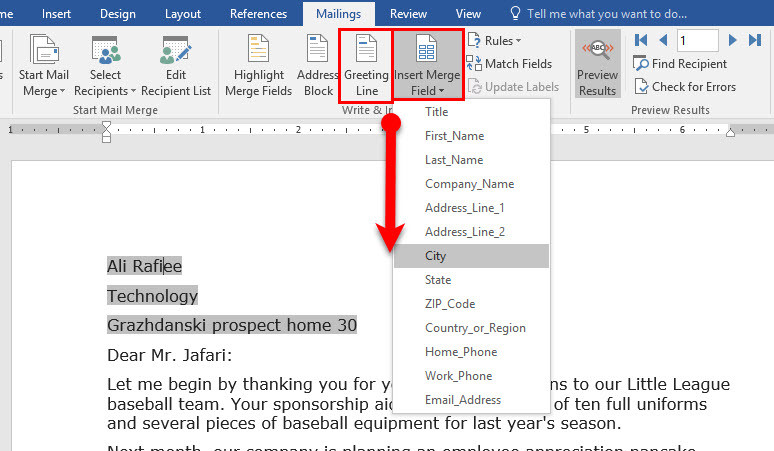
- Greeting Line: – Through to this option you can add a greeting line in your document. You can write this greeting line on the top and bottom of your document.
- Insert Merge Field: – Add a field from your recipient list to the document such as title, state, city, home phone and …. When you finish your mail merge Word will replace these field with the actual information of your recipient list.
- Rules: – Here you can specify a rule in your document, to apply the rules you have some examples written here. For example use “If … Then … Else” to show a local phone number for recipients near you. And an International Phone number for recipients outside of your country.
- Match Field: – It can help you to tell the Word the meaning of different Field in your recipient list.
Preview Results and Finish your Mail-Merge
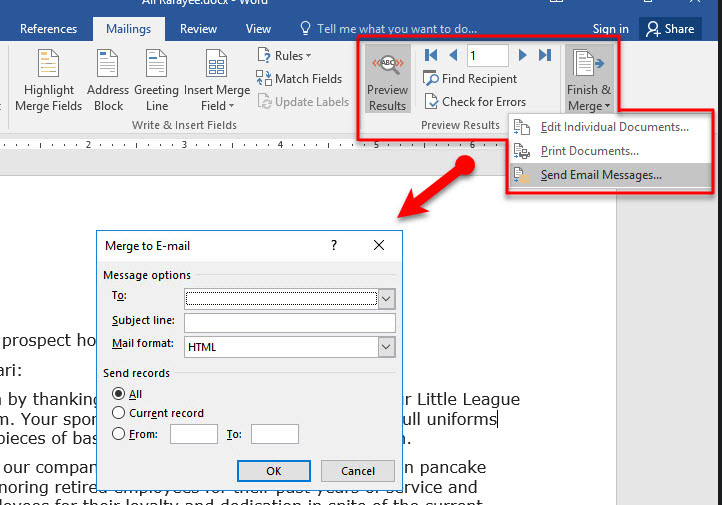
Step 3. Now your emails has been merged, you added some recipients and for each of them added new fields for your customers. Now you can see the results and check for errors, if there was any error modify that and finish it. After that, you can print your email, edit individual documents or send to other members
Conclusion
Mailings are one of the most Important tabs in Microsoft Word. Here you can write an envelope merge the emails and send them to multiple members and customers. The article which I explained was the second type of create mail-merge-send envelope in Microsoft word 2016. In the previous article, i went all step directly from on option. Here I applied the options through to your document window. If you faced any question just write down and comment it. Thank you for fallowing us.


Leave a Reply