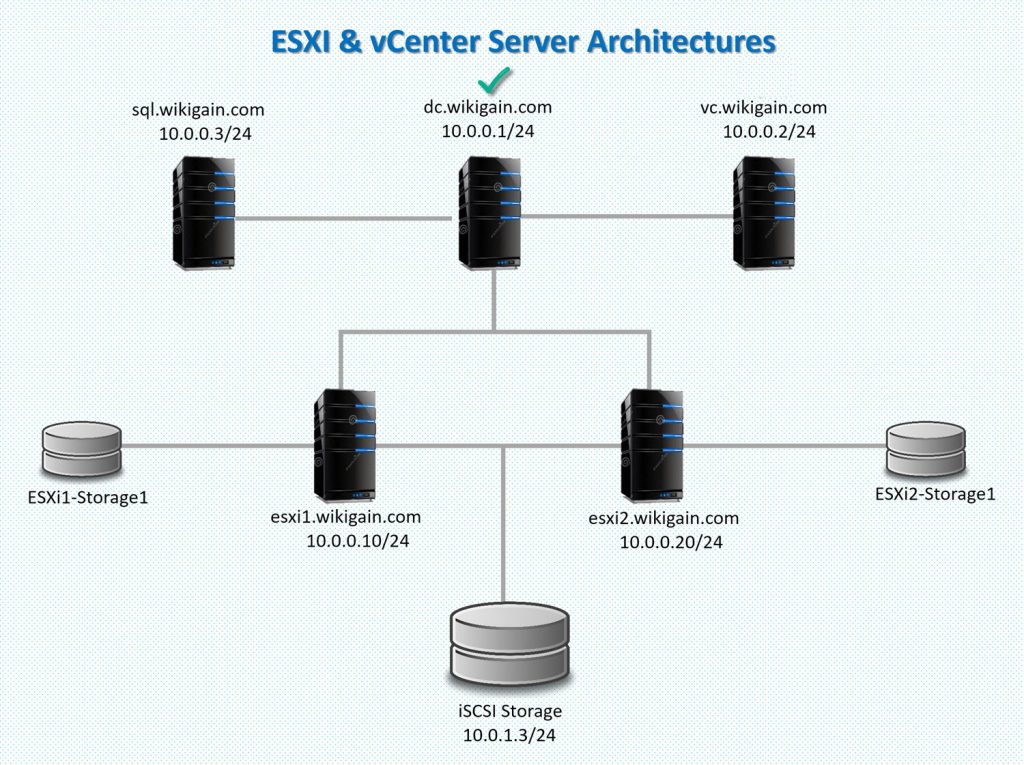
In this article, I’m going to show you how to Build vSphere Infrastructure on Windows Server 2008 R2 (Domain Controller VM). This will be a comprehensive guide that I’m going to explain step by step to Build vSphere Infrastructure on Windows Server 2008 R2 from scratch. In addition, this guide will continue until I create the following objectives.
Build vSphere Infrastructure on Windows Server 2008 R2
Note: To build up this infrastructure, we need (DC, VC, ESXi1, ESXi2) and SQL which is optional. We won’t use SQL server for this build but if you’re interested, let me know in the comment section and I will create a guide for that as well.
Requirements
- A System with at least 16GB of RAM 32GB is recommended
- 250GB Hard Drive (SSD is recommended)
- X64 bit Operating System (Windows is preferred)
- ISO File of Windows Server 2008/2012 R2
- ISO File of vCenter Server
- ISO File of ESXi
- VMware Workstation for Virtualization
- Others (iSCSI Target and etc.)
Part 1: Installing Windows Server 2008 R2
- Install Windows Server 2008 R2
- Install VMware Tools
- Server 2008 R2 Initial Configuration
- Install DNS and Create Zones
- Install Active Directory Domain Services
Part2: Installing vCenter Server
- Join vCenter Server to DC
- Create a User Account (VCAdmin)
- Install vCenter Single Sign-On (SSO)
- Install Inventory Service
- Install vCenter Server
- Install vSphere Client
Part3: Installing ESXi Hosts
- Creating Virtual Machines for ESXi Hosts
- Installing ESXi Hosts on VMware Workstation/Player
- Adding ESXi Hosts to vSphere Client
Part4: Building up Shared Storage (vStorage)
- Adding & Initializing New Hard Drive
- Adding Multiple Network Adapters
- Creating Shared Storage
Part5: Building VMs on ESXi Host
- Creating Virtual Machines
- Installing OS on the VMs
Part6: Migrating Virtual Machines
- Moving VMs from on ESXi Host to another ESXi Host
- Working with vMotion and vSMotion
Part7: VDR – VMware Data Recovery
Part8: High Availability, Fault Tolerance, NAT
In this post, I’ll only cover the first topic which is Installing Windows server 2008 R2 or 2012 R2. I’ll go step by step through these process so please keep patient and follow everything up to the end. Don’t miss any step because later on you’ll need all the step which is outlined in this or later articles. Also, let mention that if you stuck in any step, feel free to hit a comment down below each post and we will answer as soon as possible.
#1. Installing Windows Server 2008
I’m not going to discuss any more so just let’s get started with creating a virtual machine for our windows server.
First, you need to Download and Install VMware Workstation on your system. The installation is very straightforward and it’s just a matter of Next and Next. Once the installation is done then follow the steps below.
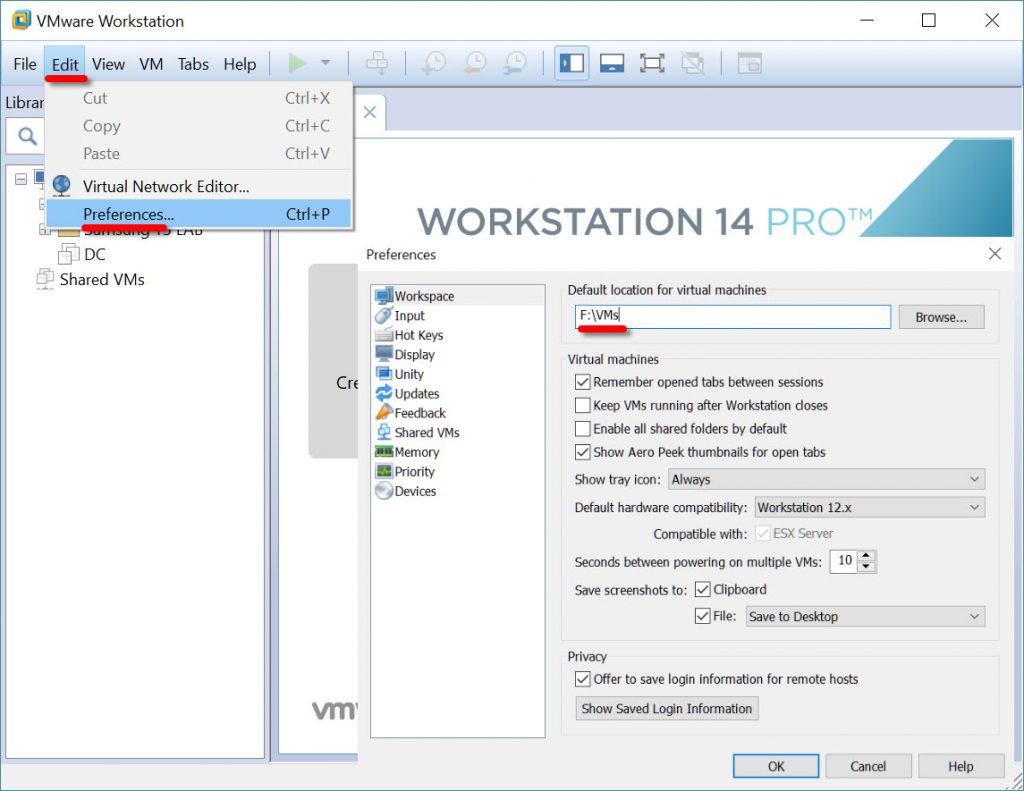
Step #1. Open up VMware and click on Edit>Preferences. Every time that you create a new virtual machine, it’ll be saved to the Documents>Virtual Machine folder so here we will change the default location to our SSD or HDD. Under the default location type your new location path and create VMs folder. In my case, it’s F:\VMs.
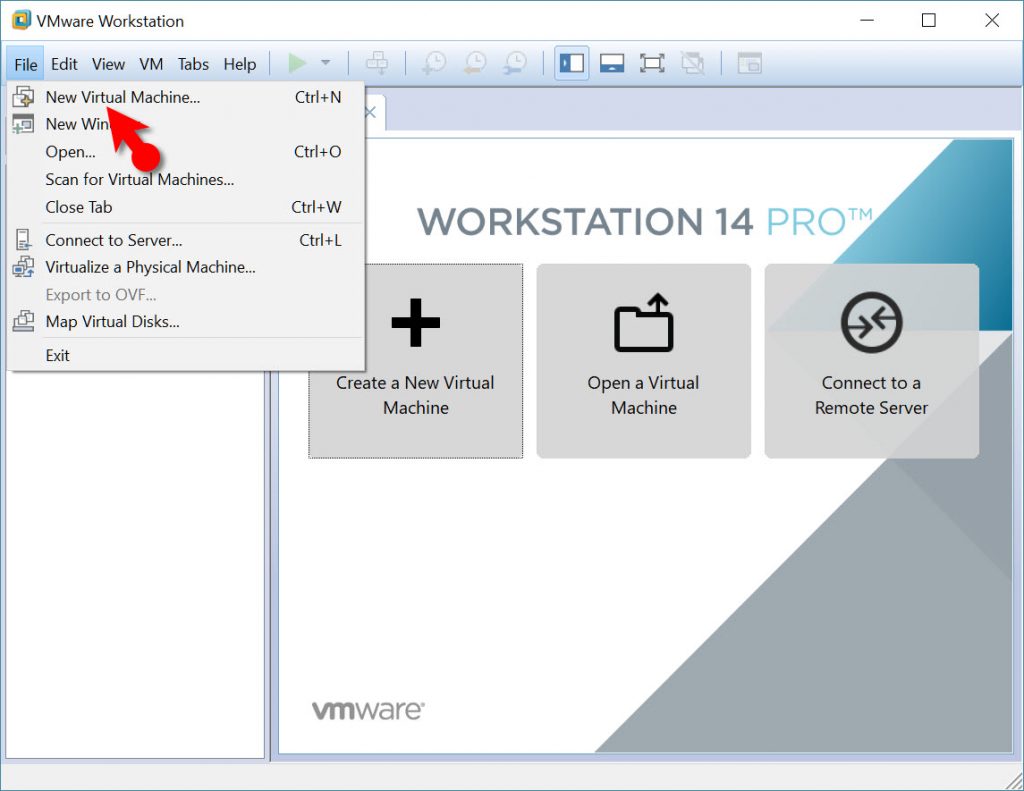
Step #2. Now click File Tab and select New Virtual Machine.
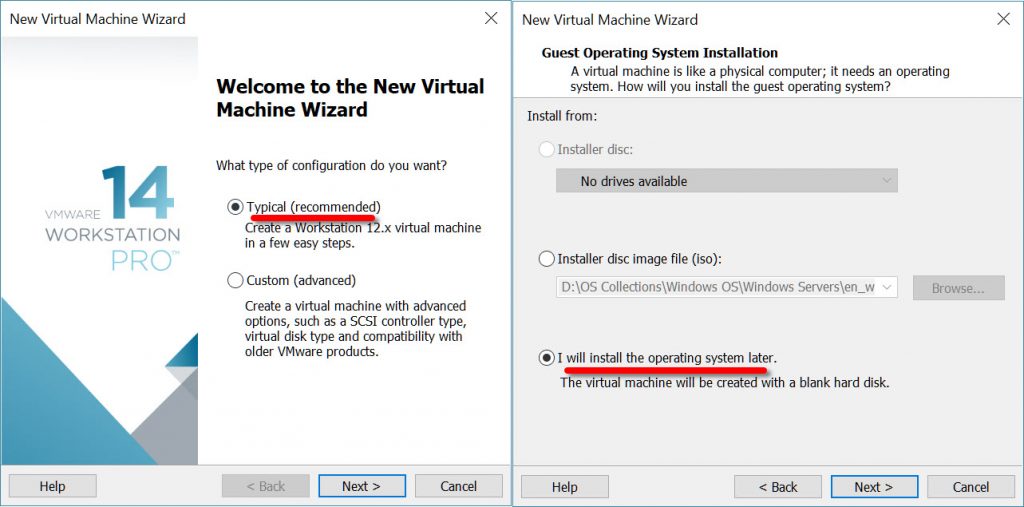
Step #3. You’ve two options to install Windows server or any other OS. The first option is easy Install which automates the whole installation and you only need to create a user with a password and that’s it. The second method is that you can do a custom installation. So we will do a custom installation here. Select the last option “I will install the operating system later”. Click Next.
Note: If you want to do the easy installation then select the 2nd option and browse the ISO file of Windows server.
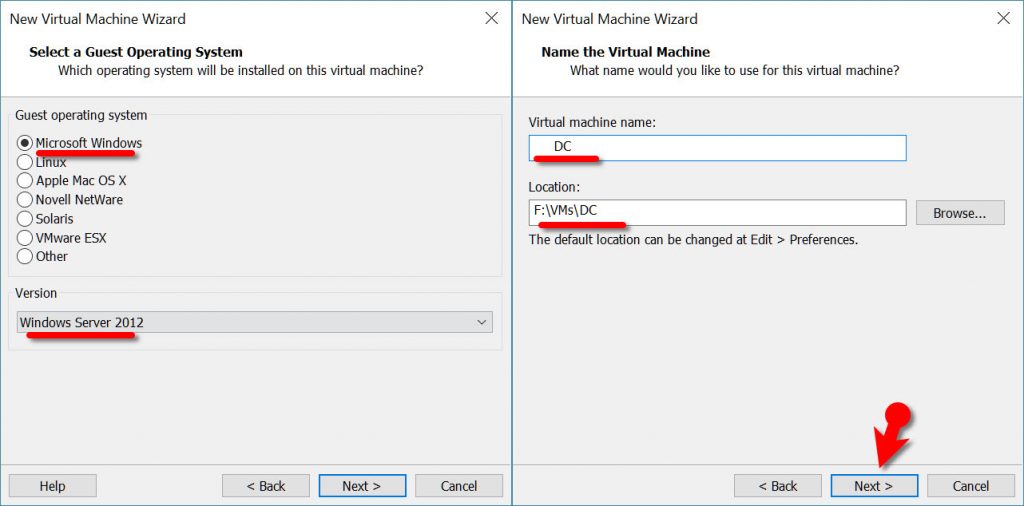
Step #4. Select Microsoft as Guest OS and as a version select Windows Server 2008 or 2012 R2. Name the Virtual Machine DC and select the location. In my case, it’s “F:\VMs\DC”.
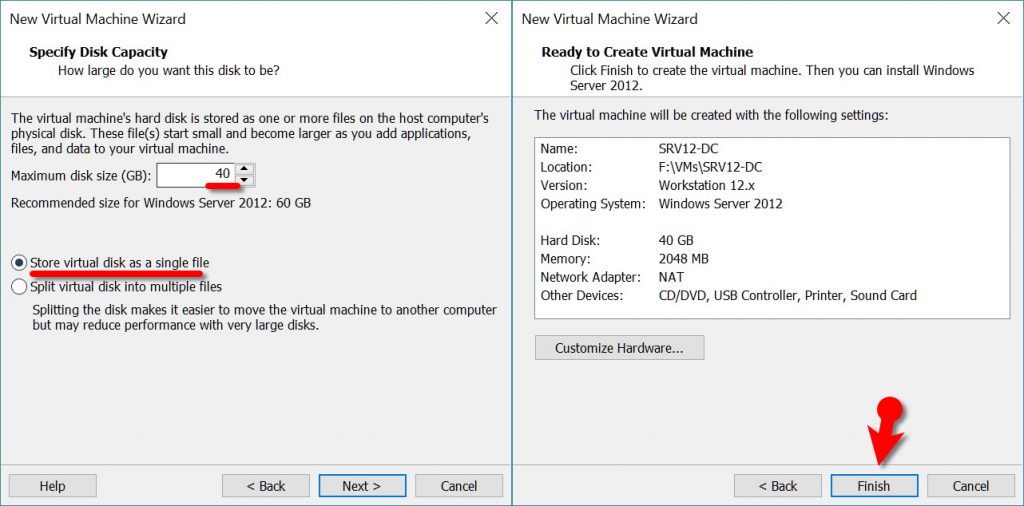
Step #5. Specify disk space for the virtual machine. For example, I’ll dedicate only 40GB which is enough for my domain controller. Also, tick the first box “Store virtual disk as a single file”. Click Finish.
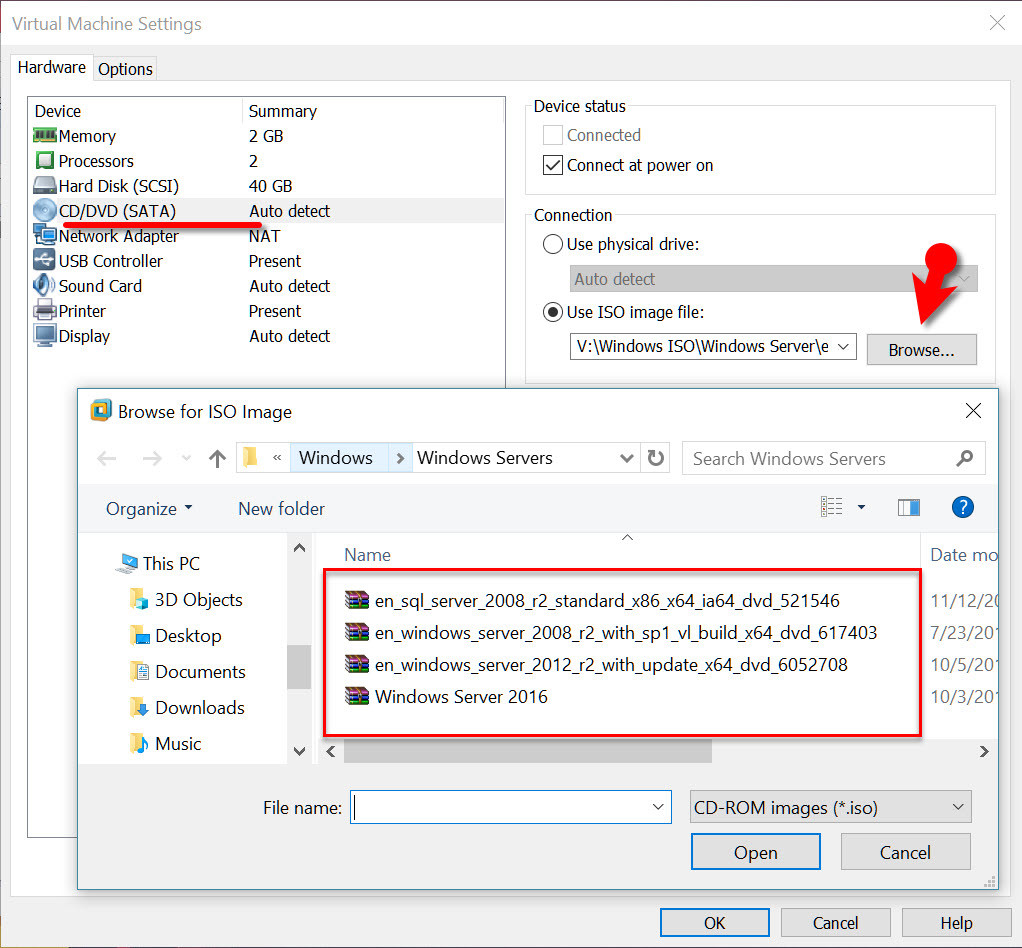
Step #6. Now click on the CD/DVD (SATA) under the hardware section of the VM. Select Use ISO Image file and browse for the image file. Select any Windows Server 2008 R2 and click Open. For now, the Network Adapter should be NAT because we need to have access to the internet later on for activation and installing “.Net Framework 3.5”. Once everything looks like the screenshot below then you’re good to go.
Just Power on the virtual machine and begin the installation. If you don’t know how to install the Windows operating system, follow up this guide.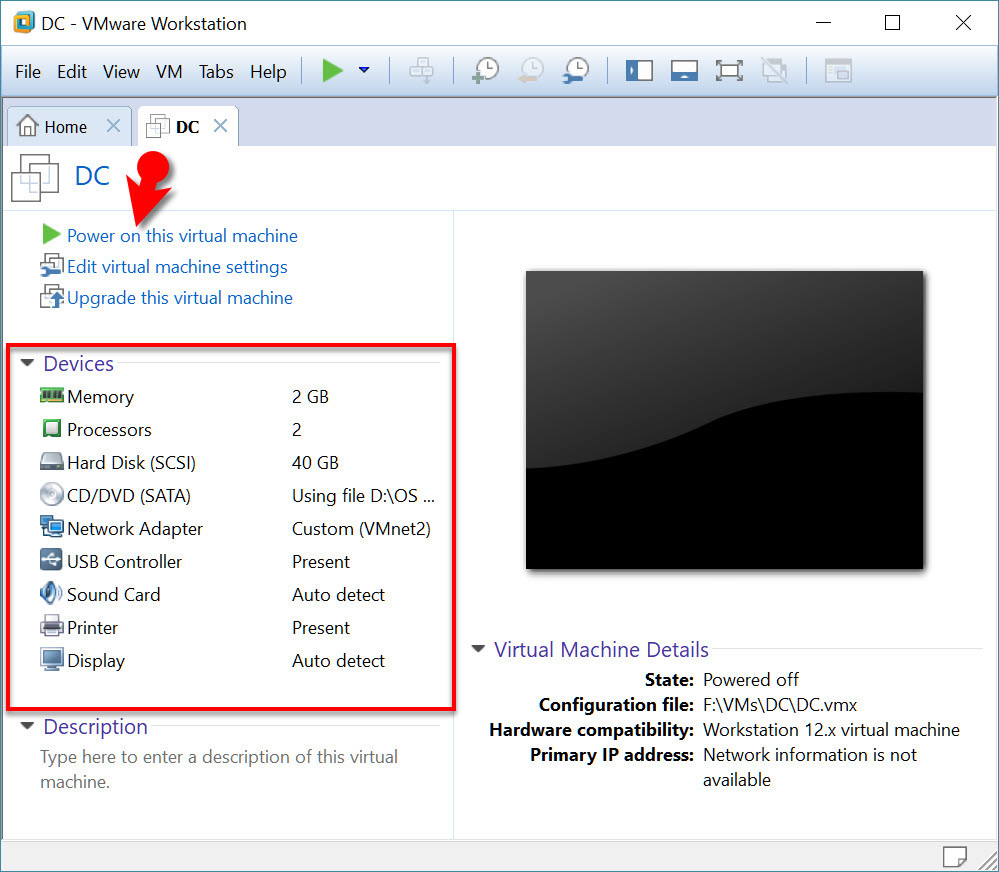
#2. Install VMware Tools
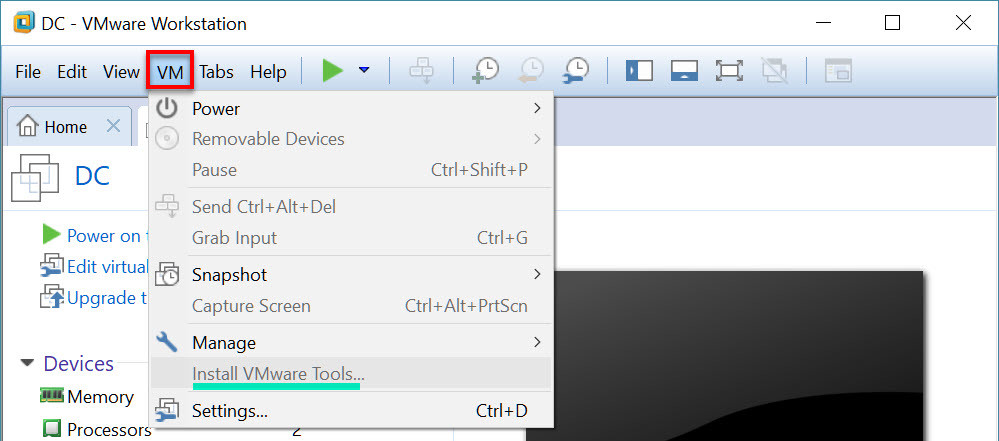
Step #1. To Install VMware tools, you need click on VM tab then select Install VMware Tools.
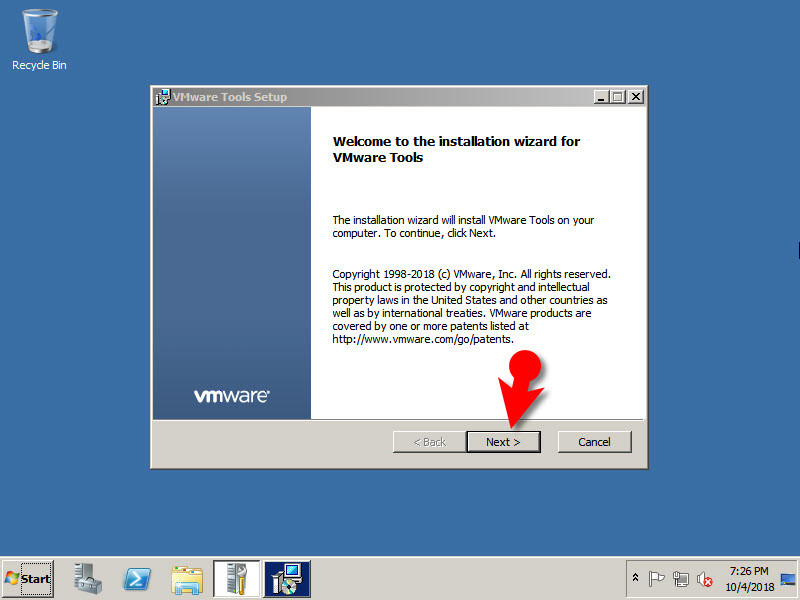
Step #2. Open file explorer and Right Click on the DVD room and select Install or run the program from your media or wait for a few seconds and you’ll see the snapshot below just click run setup64.exe. Click Next for a couple of times and finally click Install button.
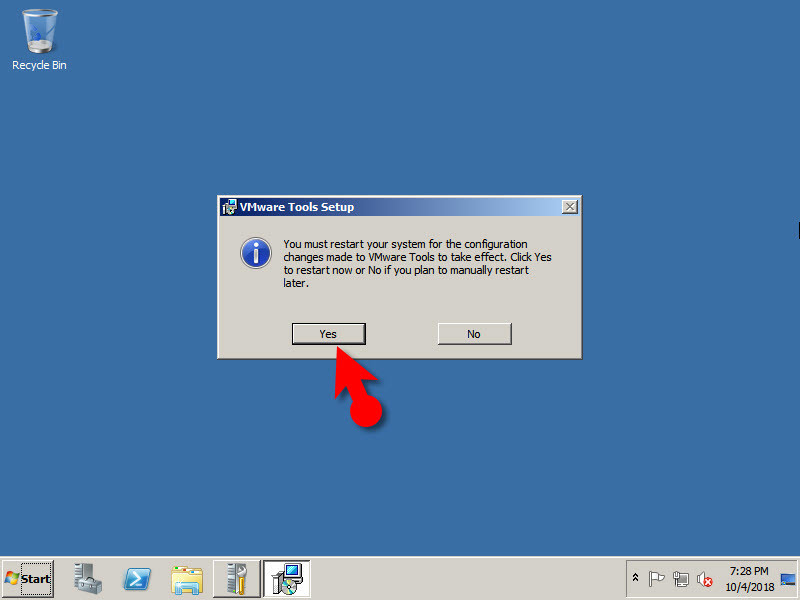
Step #3. Once the VMware Tools is installed, you need to Restart the VM.
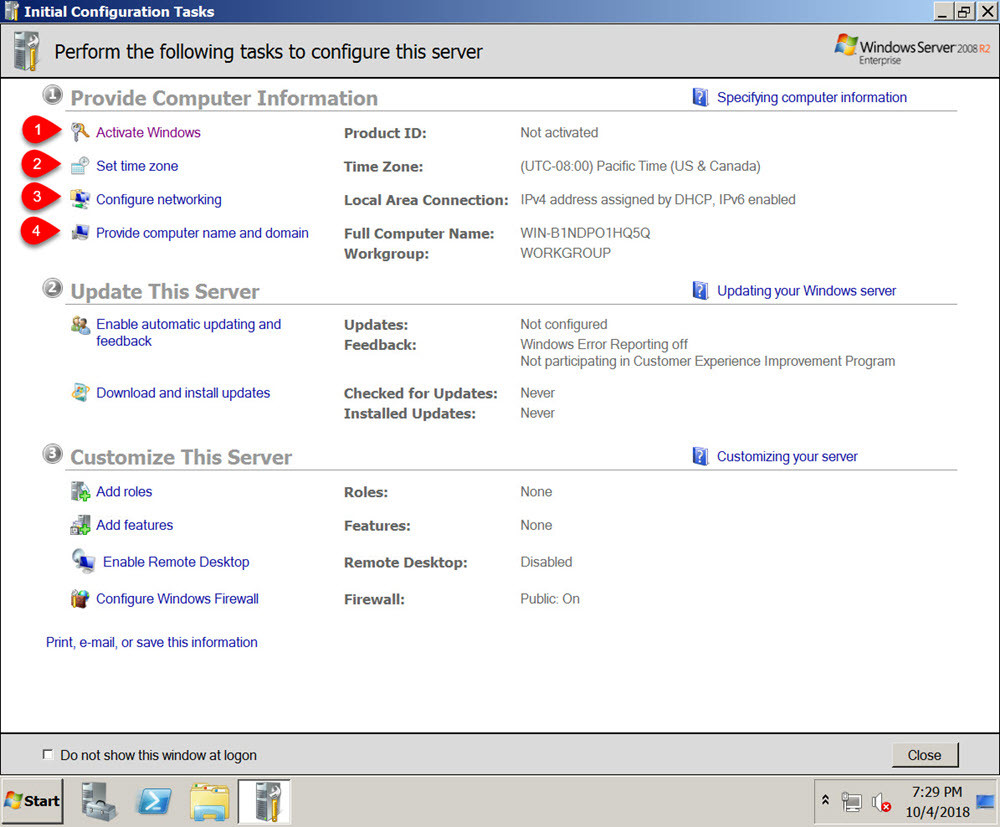
#3. Windows Server 2008 R2 Initial Configuration
In this part of the tutorial, I’m going to configure the following tasks.
- Activate Windows Server 2008 R2
- Change the time zone
- Change computer name + add DNS Suffix
- Changing the default administrator account
- Windows update
- Installing “.Net framework 3.5.1”
- Disabling IE ESC
- Disabling Shutdown Event Tracker
- Add static IP address
Let’s start from Windows activation.
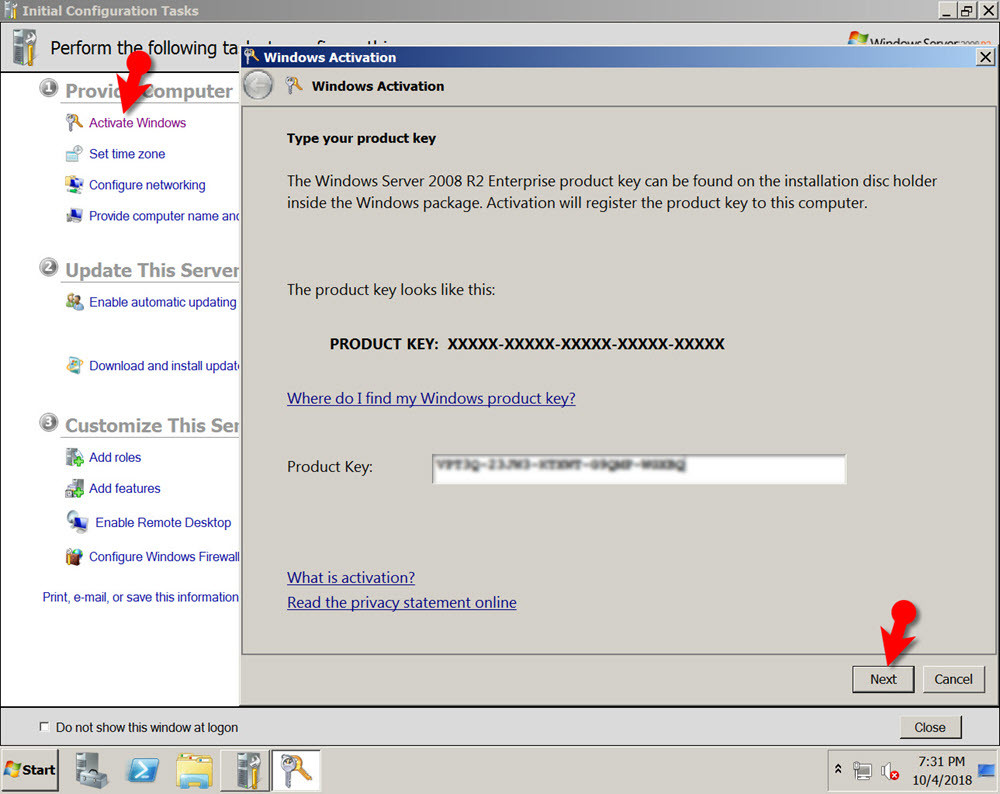
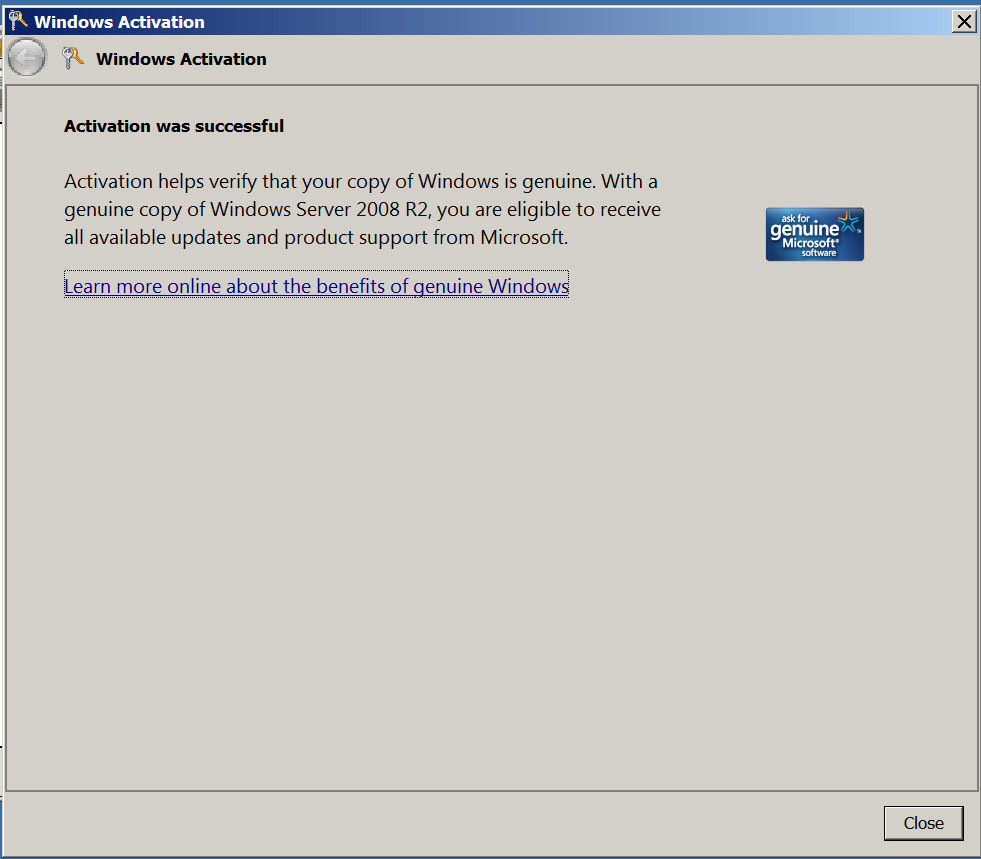
Step #1. To activate Windows server 2008 R2, on the Computer Information window, click Activate Windows. Enter your Windows license key and Next. Once the activation is done, you see the genuine window that says activation was successful.
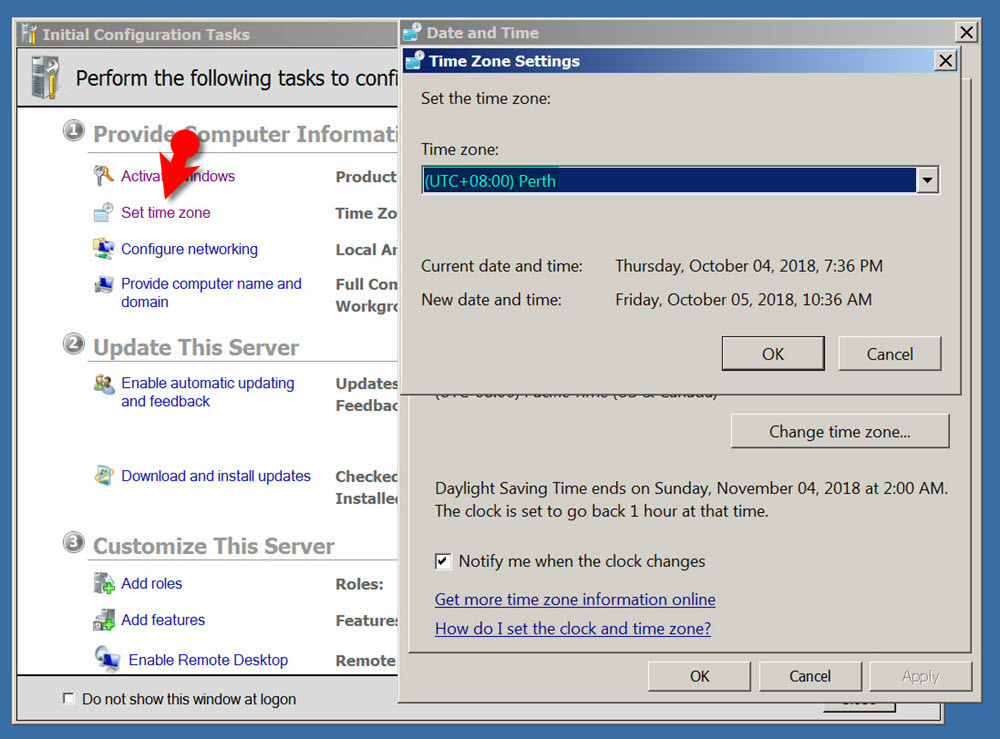
Step #2. Change the time zone. Again from computer information window click on Set time zone and choose your appropriate time zone that you’re currently in.
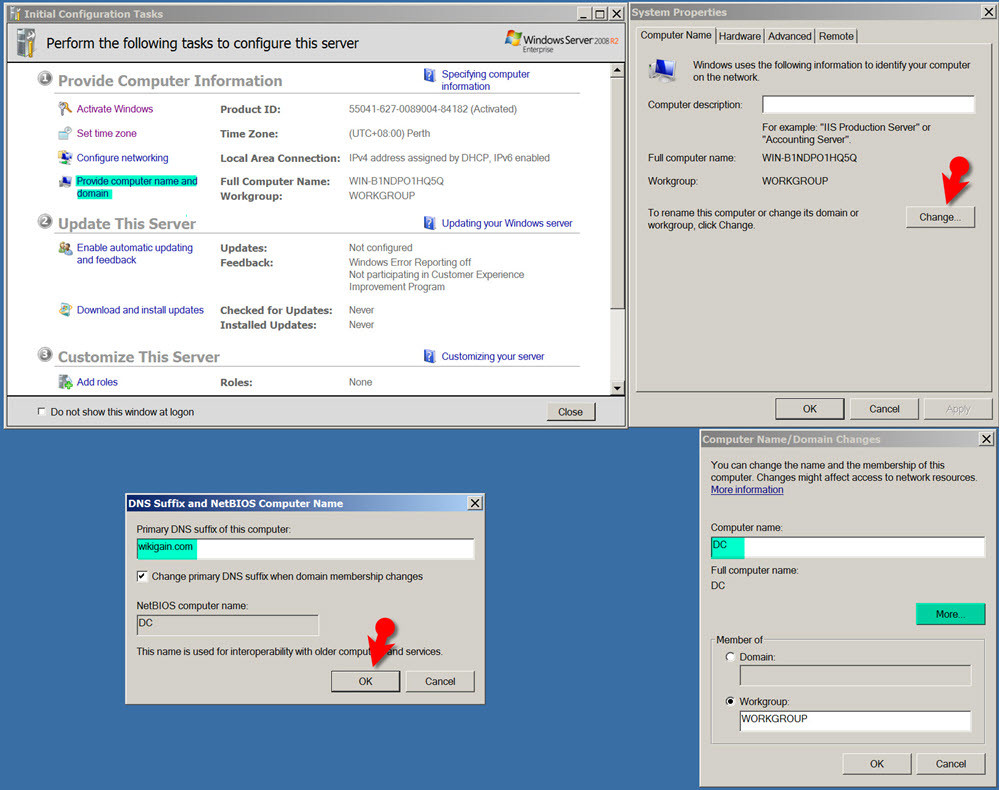
Step #3. To change the computer name, click “Provide computer name and domain” then click on the Change button. Enter DC as a computer name and click More button to add DNS suffix. Add your domainname.com (wikigain.com) and click OK.
Another method: Open Run and type sysdm.cpl and hit enter. You’ll see the same System Properties window to change the computer name.
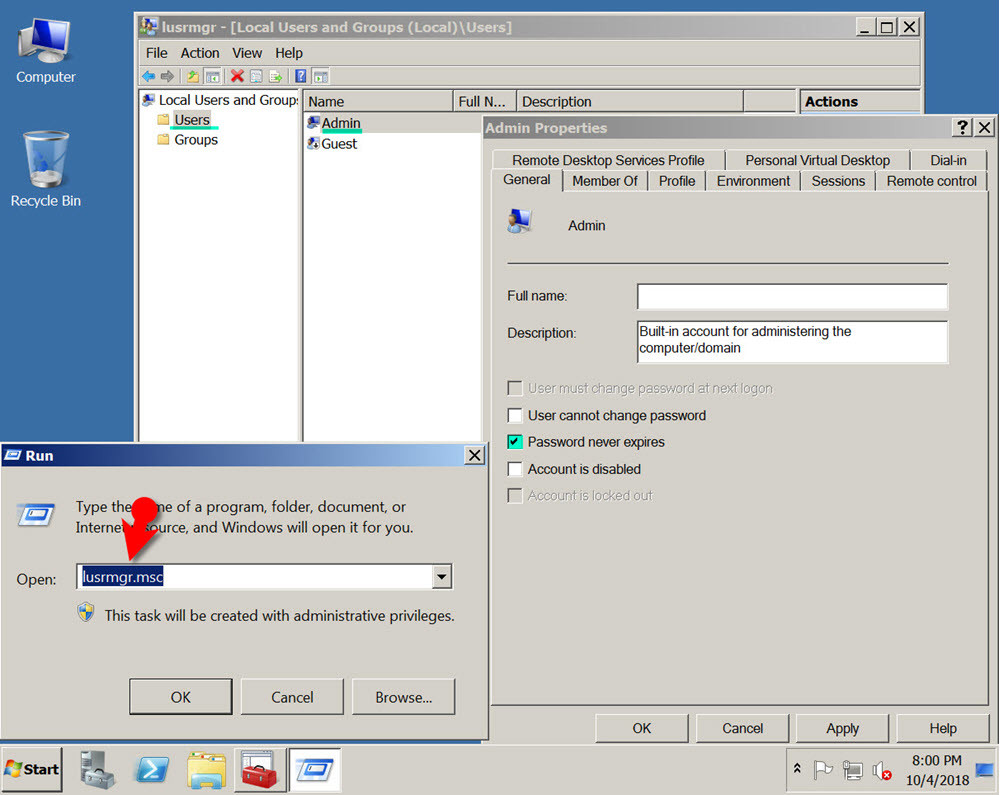
Step #4. To change the default administrator account, you need to open Run and type lusrmgr.msc and press enter. Change the administrator to Admin and right click on admin select Properties. On the General tab select Password never expire. Close all the opened Window.
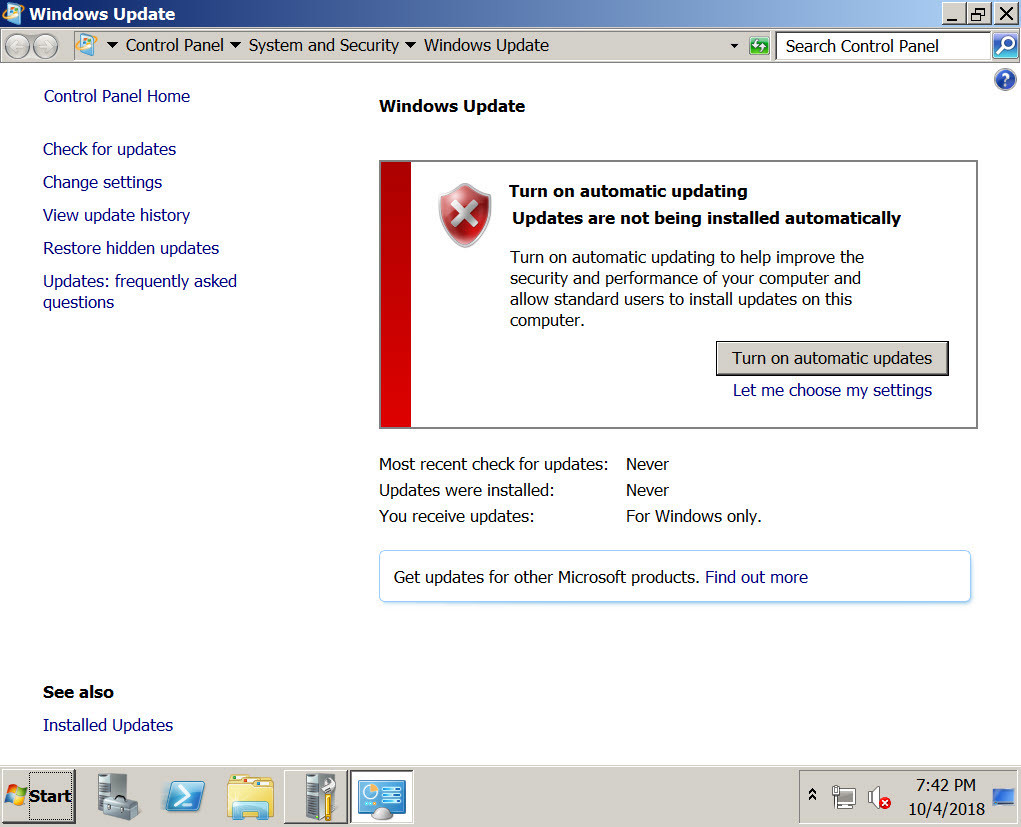
Step #5. This step is optional and you don’t need to do it but if you do everything will be updated. For Windows update, you must be connected to the internet. On the Initial Configuration window click Enable Automatic updating and Windows will be updated. I’m going to skip this step.
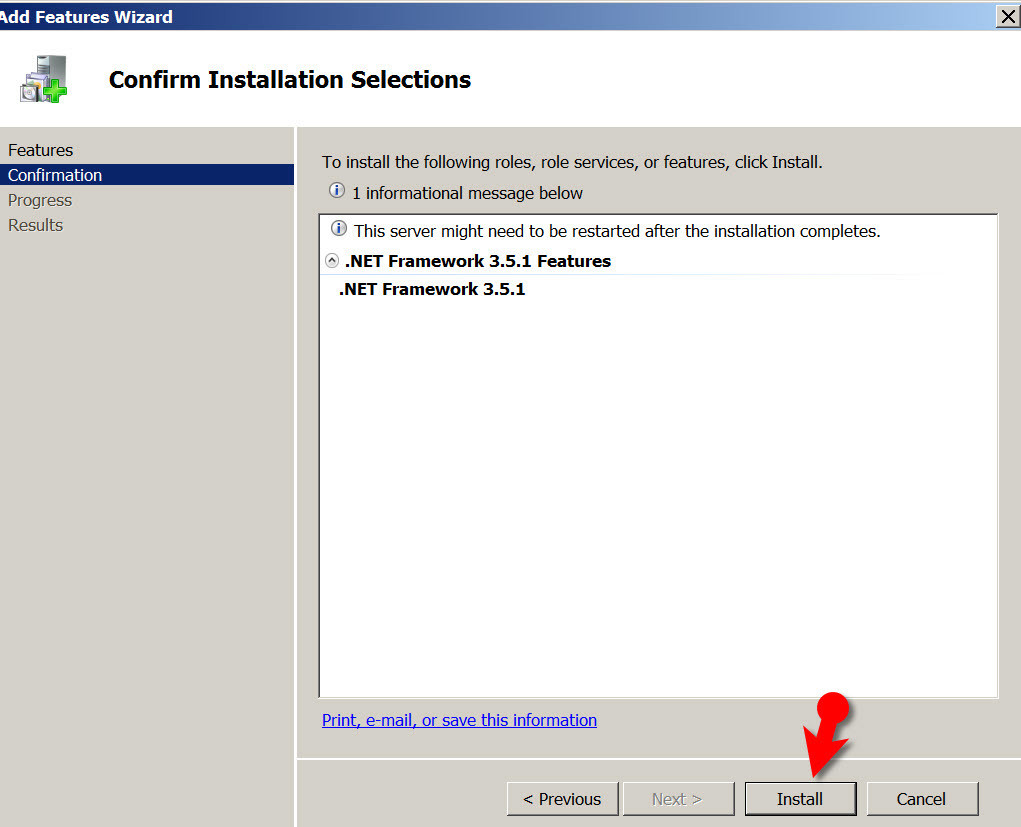
Step #6. It’s recommended that you install “.Net framework” because in some cases some software requires this feature that should be installed on the system. So here, we install it. You can install “.Net framework” offline but in this guide, I install it online. Just make sure you’re connected to the internet and open server manager and click on Add Feature. From the feature section select “.Net Framework 3.5.1“ and install it.
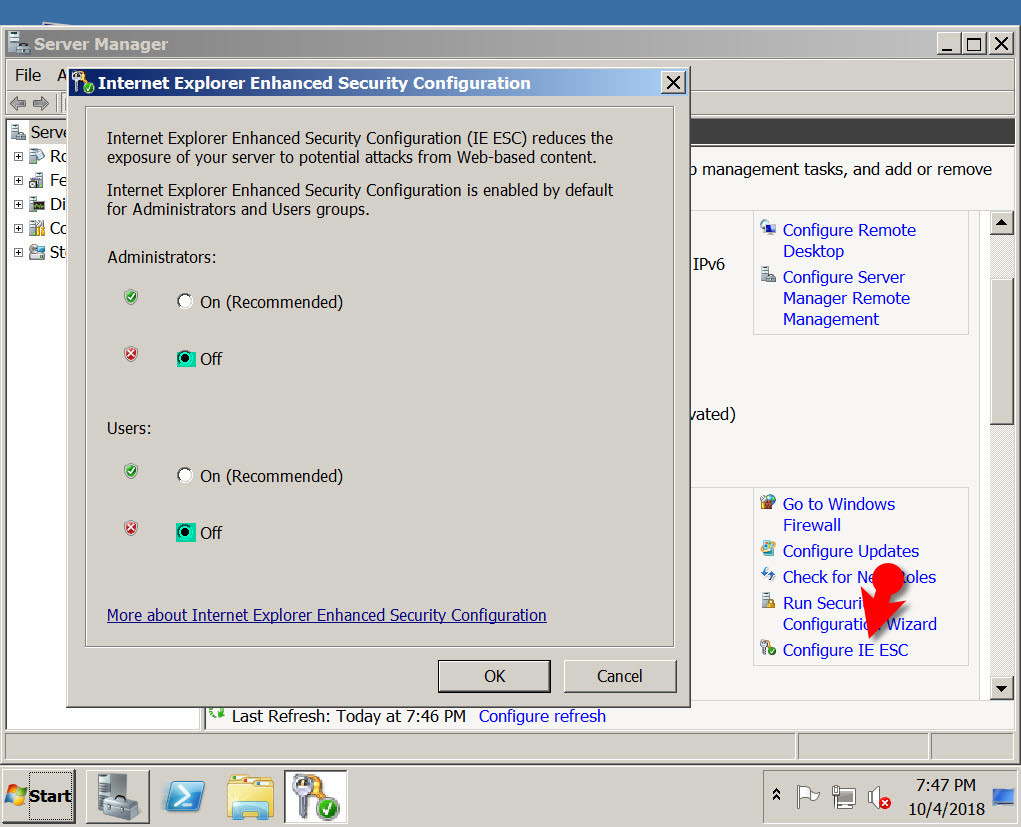
Step #7. Also, we’re going to disable Internet Explorer Enhanced Security Configuration (IE ESC). To disable it, on the server manager click on Configure IE ESC and select Off for user and administrators.
Step #8. In Windows Server 2008 R2 shutdown event tracker is enabled by default which is really annoying. Every time that you want to restart, shutdown and Logoff, you’ll get a window that you should type something to skip it.
I’m going to disable it because in most cases people don’t like it. So to disable it, open Run and type gpedit.msc and then go to Computer Configuration>Windows Settings>Administrative Templates>System>Display Shutdown Event Tracker. Double click on shutdown event tracker and select Disable.
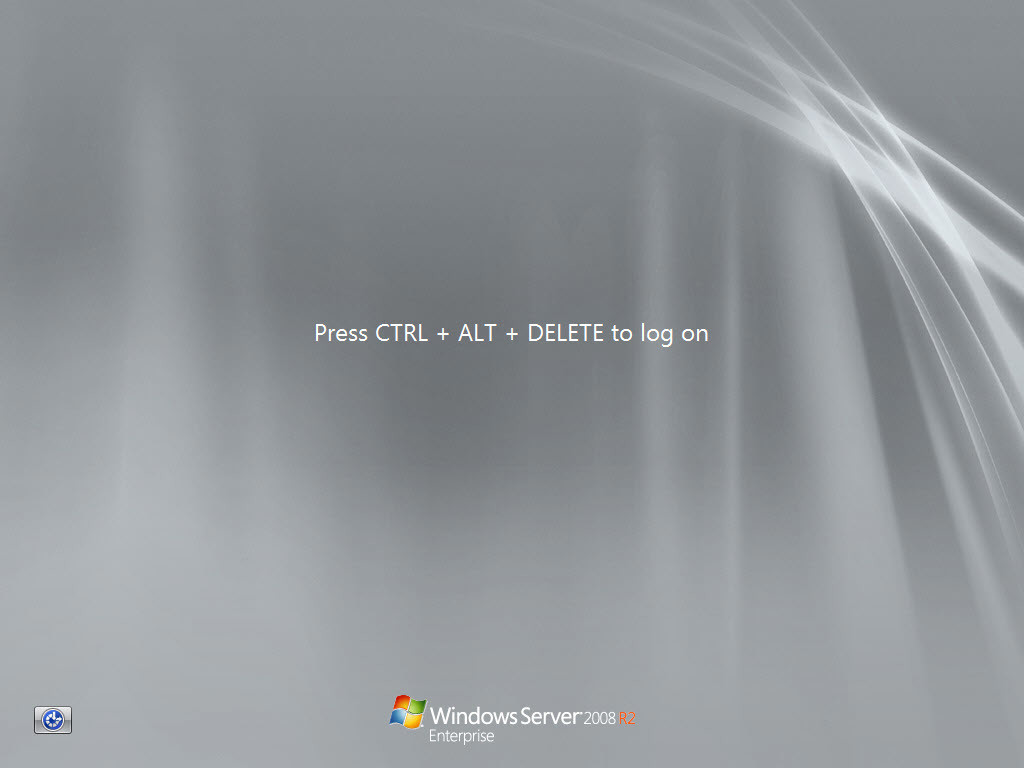
Step #9. Also, if you don’t like to every time enter Ctr+Alt+Del then you disable it. Just follow the guide below.
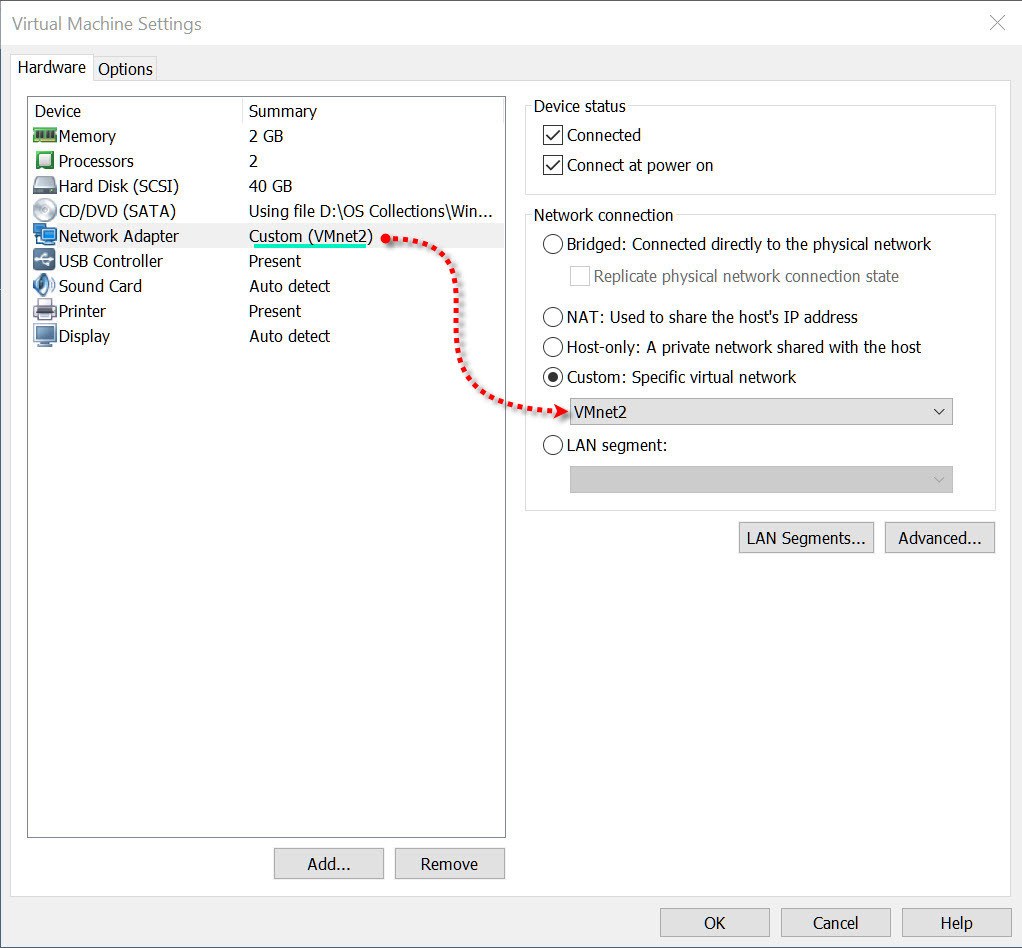
Step #10. This is the last step for initial configuration part of this guide. Now, we don’t need internet access after this so go to VMware settings and change the Network Adapter from NAT to Custom. Select VMnet2 and click OK.
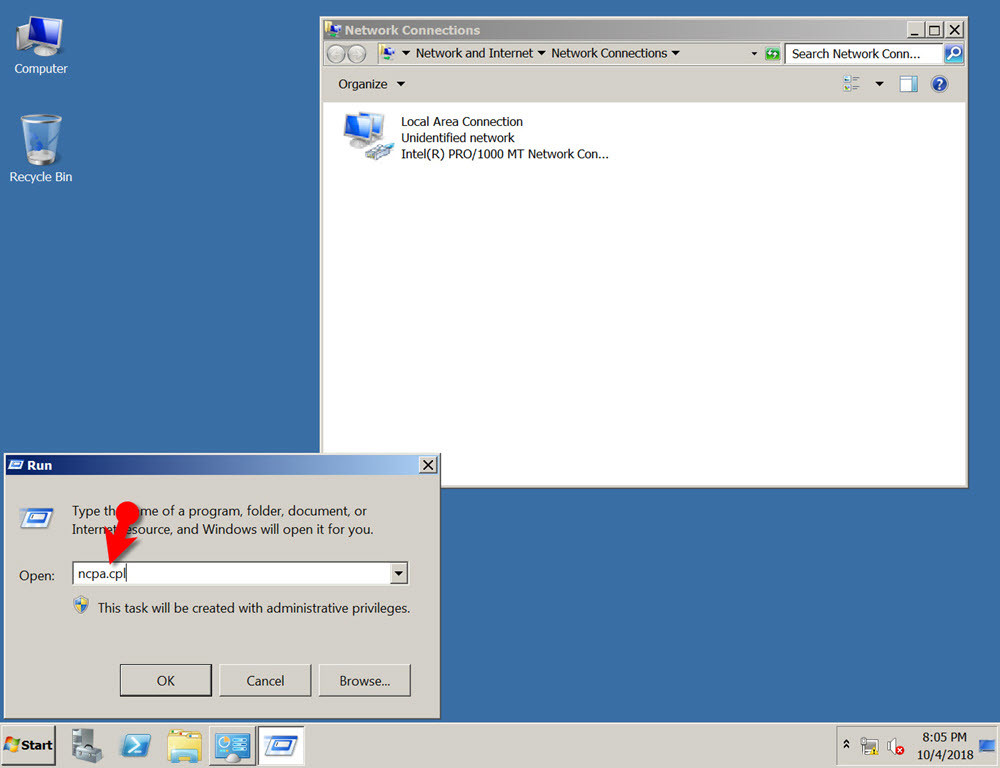
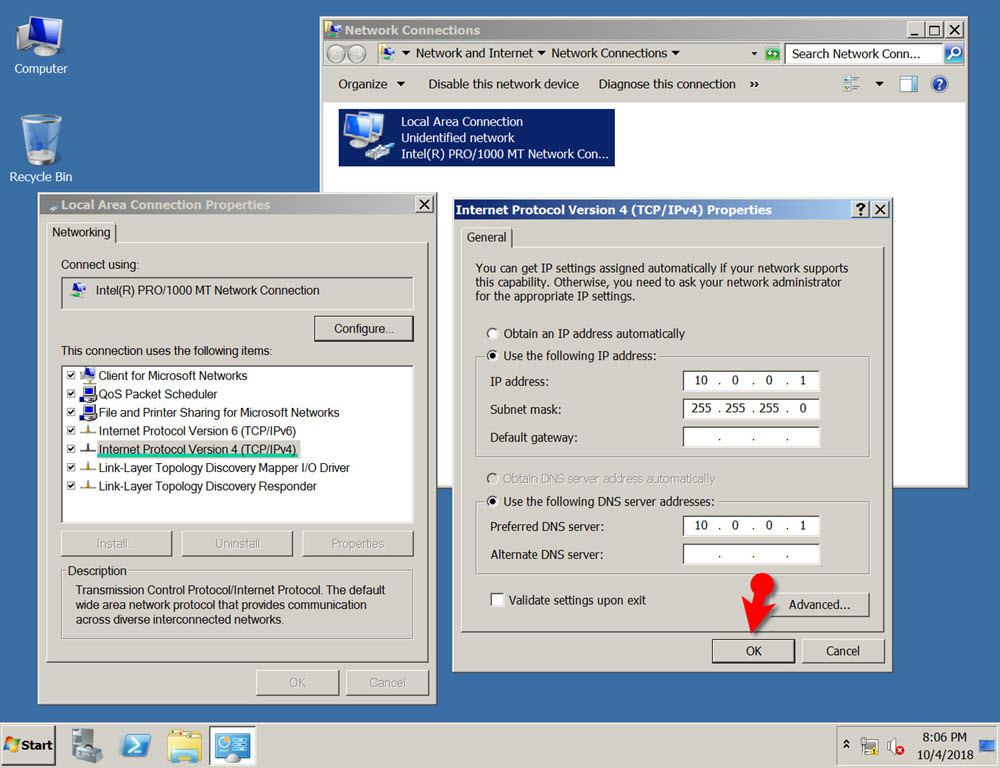
Now we need to add static IP address to this VM because in the next step we are going to make it a Domain Controller for our infrastructure. Open Run and type ncpa.cpl and it’ll open up Network connections window. Right click on the local area connection and select Properties. Double click on Internet Protocol Version 4 and add the following address.
IP Address: 10.0.0.1
Subnet Mask: 255.255.255.0
Preferred DNS Server: 10.0.0.1
Note: You can use class C (192.168.10.1) or class B address. Also, don’t be confused with IP address from class A and subnet mask from class C. It’s a huge topic that needs explanation.
#4. Install DNS and Create Zones
At this stage, you need to install DNS and as well as create Forward and Reserve zones. To do that simply follow the steps below.
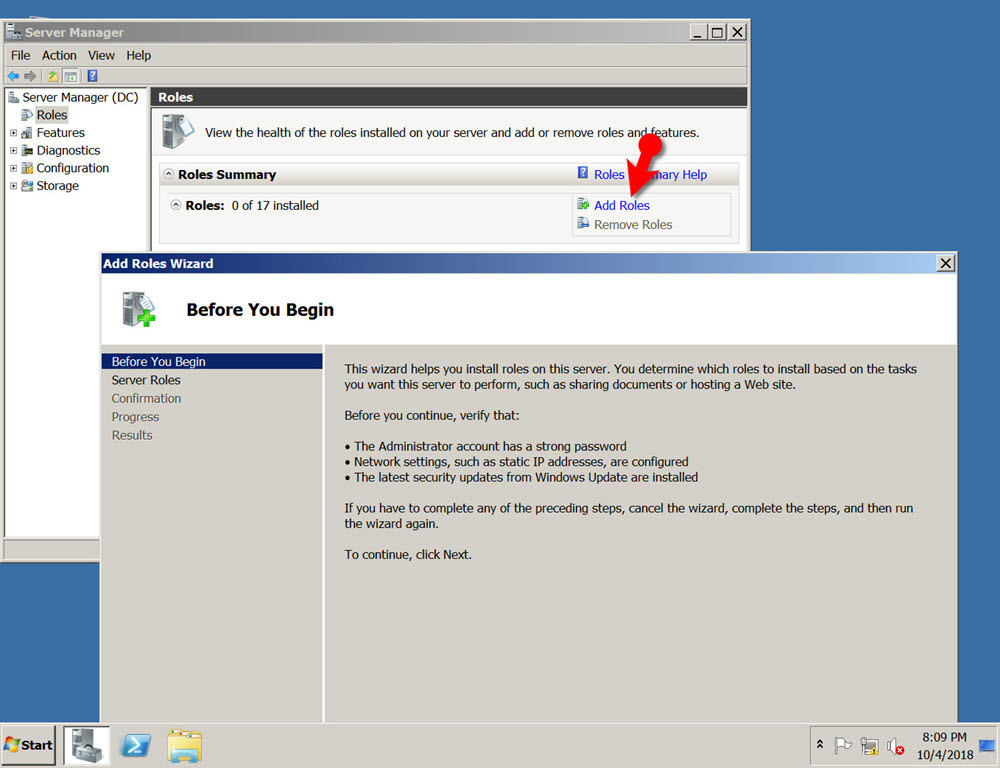
#1. Navigate to your server manager and click Add Roles. The installation process is very easy to click Next a couple of times.
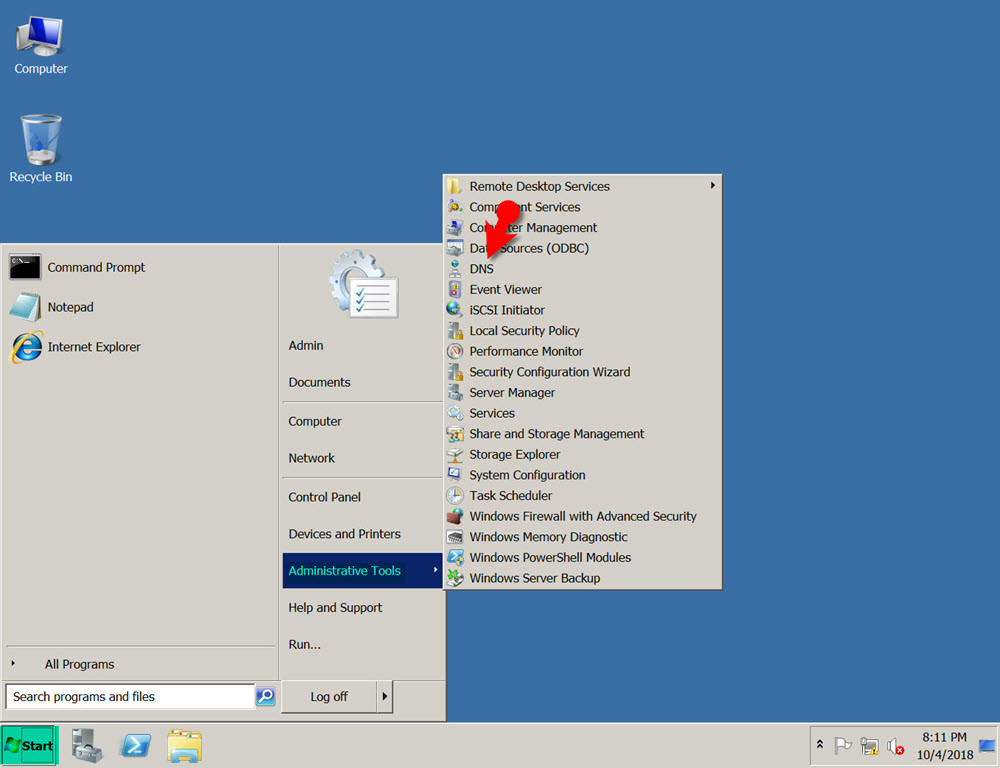
#2. Once the installation is done, click Start menu>Administrative Tools>DNS.
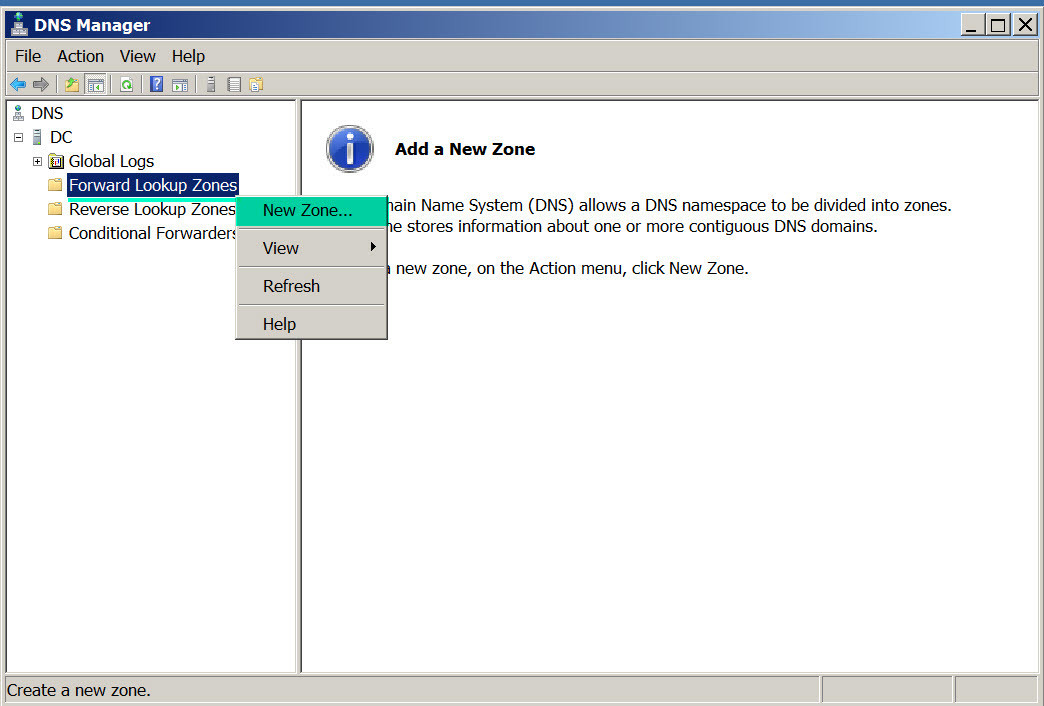
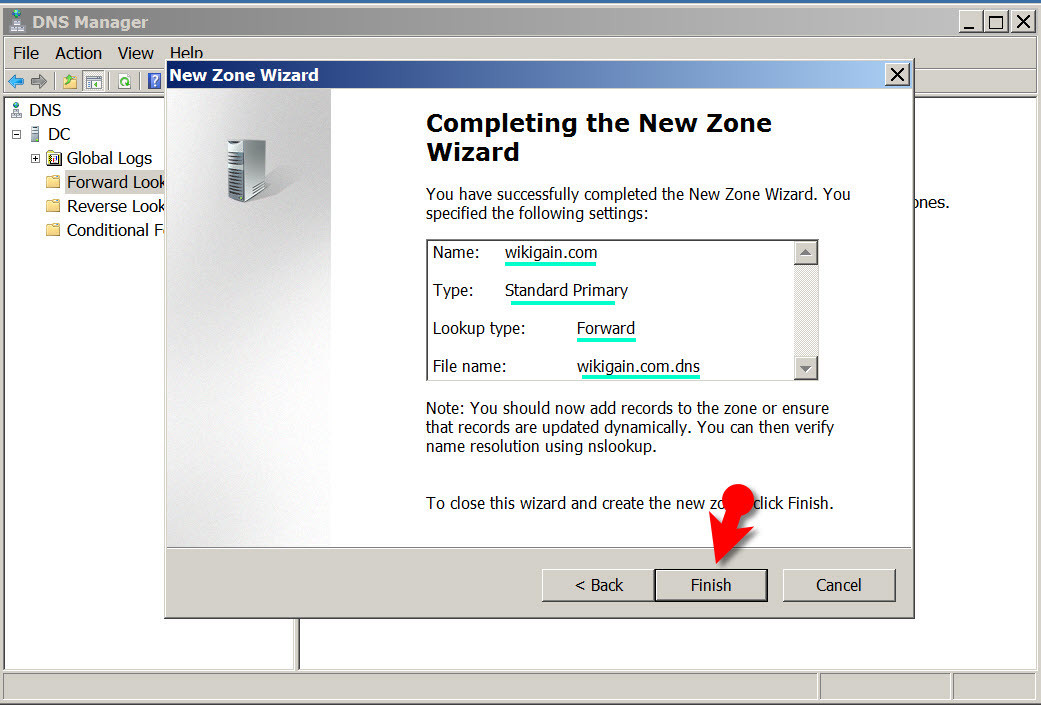
#3. First, we’ll create a Forward Lookup Zone. Right click on Forward Lookup Zones and select New Zone.
- Type: Primary Zone
- Zone Name: wikigain.com
- Create a new file: com.dns
- Dynamic Updates: Allow both unsecured and secure dynamic updates
#4. For creating Reserve Lookup Zone follow the bellow settings.
- Type: Primary Zone
- IP: IPv4 Reserve Lookup Zone
- Network ID: 0.0
- Create a new file:0.10.in-add.arpa.dns
- Dynamic Updates: Allow both unsecured and secure dynamic updates
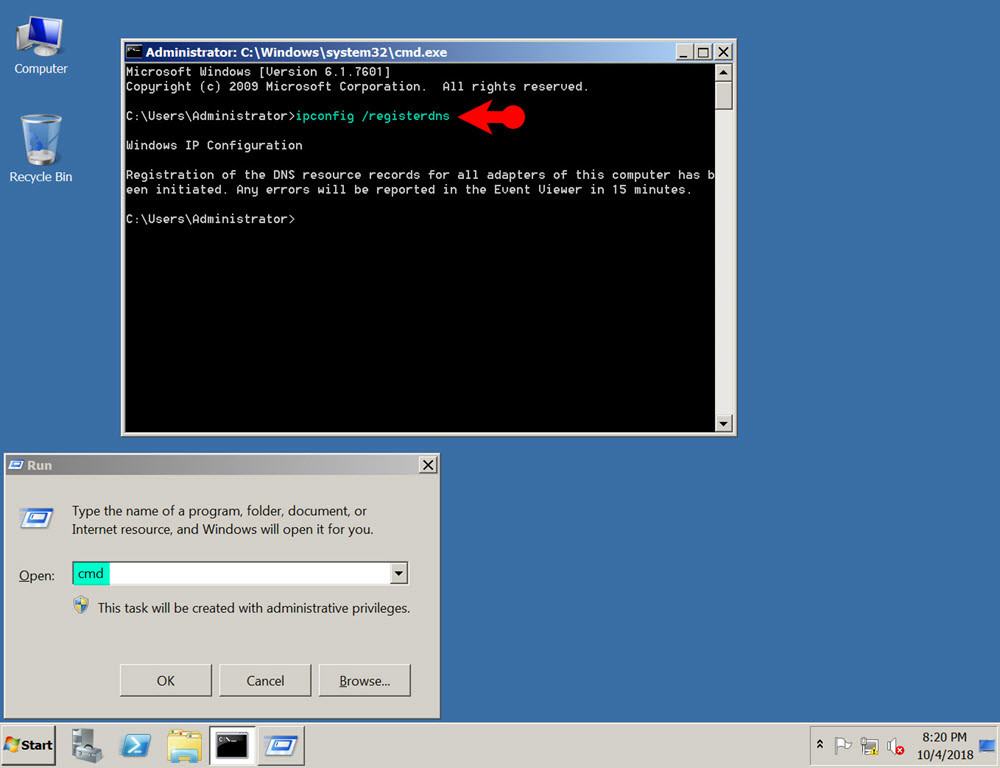
Now you should register the DNS via the command prompt. Open up Run and type cmd the execute ipconfig /registerdns then press enter.
Finally, your DNS server should look something like the screenshot below.
#5. Install Active Directory Domain Services
Sorry guys I know this guide is expanding and this step will be the last step to conclude this post. Just keep reading and following the guide to reach the final result. Follow the steps below to install active directory domain services on your windows server 2008 R2.
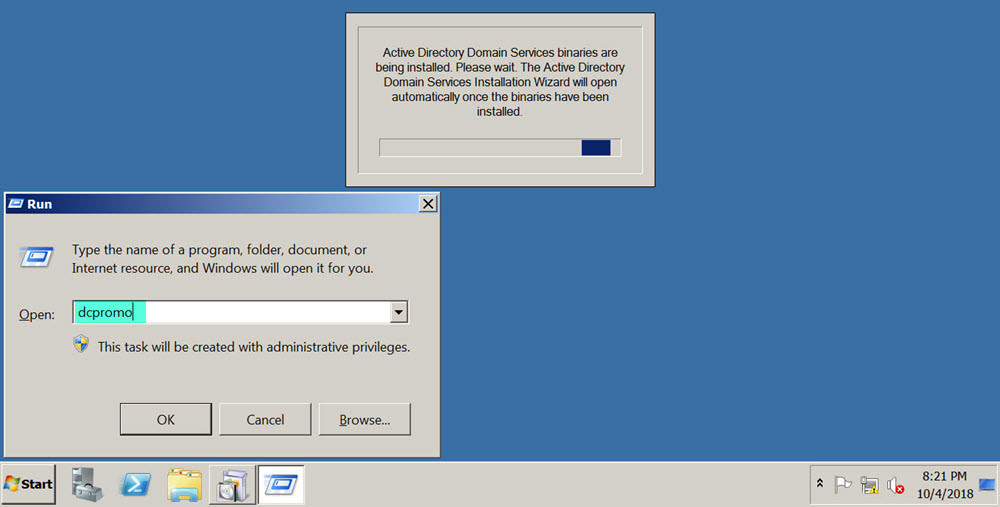
#1. Open up Run and type dcpromo or simply you can open up server manager Roles and you can install ADDS from there as well. For server 2008 R2 dcpromo works so I’ll use this command.
Note: dcpromo command does not work for Server 2012 and above so you need to add it from server manager roles and features.
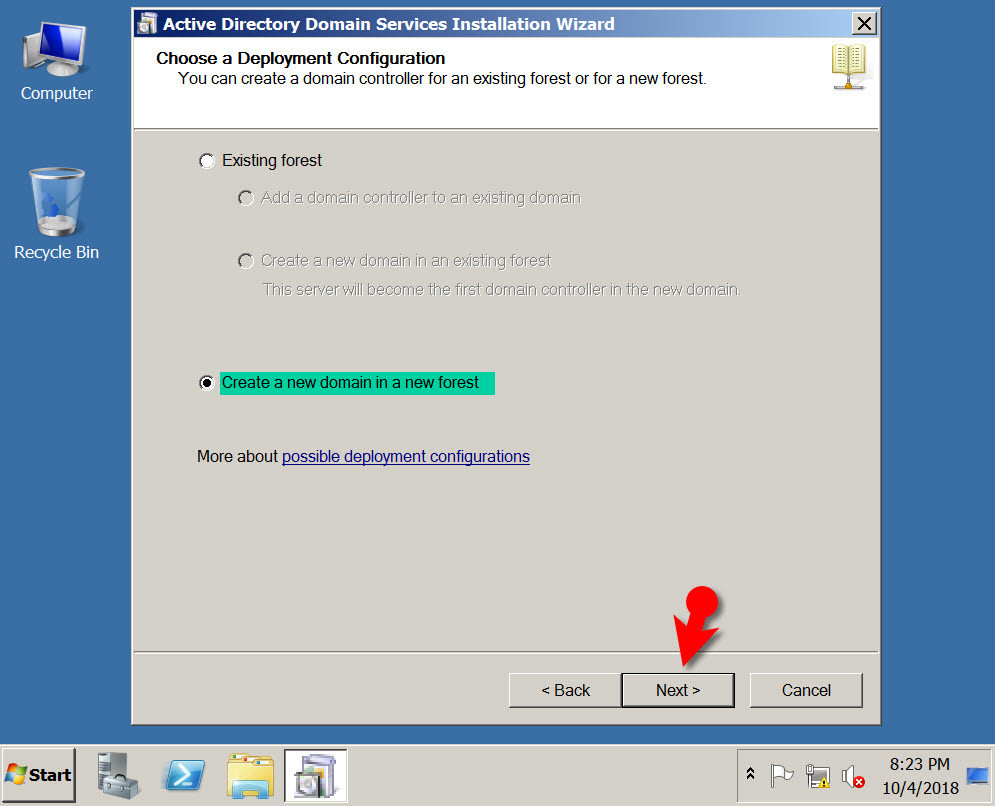
#2. Select the 2nd option which is “Create a new domain in a new forest”.
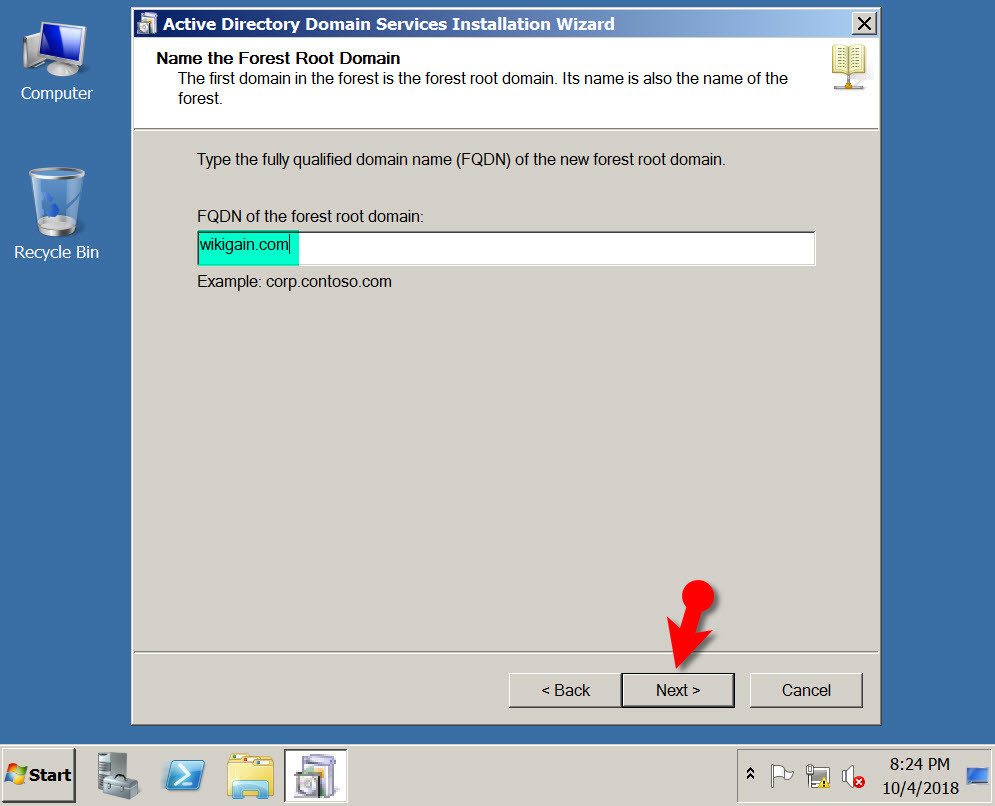
#3. At the Name, the Forest Root Domain simply types your domain name so in my case I use “wikigain.com”. You can use your name or any other name that you like.
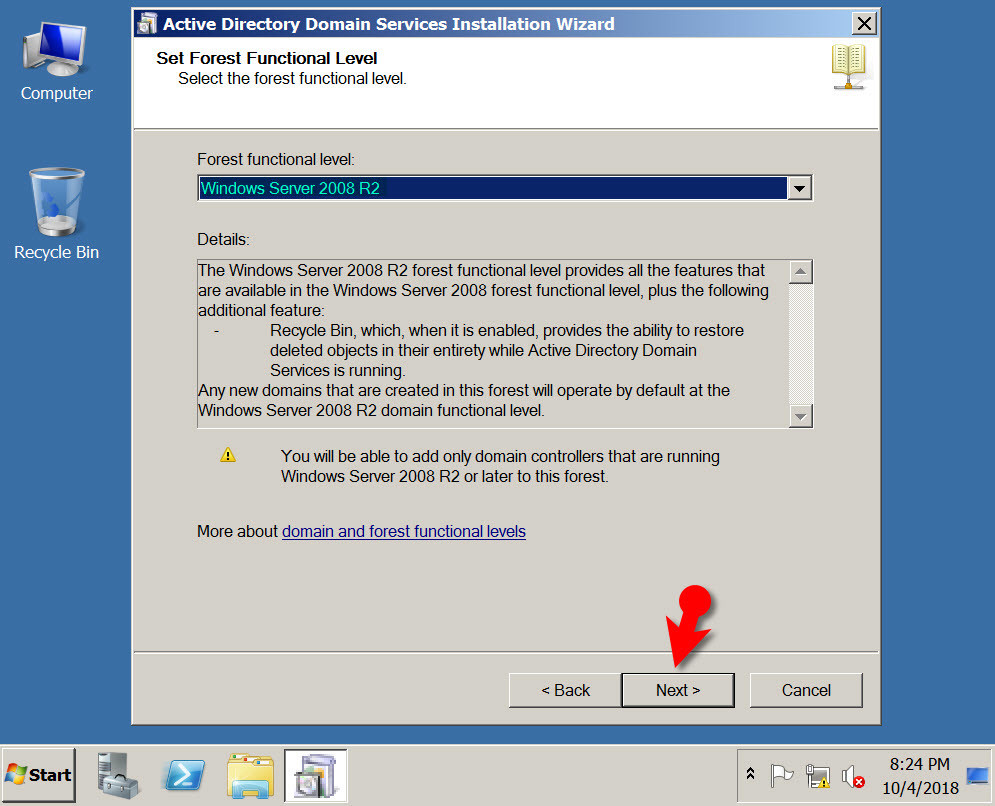
#4. If you’re installing Server 2008 R2 then select the Forest functional level “Windows Server 2008 R2”. To know what the functional level is, please read the details section.
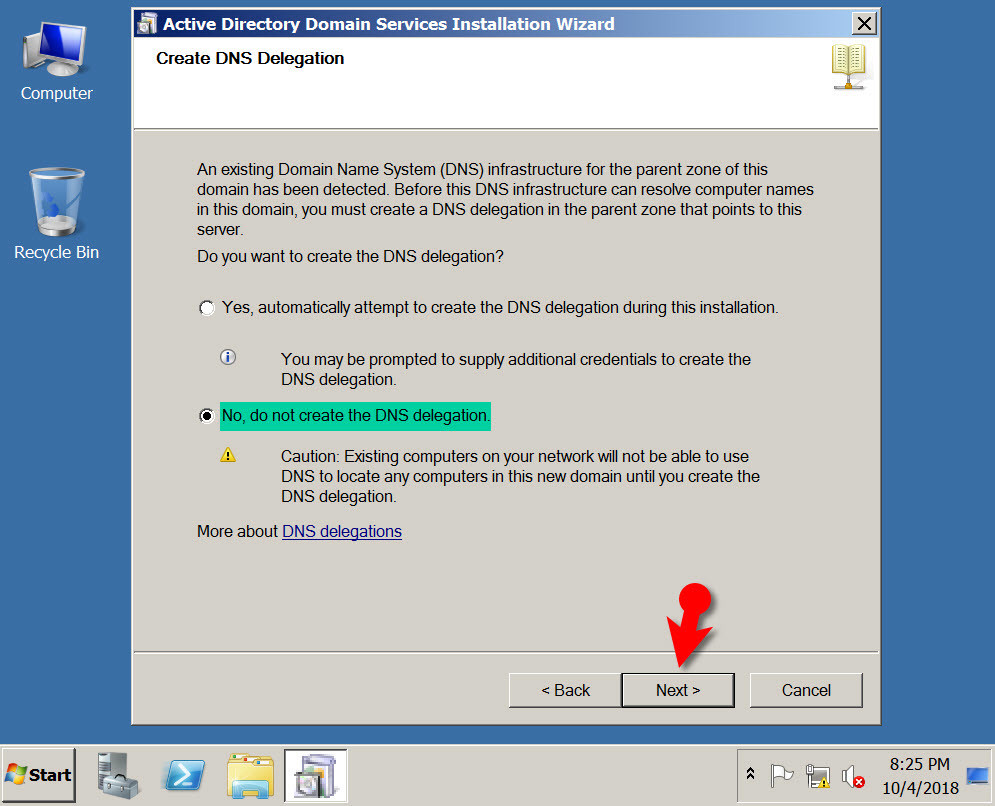
#5. You don’t need to create DNS delegation so just select the 2nd option “No, do not create the DNS delegation”.
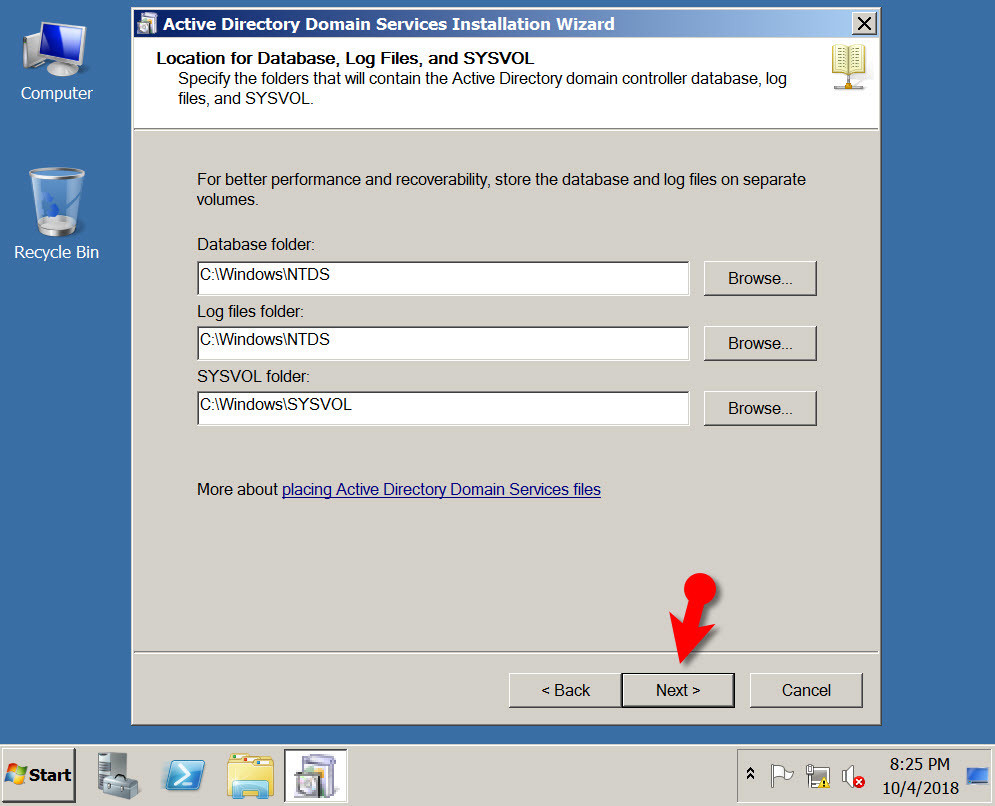
#6. At this step, you can change the default database folder but for the sake of this demonstration, I’ll put it to the default location. Keep in mind that in the real world, it must be stored in a new location for security reason.
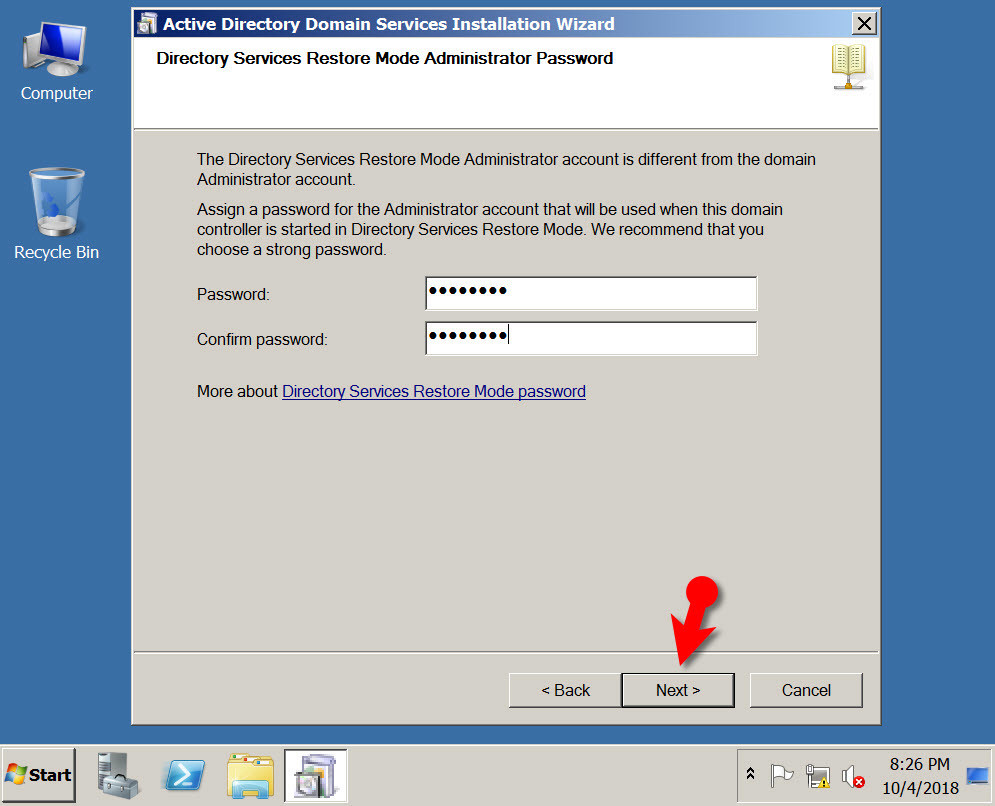
#7. Type the Password for the database and confirm the password.
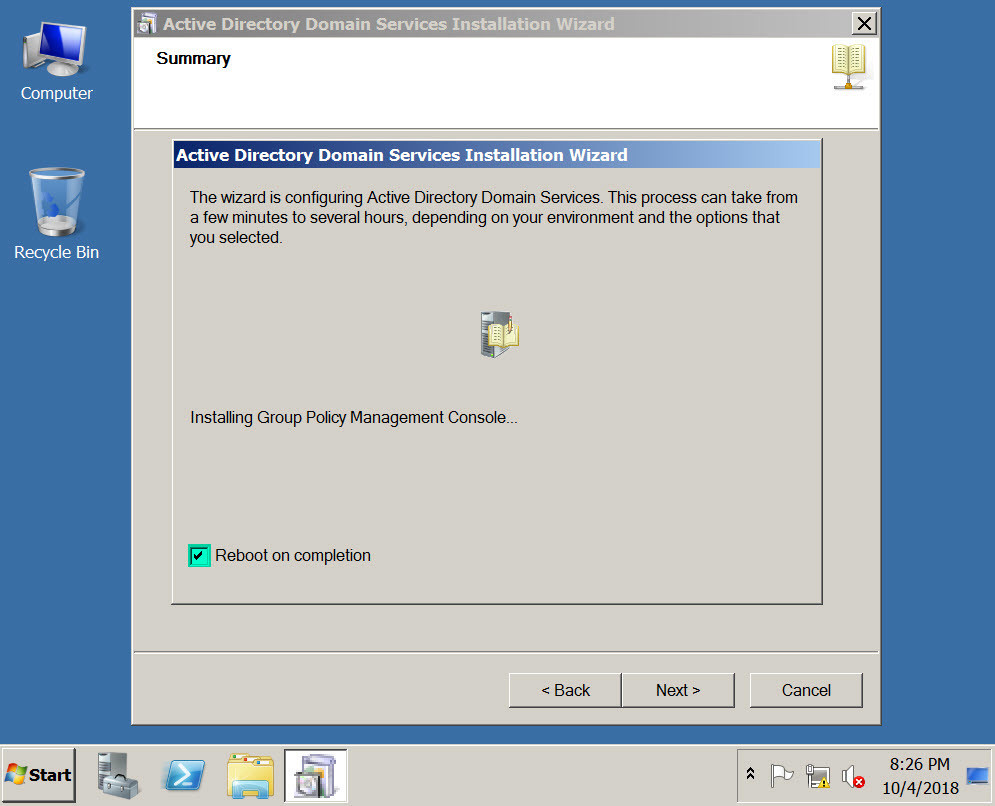
#8. Now tick the Reboot button to restart your system when ADDS installation finished.
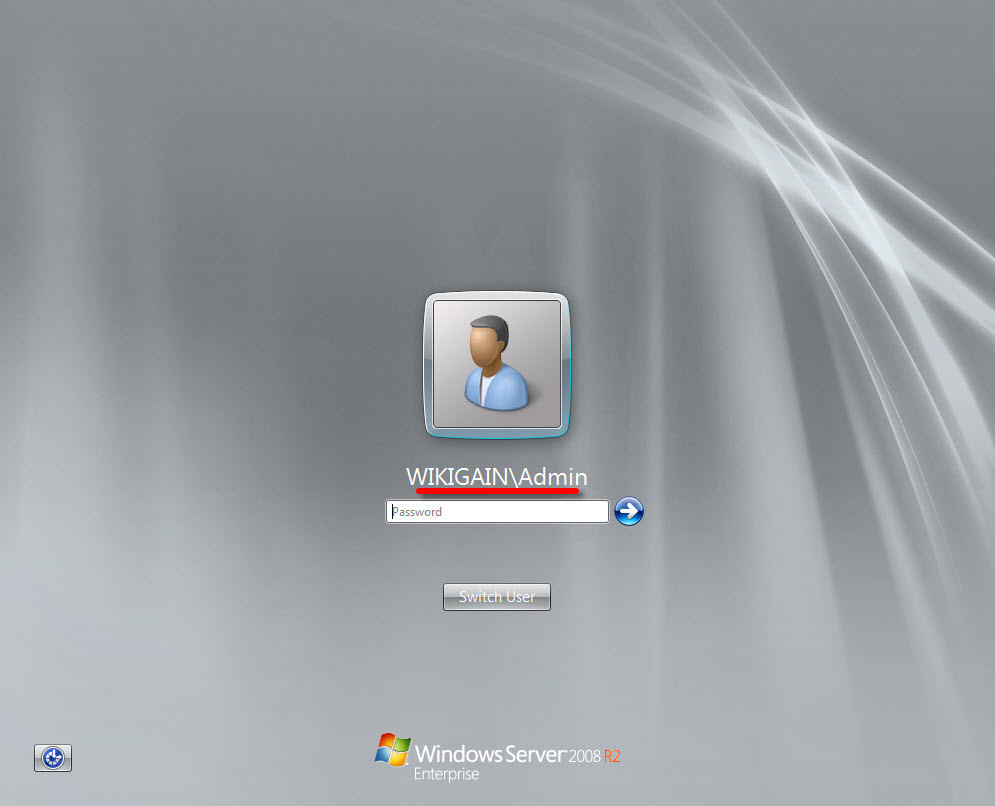
After your system reboot, you should see the snapshot below “Wikigain\admin”. If you see this picture, then you’ve successfully installed Active Directory Domain Services (ADDS).
Conclusion
In this topic, I’ve covered a whole bunch of tasks so simply what I did, are the following tasks.
- Install Windows Server 2008 R2/2012 R2
- Install VMware Tools
- Server 2008 R2 Initial Configuration
- Install DNS and Create Zones
- Install Active Directory Domain Services
And Also, I’ve explained what topics I’m going to cover in our next guide so please stay tuned for that. Your feedback is highly appreciated because those feedbacks help us and our visitors to create a better guide like this one. If you stuck in any step feel free to share it in the comment section down below this post.



Leave a Reply